Search This Blog

Pages

Showing posts with label Acetate. Show all posts

January 17, 2021

ONE ITEM, MULTIPLE LOOKS! SERIES {#4} Featuring Numbers Embossing Folder

 Welcome to my new series One Item, Multiple Looks!  

 I'm really excited to inspire myself and others to

* explore and stretch the supplies we own 
* let go of anything we don't love
* choose wisely when repurchasing 
*  explore the endless techniques and styles available to us

I will be posting one new grouping featuring a different specific crafty item each week for at least the month of January or so.  To access all posts in this series just click on the topic One Item Multiple Looks! in the sidebar Index of Posts...  Hope you enjoy!

This weeks item is an embossing folder featuring a mixed numbers font by Cuttlebug:


TULLE WINDOW CARD
(first saw this idea on Jennifer McGuire's youtube channel)


SUPPLIES

STAMPS  elephant - Stampin' Up! Elebration single stamp, words - Stampin' Up! Hooray It's Your Day set
INKS  Distress dye
DIECUT  Spellbinders Nestabilities Classic Rectangle set
EMBOSSING FOLDER   Provocraft Cuttlebug 
EMBELLISHMENTS   random aluminum number 1
OTHER   white tulle, twine
CARDSTOCK  random soft shimmer pink, white


Let's get started!

STEPS 

1.  Cut pink cardstock panel to fit a standard white card in layers as shown. (ALTERNATIVE to shimmer pink cardstock: ink blend dye ink onto white cardstock and spray with a homemade shimmer mix, or use shimmery pigment ink brayered onto cardstock).
2.  Run pink cardstock through embossing machine with numbers folder. (ALTERNATIVE to an embossing folder:  stamp individual elements onto cardstock in matching ink, OR in Versamark ink and then apply clear embossing powder over top).
3.  Run pink panel through die cut machine with rectangle die placed as shown. (ALTERNATIVE to the correct size die or punch: simply measure and cut square out with a sharp blade.)
4.  Lay pink panel over card front to determine window placement. Mark corners with pencil and attach die with low-tack tape. Run white card front through die cut machine.
5.  Cut tulle slightly larger than windows and adhere to from of card.  Adhere pink panel over, aligning windows. (ALTERNATIVE to tulle: a sheet of acetate, which could be stamped with a delicate pattern in white Staz-On ink, or you could use light vellum).
6.  Stamp elephant in gray ink on white cardstock scrap and color in with Distress inks watercolor style.
7.  Stamp words in gray ink on white cardstock scrap.
8.  Fussy cut elephant and sentiment.
9.  Time to assemble! Tape or glue on the reverse any area of the elephant that will hang over the edge and adhere to panel. Pop dot the sentiment.  Tie twine through the metal number holes, place foam tape on the reverse and adhere (ALTERNATIVE to metal number: trim number from a scrap of gray cardstock embossed with numbers, and then add metallic or shimmer to it with whatever you have on hand)

.


PENNANTS CARD


SUPPLIES

STAMPS  fox - Stampin' Up! Storybook Friends set, words - Stampin' Up! Hooray It's Your Day and Happiest Birthday Wishes sets
INKS  Memento Tuxedo Black, Versafine Onyx Black
MARKERS Copic
PUNCH pennants - Stampin' Up!
EMBOSSING FOLDER   Provocraft Cuttlebug 
OTHER   twine
CARDSTOCK   random orange and white
PATTERNED PAPERS unknown, possibly older Stampin' Up!


STEPS 

1.  Cut white cardstock and patterned paper panels to fit a standard white card in layers as shown. (ALTERNATIVE to patterned paper: emboss off white cardstock with pattern using clear embossing powder and then ink blend or brayer dye ink over).
2.  Run white rectangle scrap cardstock through embossing machine with numbers folder. (ALTERNATIVE to an embossing folder: stamp individual images in Versamark ink on white panel and then apply white embossing powder over top).
3.  Stamp fox image on white cardstock scrap using Memento Tuxedo Black ink and color in with Copic markers. (ALTERNATIVE to Copic markers: use any coloring medium on hand, being careful to choose the correct black ink.) Fussy cut fox and flag, discarding pole.
4.  Punch pennants from patterned paper (ALTERNATIVE to specialty punch: cut triangles utilizing a pencil and ruler or Scor-Pal, etc). 
5.  Score and fold tops of pennants over a piece of twine and glue in place. Tie ends of twine into decorative knots. 
5.  Using Versamark black ink, stamp words on scrap orange cardstock and cut into rectangles.
6.  Stamp fox in Versafine black ink on large white cardstock panel. Apply fussy cut and colored image over this along with tiny flag. 
7.  Time to assemble! Adhere panels and pennant elements as shown.


Playing along with the following challenges:


I'm always so calm and happy with vintage greenish-blue and yellowy-orange!


FILMSTRIP CARD


SUPPLIES

STAMPS  dog - Rare Image Rubber Stamps Pets sheet (see sidebar), cake - Stampin' Up! unknown, frame - Artistic Outpost, words - Stampin' Up! Double Line Favorites and It's Your Birthday sets
INKS  Versafine Onyx Black, Distress Oxide Frayed Burlap
EMBOSSING FOLDER   Provocraft Cuttlebug 
PUNCH circle - Stampin' Up!
OTHER   pompom, acetate, colored pencils
CARDSTOCK   random white, black and red
PATTERNED PAPERS unknown, possibly older Stampin' Up!


STEPS 

1.  Cut red and black cardstock panels to fit a standard white card in layers as shown. 
2.  Run red rectangle scrap cardstock through embossing machine with numbers folder. Brush black ink pad lightly over the top to highlight the numbers. (ALTERNATIVE to an embossing folder: stamp individual images in Versamark ink on panel and then apply colored embossing powder over top).
3.  Stamp dog image on white cardstock scrap using black ink and color tongue in with colored pencil.  Fussy cut.
4.  Using a stamp positioner, stamp film strip box four times to make a row as shown (I wanted an aged look so I stamped the black ink off once before applying to panel). 
5.  Stamp cake slice in boxes and color in with colored pencil.
6.  Stamp sentiment box in one section with Frayed Burlap ink.
7.  Stamp sentiment in Versamark ink on black cardstock strip and emboss with white powder. 
8.  Cut, punch or die cut circle and triangle from patterned papers (ALTERNATIVE to patterned paper: emboss off white cardstock with pattern using clear embossing powder and then ink blend or brayer dye ink over).
9.  Time to assemble! Adhere panels and elements as shown. I applied a strip of acetate over the filmstrip to add to the feeling, and used some foam tape towards the ends on the Happy Birthday strip to account for the added thickness of the strip and circle.


Playing along with the following Challenges:


                         Papercraft Challenges #66 Heat or Dry Embossing (ends 1/14)


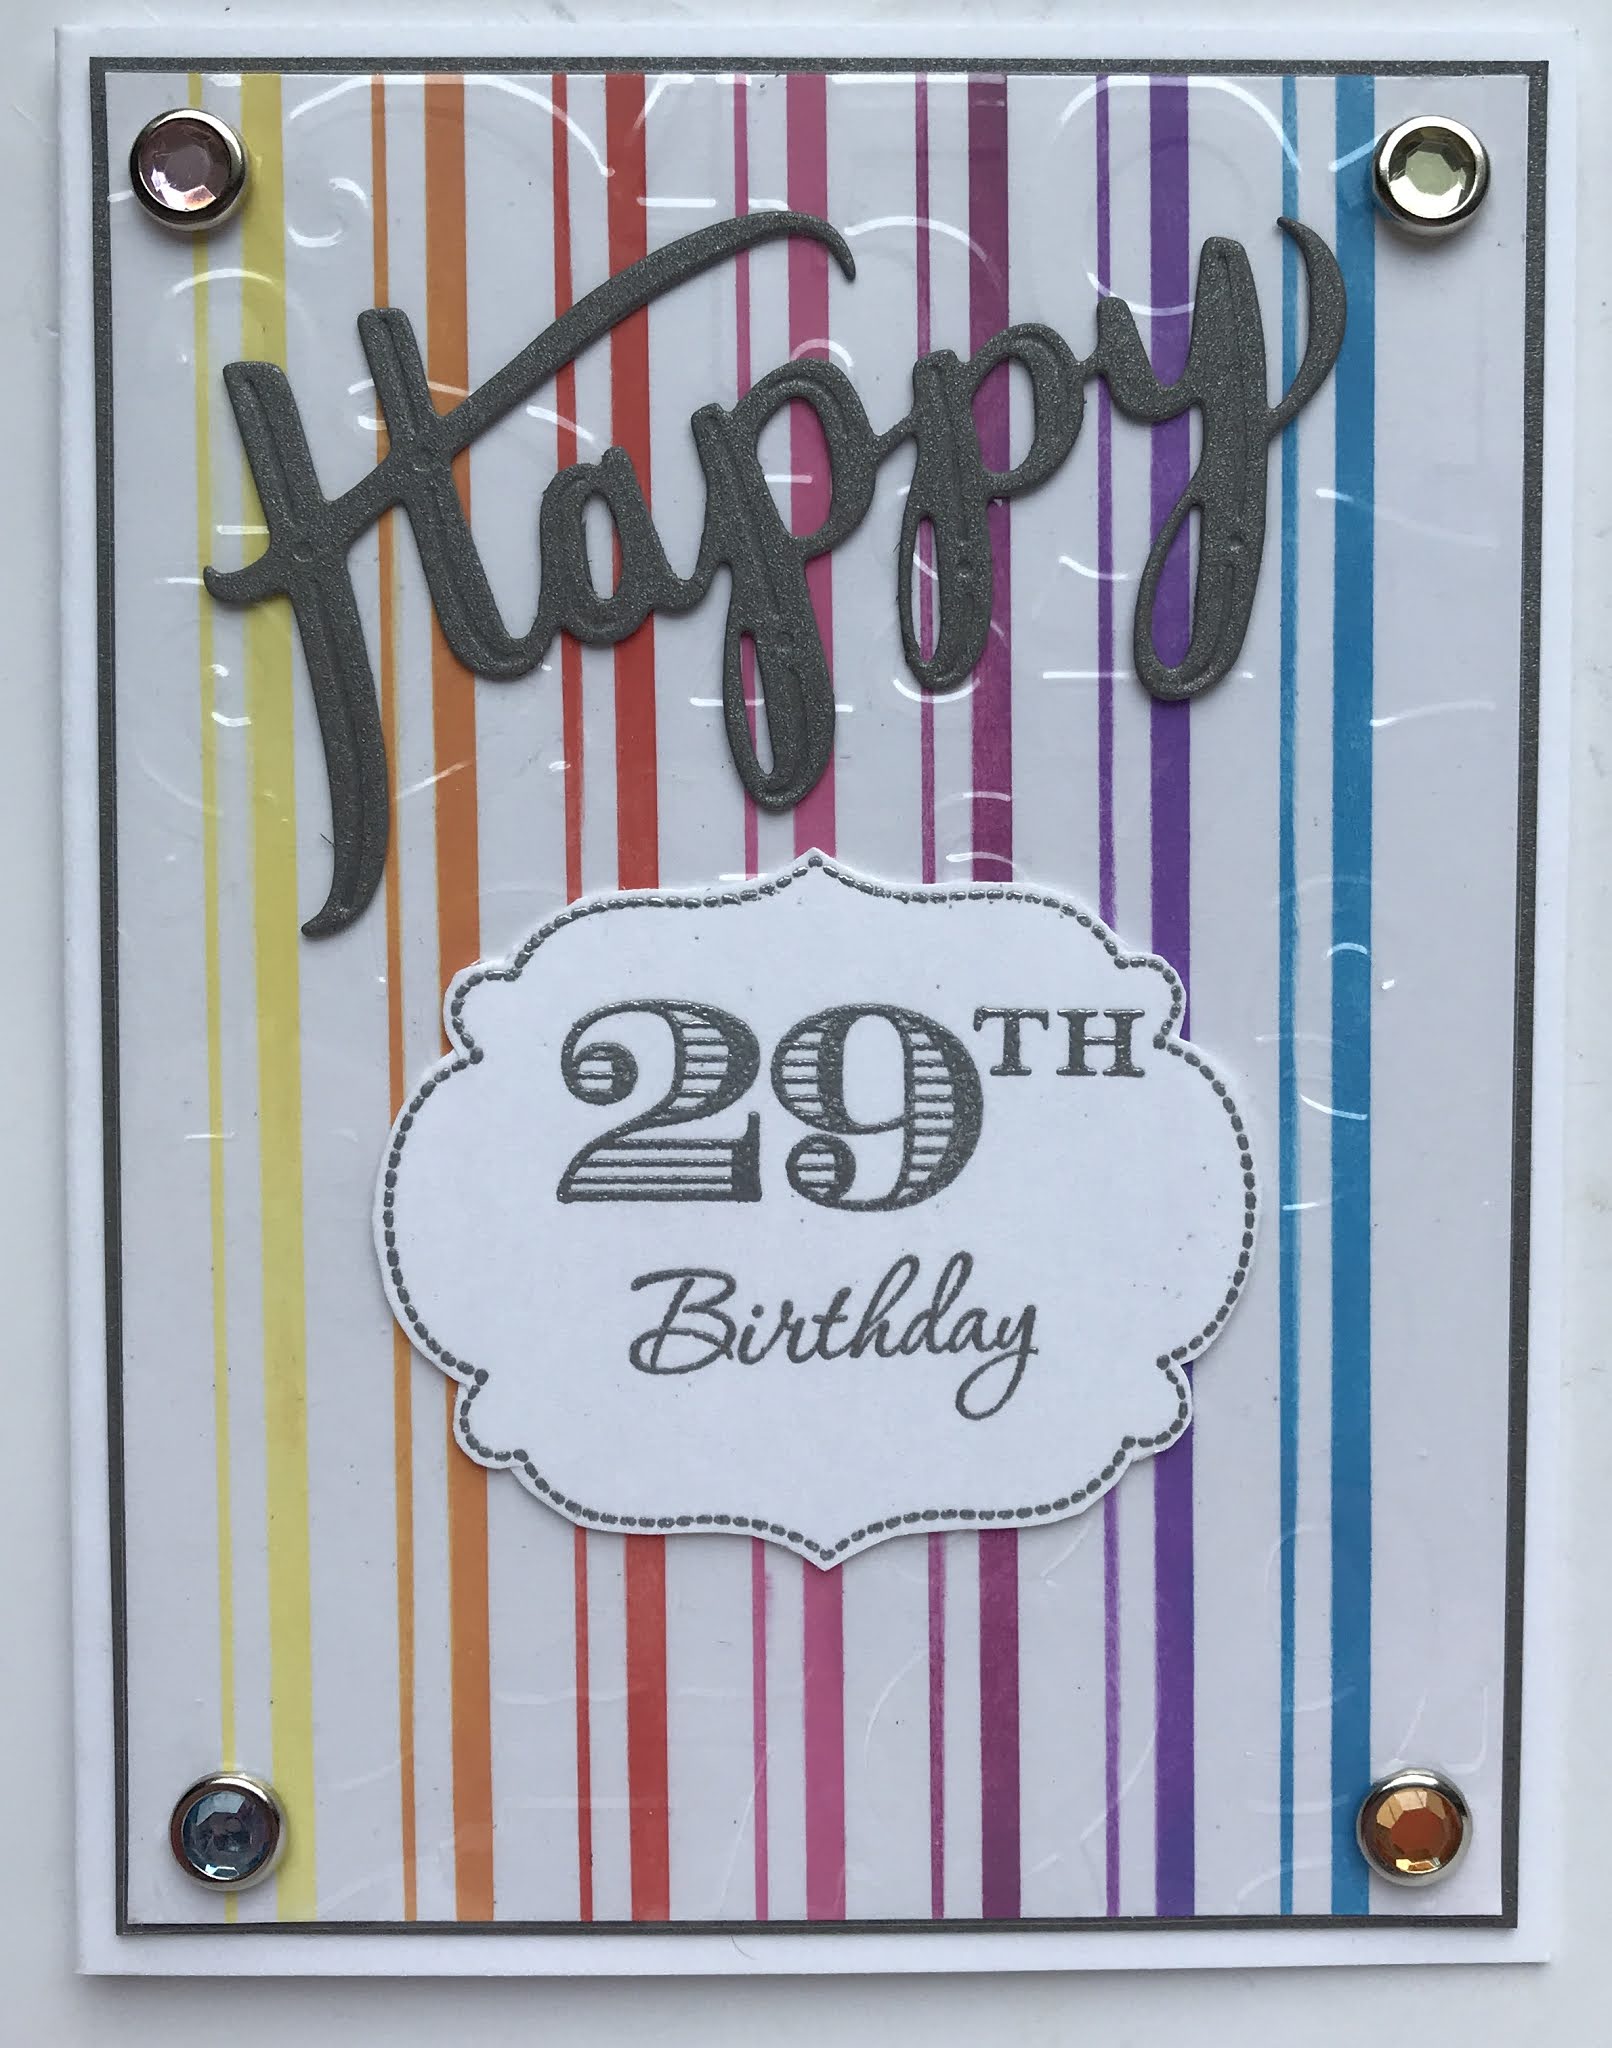
STRIPED CARD


SUPPLIES

STAMPS  numbers and frame - Stampin' Up! Memorable Moments set
DIE CUT  happy - EKSuccess Word Set #54-80027
INKS Versamark
EMBOSSING FOLDER   Provocraft Cuttlebug 
OTHER   acetate, rhinestone brads, silver detail embossing folder
CARDSTOCK  white, metallic silver
STENCIL  older random stripes


STEPS 

1.  Cut white and silver cardstock panels and acetate panel to fit a standard white card in layers as shown. 
2.  Run acetate through embossing machine with numbers folder. (ALTERNATIVE to acetate panel: many plastic packaging pieces can be cut down and run through with a folder.)
3.  Stamp frame, numbers and word on white cardstock scrap using Versamark ink and heat emboss with detail silver powder.  Fussy cut.
4.  Die cut Happy from matte silver cardstock (ALTERNATIVE to metallic cardstock: spray shimmer mist onto dark gray cardstock, or run a glimmery inkpad across gray cardstock).
5.  Lay stencil over white panel and blocking off all other stripes, ink blend yellow into panel.  Proceed with rainbow colors. (ALTERNATIVE to striped stencil: patterned paper OR use a ruler and marker OR lay down pieces of scrap cardstock cut into strips as shown.)
6.  Time to assemble! Adhere panels and elements to white card front as shown. 


Playing along with the following Challenges:


Thanks for stopping by!
Nancy


December 04, 2020

BELIEVE

Holiday hello all!


Inspired by and playing along with the Challenges below:

Shabby Chic and Vintage Style


SUPPLIES

STAMPS  Hero Arts candles (partial: I omitted the flame portion),  Basicgrey flourishes, Stampin' Up! Harlequin background
DIE CUTS   Momenta #32265 R8
INKS   Distress Antique Linen, Memento Tuxedo Black, Staz-on White
MARKERS   Copic assorted greens
EMBELLISHMENTS   Jolee's Boutique flat back black faceted gems, random flat back reflective red gems, sheer gold ribbon, acetate sheet
CARDSTOCK   mirror gold, random white
OTHER   Pentel Slicci gold pen, Wink of Stella glitter brush pen


STEPS

1.  Trim acetate panel and score to side fold card size
2.  Cut 4 white cardstock panels to the size shown
3.  Stamp one white panel with harlequin background stamp and Distress Antique Linen ink
4.  Ink candles stamp with Memento Tuxedo Black ink (I omitted the flames) on previously stamped panel and again on scrap white cardstock
5.  Color the candles on scrap cardstock with black and gold pens as shown, and trim around each candle.  Adhere to image panel
6.  Color in the leaves with Copic markers and adhere flat back gems where berries are stamped
7.  Ink flourishes with black ink and stamp in desired pattern. Coat with Wink of Stella when ink is dry.
8.  Stamp large flourish in white Staz-on onto acetate cardfront
9.  Use make-up sponge to add ink to edges of cardfront with white Staz-on
10.  Apply ribbon as shown to image panel and along card fold 
11.  Die cut sentiment from mirror gold cardstock and apply over ribbon as shown
12.  Apply flat back faceted black gems as shown


 Thanks so much for being here!

February 11, 2020

1 Stamp, 2 Looks * Floral Cornucopia


SUPPLIES:

Stamps - Stampendous flower arrangement, Stampin' Up! sentiment
Inks - Versamark, Memento Tuxedo Black
Markers - Copic
Other - flat back rhinestones, black detail embossing powder, acetate card (I have heard good things about Hero Arts' but I just used a transparency sheet I had on hand), Gina K. Connect glue

TECHNIQUE:

1.  Stamp image in Versamark onto white cardstock. Emboss with black powder.
2.  Color in image with Copic markers, including pale blue around image. 
3.  Stamp sentiment
4.  Apply rhinestones
5.  Trim image as shown, and cut 3 more pieces of white cardstock to match size.
6.  On acetate card, mount image panel to cardfront, another on the reverse it on the inside cover, and the same steps for the inside and back of the card.


Playing along with TTCRD Anything Goes


Another card with warm tones instead of cool:


SUPPLIES:

Stamps - Stampendous flower arrangement, Stampin' Up! sentiment
Inks - Versamark, Stampin' Up! brown
Markers - Copic
Other - flat back half pearls, gold detail embossing powder, Gina K. Connect glue, tan/ochre watercolor, white gel pen, Wink of Stella sparkle pen

TECHNIQUE:

1.  Stamp image in Versamark onto white cardstock. Emboss with gold powder.
2.  Watercolor around image and scrunch paper up if it refuses to dry flat!  Edge with brown ink pad.
3.  Color in image with Copic markers. Highlight with white gel pen and sparkle pen on main flower.
4.  Stamp sentiment in brown ink.
5.  Apply half pearls


Thanks for stopping by! 
May you be blessed today, and may you be a blessing...

Nancy

December 21, 2007

Acetate Sympathy Bouquet

Good morning :o)

I was browsing SplitcoastStampers for the first time in a long while yesterday and found a tutorial for acetate-bodied cards. I had tried my own last year and it worked alright, but it was so much easier with their step-by-step instructions with photos and sizes. Here's the link for the page it's on: SplitcoastStampers Be sure to click on the gallery link at the bottom of the page for some more great sample cards.


Card measures 4 1/4" x 5 1/2"

I pretty much followed the SCS directions, changing the size to suit my stamp image size. I stamped the flowers (Inkadinkado) in black Staz-On, then used a blender pen and Stampin' Up! markers to color it in. I used some iridescent glitter glue over the blue on the water area and added a silver dragonfly brad as shown.

*tip*
When adding brads and rivets, etc. try to use them so that subsequent layers of cs will cover the backs.

The sympathy stamp is a Anna Griffin, and the swirls are Autumn Leaves, Rhonna Farrer, Elegant Swirls set (stamped in white Staz-On - don't forget to reink this pad frequently for best coverage.) I used a sponge to edge the card with the white ink, and tied a sheer silvery ribbon along the fold.
Thanks for looking!

November 08, 2007

Acetate & Tissue World Map


Here's another Acetate and Tissue card.


Finished card measures 4 1/4" x 5 1/2"


You can see how by changing the colors a bit you can get a whole different feel. For directions on this technique check week one's post. I left the glitter step off for a more antique-y feel.

The layout is very simple. The cardfront is black, then a layer of antique gold shimmer cs, then textured green with black ink sponged on the edges. I wrapped some black Magic Mesh around both corners - MM is self adhesive but not so sticky that you can't move it around. Over this is a black cs layer, then the acetate panel which I backed with white because it was too muddy otherwise. The image is by Inkadinkado.

IRL the blue in the ribbon matches the main image panel colors fine, but not so much in the scan. I'm not sure where I got the ship charm, but it was silvertone so I rubbed some gold metallic Rub-Ons onto it so it blended better. Under the ship is just a scrap of the same green cs as the layer, cut into tag shape, and edged with Brilliance Galaxy Gold. The word is from a travel quote by PSX.

Thanks for looking!

November 06, 2007

Acetate & Tissue Tall Autumn


I'm going backwards! Christmas yesterday, Autumn today - try to keep up LOL ;o)

Finished card measures 8 1/2" x 3 7/8" and fits in a business size envelope.

The main image panel is done using the acetate and tissue technique (see last week's posting for detailed instructions). The image is a large background leaf stamp by Northwoods Rubber Stamps. This panel is mounted to an orange cs for a thin border of color.

The brown panel under this was stamped using the same stamp and black ink, and then each side was edged with a sponge and black ink. The half circle punch used to make the tabs that the copper brads are on is by Stampin' Up!.

The orange panel under this has the phrase by Serendipity Stamps stamped in black, and then it's edged in Brilliance Cosmic Copper and then black ink. The base layer was stamped in Cosmic Copper using the same background stamp, and then edged with black.
When I had the card all put together I decided I needed to add the copper colored cording so here's my tip for the day:

*tip*
If you've finished gluing all your cs panels together and then decide to add floss, cording, etc. grab a large-bore needle and angle it under the top layer slightly so the hole doesn't show when looking straight at the card. Use a bead threader to thread the cord. These can be had cheaply at a Joann's/Michael's, and look like a very thin wire twisted around itself with a loop at the end. I couldn't work without mine!


It still looked too stark, so I grabbed some loose leaf embellishments I picked up at Joann's on a lark a few days back because they looked handy and were so cheap. I kid you not, you get about 200 of these AT LEAST I didn't count for $1.99! My two packs had maple and oak leaves. Once I had placed them on the card with Mini Glue Dots (would have a hard time making cards without these too) they looked too dull, so I touched the high points with Cosmic Copper right from the foam pad, and I think it was just the right amount of glimmer.
Here's a photo of how I store my loose leaves and flowers - it works so well for me! The metal rings have a hinge and open and shut easily. They are 2" rings, and I think I picked them up at Office Max not too long ago. Just hole punch one corner of a ziploc baggie and add when needed.
Thanks for looking!


November 03, 2007

Acetate & Tissue Faux Post

Is anyone else a fan of the Canadian show Corner Gas? I've been catching episodes as I can - suits my dry sense of humor :o) I like Hank but Wanda is my favorite.

This is a card I made after receiving one with a similiar technique and realizing I had never tried it! It's generally referred to as acetate and tissue.


Here's how to make it:

Pick out a stamp with some open areas - I used Uptown's Dawn Houser design. Ink the stamp with Staz-on ink of your choice, and stamp it onto a piece of acetate.

*tip*


Don't drink any caffeinated beverages before the stamp session because it requires a stable hand to stamp on acetate as an inked up stamp will want to slide when it hits the surface. LOL The goal is to lower the rubber to the stamping surface, press firmly without letting it slide, and lift up. If you mess up, swipe quickly with an alcohol pad and sometimes that will clean it off and you can try again.


Let the image sit till it's dry, then flip acetate over to uninked side and apply about 5 nickle size dots of dimensional adhesive (I use Judi-kins Diamond Glaze, some others are Crystal Effects by Stampin' Up!, and 3-D Crystal Lacquer). You want to add just a drop or two of dye reinker to each circle of glue, one color per circle. Next, take your finger and spread the dots around, being careful not to mix the colors more than just around the bordering edges. (For this card I used SU Orchid Opulence, SU Almost Amethyst and Tsukineko Lilac and black Staz-On). If you want some sparkle, this is the time to sprinkle a little glitter, etc. onto the surface of the glue mix.

Crinkle a regular piece of white tissue paper and unfold without flattening totally. Lay this over the glue and press down lightly. If you finish and have a bare spot that's not sticking down you can add a smallish drop of glue and press down. Let this dry, flip over, and trim to size.

How it looks when layered depends on what color you mount the acetate/tissue piece on. I used a light lavender here, then black, then an orchid, then a purple piece that I stamped a script (A Stamp in the Hand - you'd think I own stock! LOL) on in Brilliance Platinum Planet and then trimmed with a stamp edge scissor. The colors didn't scan quite true but you get the idea ;o)

This style card is best seen in real life to fully enjoy it because it catches the light differently from every angle.

Thanks for looking!