Search This Blog

Pages

Showing posts with label Enamel Accents. Show all posts

February 11, 2020

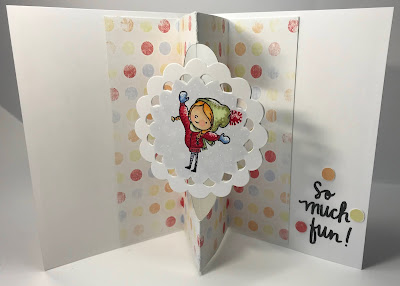
Snow Day Spinner Card


(See video below to watch spinner inside actually spinning)


SUPPLIES:

Stamps - Crate Paper SNOW AND COCOA
Ink - Memento Tuxedo Black
Markers - Copic
Die Cut - Stampin' Up! Sizzix Big Shot Bigz L PERFECT PENNANTS
Patterned Paper - unknown
Other - Ranger Accents in white, Sakura Gelly Roll white gel pen


TECHNIQUE:

1.  Die cut 3 scalloped circles from white cs
2.  Stamp each circle with a different child and color with markers.  Use gray marker to color in open space and add white gel pen highlights.
3.  Affix patterned paper to white card front.  Adhere one circle with image, stamp sentiment in black and highlight with white dot accents.
4.  For best results on inside of card refer to spinner card videos on YouTube - Jennifer McGuire is a mechanical card genius! The main thing is to make sure your circle cut from the inside patterned paper will freely accomodate your spinning feature. The second most important is that the spinning circle won't hang outside the card when folded for mailing.
(TIPS:  Hold off on cutting the length off your patterned paper till you know how much you will need when it is folded.  You may need to reinforce the patterned paper section with light to medium weight cardstock.  Be sure to have the panel lying flat when you attempt gluing the thread on the inside fold top and bottom as it will need to dry flat and stretched straight.) 
5.  Stamp sentiment on inside of card as desired.


Thanks for stopping by!
May you be blessed today, and may you be a blessing...

Nancy


November 22, 2019

Temptation


Playing along with the following challenge:


STAMPS:  cat - Coronado Island Stamps (#W001-H), word - Westwater Enterprises (94-02-11642), lights - Rubber Stampede (#A2606D), foliage - Stampin' Up! from "Watercolor Winter" set 

INKS: Memento Tuxedo Black, Stampin' Up! Gumball Green, Versamark


MARKERS: Copic


OTHER: circle punch, Ranger Glossy Accents, Recollections Snow embossing powder, Sakura Gelly Roll white gel pen and sparkle pen, Judikins Color Duster

1.  Stamp lights on white card front, stamping again on Post-It note for a mask. 
2.  Trim bulbs from Post-It and place over stamped image on card.
3.  Overstamp foliage in green ink and use stipple brush to fill in around edges.
4.  Color bulbs with marker and apply Glossy Accents.  Allow to dry.
5.  Highlight bulbs with white gel pen and use sparkle pen around outside edges.
6.  Stamp cat on card front using black ink.
7.  Color and shadow cat with markers.
8.  Stamp word on black cardstock using embossing ink. Sprinkle with embossing powder and use heat tool to set.
9.  Punch word out with circle punch and pop-dot to card. 


Thanks for stopping by!
May you be blessed, and may you be a blessing... :o)


November 20, 2019

Toads, Frogs...it's all love!

Card for hubby, who loves all things cute
Card is white IRL, and eyeballs are covered with gloss medium.


Playing along in the following challenges:


STAMPS: Stampin' Up! set "Unfroggetable" 

INKS: Stampin' Up! Barely Banana, Memento Tuxedo Black

MARKERS: Copic

OTHER: Sakura Gelly Roll white gel pen, metal ribbon, Ranger Glossy Accents


1. Stamp frog on white cardstock, and off-stamp on Post-It for a mask.
2. Trim mask and place over frog image.
3. Lay stencil down and use dauber to sponge ink over and around mask, fading towards the edges.
4. Use black ink to stamp sentiment.
5. Unmask frog and color in with markers.
6. Highlight areas with white gel pen.
7. Appy gloss to eyeballs and allow to dry.
8. Layer with green panel to white cardfront.


Thanks for stopping in! 
May you be blessed and may you be a blessing.... :o)

November 15, 2019

Blessed Season

I cut the circle out so I could pop-dot the frame up higher, which gives it a lot of dimension when viewed in person, and you can easily see red around the blue dot frame when it is at an angle.


Entering into the following CHALLENGES:


STAMPS:
Stampin' Up! sets - critters from "Polar Bears" and phrase from "Grateful Greetings"

INKS: 
Stampin' Up! Pacific Point, Memento Tuxedo Black

MARKERS: 
Copics as shown

OTHER:
circle punch, Ranger Enamel Accents, Sakura white gel pen

1. Use black ink to stamp critters wherever desired.
2. Use circle punch or die cut to punch image out.
3. Color in the image with markers, and use white gel pen to add dots to scarf.
4. Use dark blue marker to add dots around the edge of the circle.
5. Use the blue inkpad to stamp snowflakes as shown. 
6. Use the black inkpad to stamp the sentiment.
7. Lay both pieces on the red cardstock. Affix the image panel with flat tape and the sentiment panel with foam tape.
8. Affix red panel to white cardfront.
9. Add enamel accent dots to center of snowflakes and allow to dry.


Thanks for stopping in! 
May you be blessed and may you be a blessing... :o)

November 11, 2019

Penguin Love


I always find it easier to start a card with a nice fresh sketch, especially on tired days.  
Entering this card into the following challenges:


STAMPS: 
penguins - Inkadinkado Dawn Houser (#97180 - O), phrase - Uptown Rubber Stamps Susan Wheeler Holly Pond Hill "Love is in the Air" (#V13259), snowflakes - Stampin' Up! "Serene Snowflakes"

INKS: 
Memento Tuxedo Black, Stampin' Up! Taken with Teal, Not Quite Navy, Brocade Blue, Ballet Blue

MARKERS: 
Copic

OTHER: 
Enamel Accents in black, Sakura Gelly Roll pen in white, Stampin' Up! circle punches, fingertip blender


PROCESS:

1. Stamp penguins in black ink on white cardstock, and again on a Post-It note for masking.
2.  Trim mask so only white areas on adult penguins show when placed on top of main stamping. Remove mask.
3. Use blue inks and snowflake stamps to fill in belly/chest areas. Use fingertip dauber and teal ink to shade. Use white pen to highlight center of snowflakes.
4. Use markers to fill in yellow areas and draw a heart on the little guy. Use grey markers to fill in shadows and borders as shown.
5. Using teal ink, stamp large snowflake on white card, and smaller snowflakes on cardstock scraps.  Punch these out, centering.
6. Stamp phrase on a turquoise strip of cardstock in black ink, and cut a square to go underneath main panel as a border.
7. Affix all components as shown and dot center of circles with the black enamel accents.  Allow to dry.


Thanks for stopping by!  
May you be blessed, and may you be a blessing...   :o)

November 01, 2019

CAS Winter Flora Challenge


Used a stamp positioner to align the individual letters.  Foliage was covered with gloss medium.

This card was all about imperfection and what to do with it.  I didn't realize when I stamped the berries how dry the ink pad had gotten so the letters ended up "distressed" and THEN I didn't catch a bit of ink on the edge of the upper left bordering rubber of the H  and had to draw in 3 holly berries there to cover; to balance the extra berries it was necessary to draw in another on the stem above and to the left where there were 2. But in the end I'm happy with it LOL


Stamps: Stampin' Up!"Watercolor Winter", letters unmarked/unknown

Inks: Stampin' Up! Gumball Green, Real Red

Other: Ranger Glossy Accents


Thanks for stopping by!  
May you be blessed and may you be a blessing....  :o)