Search This Blog

Pages

Showing posts with label Distress Oxide Inks. Show all posts

December 10, 2021

SILVERY TREES AND STARRY SKIES

 Welcome to this 29 day series of Christmas cards for the 2021 holiday season - so glad you're here with me! Hope you get lots of inspiration and entertainment right up to Christmas day...

I'll be using the leftover scraps from this die in an upcoming card so keep an eye out for silver and green...


TECHNIQUES

die cutting (trees, starry sky)
ink blending (distress oxides in sky, then splattered with watered down white acrylic paint)


SUPPLIES

tree die - Quikutz Trees border
sky die - Quikutz Starry Night border
inks - Distress Oxide Chipped Sapphire, Faded Jeans and Salty Ocean
silver cardstock - unknown
silver flat backed gems - Jolee's Boutique


And another version:


Sharing these cards with the following Challenge Blogs:


Thanks for stopping in and see you here tomorrow!


October 25, 2021

VIOLET ORB

Hello! A quick and easy, clean and simple card.  This one definitely looks best in person.


TECHNIQUES

ink staining (I smooshed Distress Oxide inkpad in Violet onto a large acrylic block, spritzed with water, pressed a sheet of transparent file folder into this, and then dabbed cardstock onto the plastic)

heat embossing (gray panel)
fussy cutting (thank you panel)


SUPPLIES

flower stamp - Stamp It! "Floral Cluster" #L 1659
word stamps - Penny Black "Million Thanks" #30 680
inks - VersaFine black, Distress Oxide Wilted Violet


Playing along with the following Challenges:


Thanks for stopping by!


August 03, 2021

HAPPY FAMILY

Hello there!  


TECHNIQUES

Distress Oxide ink blending, white gel pen highlights

background was flicked with water droplets, then sprayed with clear shimmer spray when dry


STAMPS

dolphins - Coronado Island, I think!
quote - Impression Obsession 'Change the World' #C5313

OTHER

Avery Elle Clear Shimmer Spray 


Playing along with the following Challenges:


Thanks for swimming by!

July 29, 2021

VACATION SHELL

Hello there!


TECHNIQUES

ink blending

to add interest to the distress oxide ink blend, I flicked the panel with water, and when it was dry I added white Nuovo drops


STAMPS

word panel 'vacation' - O'scrap! 2004 2-sided stamp
shell collage - Stampington & Company 'Parisian Shell' #C8446


Playing along with the following Challenges:


The card below was created using the same ink blending colors.  Please see adjacent post for more details:


Thanks for stopping by!


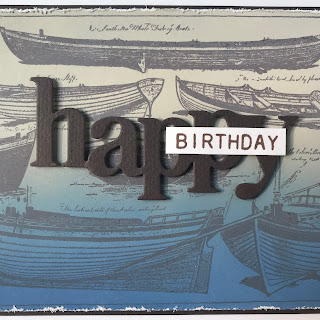
SHORELINE BIRTHDAY


Ahoy!  :o)


TECHNIQUES

ink blending, distressed edges, die cutting, foam dotted sentiment


STAMPS & DIES

boats background - Love to Stamp

'happy' die - Hero Arts Happy Thanks Stamp & Cut XL #DC282

'birthday' stamp - (I'm sorry! I can't find it now...yikes!)


Playing along with the following Challenges:


The same ink blending colors also produced the shell card (see adjacent post) :


 Thanks for coming by today!

January 24, 2021

ONE ITEM, MULTIPLE LOOKS! SERIES {#5} Featuring Figure Stamp

 Welcome to my new series One Item, Multiple Looks!  

 I'm really excited to inspire myself and others to

* explore and stretch the supplies we own 
* let go of anything we don't love
* choose wisely when repurchasing 
*  explore the endless techniques and styles available to us

I will be posting one new grouping featuring a different specific crafty item each week for at least the month of January or so.  To access all posts in this series just click on the topic One Item Multiple Looks! in the sidebar Index of Posts...  Hope you enjoy!

This week's item is a rubber stamp of a wonderful fashion figure from Stampinback:


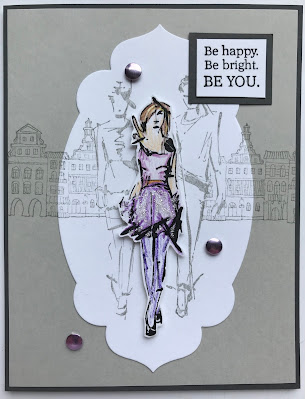
Gray Cityscape Card


SUPPLIES

STAMPS  building, words and figures - Stampinback
INKS  Versafine Onyx Black, Stampin' Up! Going Gray
DIECUT  Stampin' Up Framelits - Apothecary Accents #127003
EMBELLISHMENTS   random colored aluminum dots
OTHER   Crayola 12 pack crayons, Stickles glitter glue in Frosted Lace
CARDSTOCKS dark and light gray, white


Let's get started!
STEPS 

1.  Cut cardstock panels to fit a standard white card in layers as shown. Set aside.
2.  Die cut white cardstock (ALTERNATIVE to specialty die cut: search your house for interesting borders and forms you can trace, and then fussy cut for a unique panel).
3.  Stamp buildings in gray ink on light gray panel (ALTERNATIVE to row of buildings: stamp the same building (or) tree, etc repeatedly).
4.  Stamp two background figures on white panel, and again on masking paper (ALTERNATIVE to masking paper: Post-it notes (or) copy paper with removable tape).
5.  Apply masking paper to figures and use stamp positioner to overstamp buildings in gray ink so they will line up with image already stamped on gray card (ALTERNATIVE to stamp positioner: the L shape (long and short side) from a smaller picture frame that lays flat, and a piece of thicker acetate (or) plastic from store bought packaging).
6.  Stamp main figure image on white cardstock scrap in black ink. Allow to dry and then color in with crayons.  Apply glitter glue as desired.  Fussy cut. (ALTERNATIVES: any coloring or glittering mediums you have on hand).
7.  Stamp words in black ink on white cardstock scrap. Cut into rectangle. Adhere to dark gray rectangular scrap.
8.  Time to assemble! Adhere dark gray panel to white cardfront, and layer light gray background panel on to dark gray. Adhere white die cut panel to light gray background, lining up designs.  Use foam tape to adhere figure to white die cut. Adhere word panel as shown.
9.  Time to embellish!  Add metal dots wherever desired to highlight image (ALTERNATIVE to metal dots: any form of dot-like embellishments (or) punch colored cardstock dots and apply gloss medium).
 

Playing along with the following Challenges:


Grunge Frame Card


SUPPLIES

STAMPS  figure - Stampinback, words - Innovative Stamp Creations (Women Around the World II sheet), elements - Stampin' Up! Extreme Elements and Looks Like Spring sets
INKS  Versafine Onyx Black
EMBOSSING FOLDER Sizzix Tim Holtz Alterations  
OTHER   white matte acrylic paint
CARDSTOCKS  random black, medium gray, white, pink


STEPS 

1.  Cut cardstock panels to fit a standard white card in layers as shown. Set aside.
2.  Emboss medium gray panel with folder and apply white matte acrylic paint lightly to raised area, and center as shown with foam brush. Allow to dry. (ALTERNATIVE to acrylic paint: run a white pigment pad over same areas).
3.  Stamp figure in black ink on center of embossed painted panel.
4.  Stamp words in black ink on pink cardstock and trim strip to fit across gray panel (ALTERNATIVE to the perfect words stamp: hand write (or) type (or) cut from magazine, etc).
5.  Stamp random elements with black ink around frame as shown (ALTERNATIVE to grunge elements: use black marker to hand draw doodles and shapes/patterns).
6.  Time to assemble! Adhere black panel to white cardfront, and layer gray panel on to black. Adhere pink word strip to front of card.


Playing along with the following Challenges:


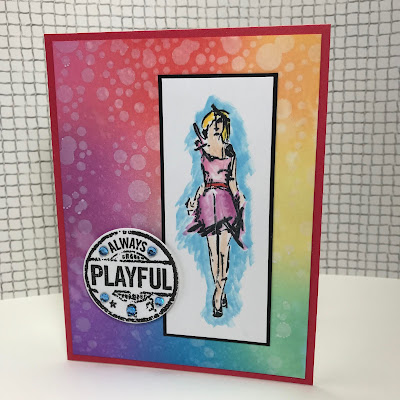
Rainbow Card


SUPPLIES

STAMPS  figure - Stampinback, word circle - Autumn Leaves #AL2618 Sentiments Circles
INKS  Versafine Onyx Black, Distress Oxides, white pigment
STENCIL  Taylored Expressions #TESN07 Bubbly
EMBELLISHMENTS   random faceted mirror back flat back gems
OTHER   waterbrush
CARDSTOCKS random pink, black and white


STEPS 

1.  Cut cardstock panels to fit a standard white card in layers as shown. Set aside.
2.  On large white cardstock panel, use a blending tool and Distress Oxide inks to blend one color into each corner and in center of each side (ALTERNATIVE to Distress Oxide inks: use any pigment or dye inks (or) watercolor a panel (or) scribble markers on your acrylic block and pick up pigment with a paintbrush).
3.  Lay stencil over rainbow colored panel and apply white pigment ink lightly (ALTERNATIVE to stencil: use bubble wrap (or) old school pencil eraser to apply ink).
4.  Stamp figure in black ink onto white cardstock scrap. Use waterbrush to loosely color with Distress inks. Trim panel to rectangle. (see ALTERNATIVES on #2)
5.  Stamp circular words in black ink and trim closely (ALTERNATIVE: stamp any sentiment and punch or die cut into circle shape, adding lines, etc with a black marker or pen).
6.  Time to assemble! Adhere pink panel to white cardfront, and layer rainbow background panel. Adhere white main image rectangle panel to black rectangle and apply to background as shown.  Use foam tape to adhere word circle.
9.  Time to embellish!  Add gems to word circle.


Playing along with the following Challenges:


Monochrome Brown Card


SUPPLIES

STAMPS  figure - Stampinback, elements - Stampin' Up! title unknown - Crafter's Companion French Greetings
INKS  Colorbox Frost White pigment
DIECUT  Stampin' Up Framelits - Apothecary Accents #127003
EMBELLISHMENTS   random colored aluminum dots
OTHER   white color pencil, random ribbon, white detail embossing powder, white gel pen
CARDSTOCKS tan, dark brown, white


STEPS 

1.  Cut dark brown cardstock panel to fit a standard white card in layers as shown. Set aside.
2.  Stamp figure in white pigment ink on tan panel. Heat emboss with white detail powder. 
3.  Use white color pencil to highlight figure.  Cut figure panel into rectangle.
4.  Stamp and heat emboss in white multiple elements on tan cardstock. Fussy cut leaving a border. (ALTERNATIVE to design element stamps: use a white gel pen to draw designs).
5.  Time to assemble! Adhere dark brown panel to white cardfront.  Layer tan elements and main panel with figure on to brown panel as shown.  
9.  Time to embellish!  Stamp word in white and heat emboss.  Fill in any gaps with white gel pen. Adhere ribbon as shown.


Playing along with the following Challenges:


Thanks for stopping by, and I hope you are so inspired to use what you have to make something you love!   Nancy J

January 10, 2021

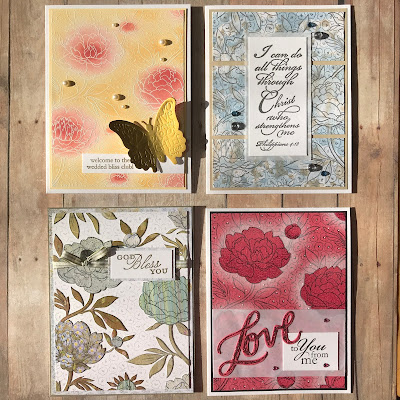
ONE ITEM, MULTIPLE LOOKS! SERIES {#3} Featuring Floral Background Stamp

 Welcome to my new series One Item, Multiple Looks!  

 I'm really excited to inspire myself and others to

* explore and stretch the supplies we own 
* let go of anything we don't love
* choose wisely when repurchasing 
*  explore the endless techniques and styles available to us

I will be posting one new grouping featuring a different specific crafty item each week for at least the month of January or so.  To access all posts in this series just click on the topic One Item Multiple Looks! in the sidebar Index of Posts...  Hope you enjoy!

This week's grouping features a floral background stamp. Techniques feature embossing, ink blending, paper piecing and haloing.


Butterfly Card


SUPPLIES

STAMPS floral background - unmarked, please contact me if you know who made it!, words -Stampin' Up! set, also unmarked (the hazards of buying preowned LOL)
INKS  Distress Oxide Spiced Marmalade and Fired Brick, Versamark
DIECUT Momenta Cut & Emboss #19803 R6
EMBELLISHMENTS  Stampin' Up! flatback pearls
OTHER  white and gold detail embossing powders 
PAPERS  white and yellow cardstock, matte gold cardstock


Let's get started!

STEPS 

1.  Cut white and yellow cardstock panels to fit a standard white card in layers as shown. Set aside (Alternative to yellow cardstock: ink a white piece with the same ink color, or edge a white panel with a yellow or gold marker).
2.  Using Versamark ink, stamp background image on white cardstock. Cover with white detail embossing powder and heat emboss. (Alternative: you could stamp your own background type image using single flower stamp and stamping some tiny image in between).
3.  Use blending brushes and inks to blend into background as shown. Brush ink off lines with soft cloth.
4.  Run matte gold cardstock through embossing/cutting machine with butterfly cut and emboss die. (Alternatives: you could emboss a sheet of cardstock and die cut a butterfly from that, or heat emboss a butterfly stamp image in gold and trim it out, etc)
5.  On white scrap of cardstock, stamp sentiment in Versamark and heat emboss with gold detail powder.  
6.  Time to assemble! Adhere image panel to yellow panel and yellow panel to white cardfront.  Apply strong glue or tape to underside of butterfly body and apply over white sentiment strip as shown.  Gently bend wings upward.
7.  Time to embellish!  Apply flat back pearls as shown.


Playing along with the following Challenges:


Silver Embossed "Watercolor"


SUPPLIES

STAMPS floral background - unmarked (please contact me if you know who made it!), words - I Brake for Stamps
INKS  Distress Ink Faded Burlap, Faded Jeans and Stormy Sky, Versamark
EMBELLISHMENTS  Hero Arts and random flatback crystal gems
OTHER  silver detail embossing powder
PAPERS  white and tan cardstock, vellum


STEPS 

1.  Cut white and tan cardstock panels to fit a standard white card in layers as shown (do not trim white panel into thirds till you're finished stamping and coloring). Set aside (Alternative to tan cardstock: ink a white piece with the same ink color).
2.  Using Versamark ink, stamp background image on white cardstock. Cover with silver detail embossing powder and heat emboss. (Alternative: you could stamp your own background type image using single flower stamp and stamping some tiny image in between).
3.  Smoosh the blue inkpads onto nonstick surface, spritz with water and lay panel into this.  Dry panel and repeat with brown ink.
4.  On white scrap of cardstock, stamp sentiment in Versamark and heat emboss with silver detail powder.
5.  Trim image panel into thirds. 
6.  Time to assemble! Adhere image panel to tan panel and tan panel to white cardfront.  Apply word panel onto vellum panel as shown, and adhere to background panel.
7.  Time to embellish!  Apply flat back gems as shown.


Playing along with the following Challenges:


Gem of a Challenge Anything Goes (ends 1/11)


White Haloing Card


SUPPLIES

STAMPS floral background - unmarked (please contact me if you know who made it!), words - Stampin' Up! set, also unmarked (the hazards of buying preowned LOL)
INKS  Versafine Onyx Black, VersaMagic Cloud White
DIECUT EK Success Word Set #54-80027
EMBELLISHMENTS  random flatback gems
OTHER  white gel pen, Stickles glitter in Pink, color pencils 
PAPERS  pink, black and white cardstock


STEPS 

1.  Cut pink and black cardstock panels to fit a standard white card in layers as shown. Set aside. (Alternative to black cardstock: ink a white piece with the same ink color, or edge a white panel with a black marker).
2.  Using black ink, stamp background image on pink cardstock. (Alternative: you could stamp your own background type image using single flower stamp and stamping some tiny image in between).
3.  Stamp flower heads on masking paper and apply to image panel. (Alternative: stamp images on copy paper, trim and apply removable adhesive to reverse.)
4.  Use blending brushes or sponges to spread white pigment ink around flower heads and buds as shown. Remove masking.
5.  Use colored pencils in same color family to shadow flower heads and buds as shown.
6.  On white scrap of cardstock, stamp sentiment in black ink.
7.  Die cut word from pink cardstock and apply glitter glue.
8.  Use white gel pen to highlight tiny flower centers.
9.  Time to assemble! Wrap vellum around background image panel, adhering on the reverse. Adhere image panel to black panel and black panel to white card front.  Apply Love die cut and white word panel to vellum as shown.
10.  Time to embellish!  Apply flat back gems as shown.


Playing along with the following Challenges:


Paper Pieced Card


SUPPLIES

STAMPS floral background - unmarked, please contact me if you know who made it!, words -Stampin' Up! Trust God set
INKS  Memento Tuxedo Black, Stampin' Up! Going Gray and True Thyme
OTHER  ribbon
PAPERS  white cardstock, unknown patterened


STEPS 

1.  Cut white cardstock and patterned paper panel to fit a standard white card in layers as shown. Set aside. (Alternative to patterned paper: ink a white piece of card stock with an intricate patterned stamp and colored inks, or stencil a white panel with various inks and patterns).
2.  Using gray ink, stamp background image on white cardstock. (Alternative: you could stamp your own background type image using single flower stamp and stamping some tiny image in between all in the same ink color).
3.  Stamp background image on various patterned paper pieces with black ink.  
4.  Fussy cut flowers and leaves/stems from patterned papers.
5.  On white scrap of cardstock, stamp sentiment in green ink.
6.  Time to assemble! Adhere all fussy cut patterned paper pieces to image stamped in gray ink on white panel. Wrap a ribbon around image panel as shown, and adhere sentiment panel as shown. Adhere image panel to patterned paper panel, and this to white card front.


Playing along with the following Challenges:

Dare 2B Artzy January Anything Goes


Thanks so much for stopping by, I'll see you here again soon!

Nancy