Welcome to my new series One Item, Multiple Looks!
I'm really excited to continue to inspire myself and others to
* explore and stretch the supplies we own
* let go of anything we don't love
* choose wisely when repurchasing
* explore the endless techniques and styles available to us
...and along that note, I'll be sharing exactly what I used and how. But I use what I have and so, in the supply list, I'll offer alternatives to specific supplies listed wherever substitutions come to mind.
I'll be posting one new grouping featuring a different specific crafty item each week for at least the month of January. To access all posts in this series just click on the topic One Item Multiple Looks! in the sidebar Index of Posts... Hope you enjoy!
This time I have a slim line, a mechanical pendulum, a CAS and a no-occasion happy card for you. I chose a rubber stamp image this go around that's close to my heart! It is from one of my own sheets years and years ago, but I don't recall if ever stamped with it. Raise a hand if you can relate to unused stuff in your stamp space?! (If you have interest in this stamp there is info in the sidebar under Rare Image Rubber Stamps.)
Below are a video, all the details, supplies and steps. Let's jump in!
SUPPLIES
STAMPS girl on swing stamp - Rare Image Rubber Stamps, quote - Fiskars Cloud 9 Design Simple Thoughts "Laughter" set
INKS Versamark, Distress dye, Memento Tuxedo Black
MARKERS Copic (alternative: you can use any marker that is compatible with the black ink you choose)
STENCIL A Colorful Life Cloud Edger (alternative: any cardstock cut with a scalloped edge)
EMBELLISHMENTS stars - Duncan Enterprises for PSX paper, rock, scissors "Extras" set, silver circles - Stampendous Diamond Dot stickers (alternative: silver pen or enamel dots in a bottle)
OTHER silver detail embossing powder, Sakura glitter pen and white gel pen, Spica pen "Sand"
CARDSTOCK Neenah Classic Crest Solar White 110 lb, matter silver (Substitution: a metallic silver paint pen to edge image panel)
Let's get started!
STEPS
1. Cut cardstock panels to fit a slim line white card in layers as shown. Set aside.
2. Use a blending brush or sponge/foam to apply pink dye ink onto white panel, using the cloud stencil. Edge the sides, and wherever else you want some depth, with the same ink.
3. Allow panel to dry, then stamp first word in purple dye ink. Allow to dry.
4. Using a stamp positioner, stamp full phrase in Versamark, going only halfway up Joy lightly. Cover with silver detail powder and heat emboss.
5. Use a stamp positioner to stamp girl image at edge of cloud with black ink.
6. Color image with markers. I used a silvery glitter pen to color the swing, and a goldish glitter pen to go over here hair. Add white highlights as desired.
7. Time to assemble! Adhere image panel to silver panel, and silver panel to white slimline card front.
8. Time to embellish! Apply flat back gems and stickers wherever you like them best.
Playing along with the following Challenges:
(this Colorful Life cloud edger stencil is new to me)
(this Colorful Life cloud edger stencil is new to me)
PENDULUM CARD
SUPPLIES
STAMPS girl on swing stamp - Rare Image Rubber Stamps "Children" sheet, tree - RIRS "Garden" sheet, quote - Fiskars Cloud 9 Design Simple Thoughts "Laughter" set
INKS Versafine Onyx Black
EMBELLISHMENTS twine, Ranger 3D Gloss
OTHER colored pencils, foam dots and tape
PATTERNED PAPER unknown (Stampin' Up! if I had to guess - it's been around a long time) (alternative: stamp your own background, or draw marker lines on white panel)
CARDSTOCK Neenah Classic Crest Solar White 110 lb
STEPS
1. Cut patterned paper panels to fit a standard white card in layers as shown. Set aside.
2. Using black ink on white scrap cardstock, stamp girl once, and tree three times. Stamp girl on scrap patterned paper also and trim out dress.
3. Using color pencils, color in trees and the rest of the girl. Glue dress in place. Apply glossy accents to shoes and allow to dry.
4. Fussy cut girl and apply twine with glue over rope lines. (Tie knot in the end of the twine for a more realistic look ;o)
5. Fussy cut trees, cutting one in half.
6. Here's where it can get tricky if you want the image to move like a pendulum. My best advice is go to Jennifer McGuire's blog, search "pendulum card", and follow her instructions to a T; she is a genius and it would be foolish for me to think I could explain the process better. (I glued the top of the swing ropes to a small circle of heavy cardstock to attach to the foam dot that moves).
7. When you have the girl cutout placed where it can swing freely, adhere the tree parts to the card as shown. Fold the upside down center one on the top over the top edge of the card as needed to hide your foam tape.
8. Using black ink, stamp phrase where it looks good.
9. Adhere striped image panel to flowered patterned paper, and then this panel to a standard white card front.
Playing along with the following Challenges:
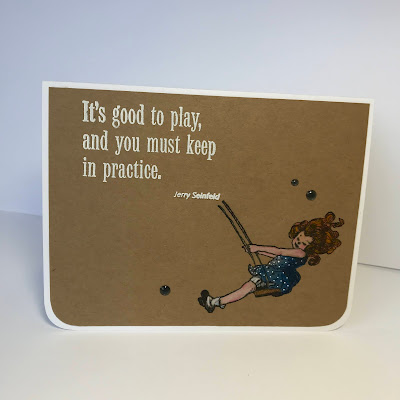
CAS on KRAFT CARD

SUPPLIES
STAMPS girl on swing stamp - Rare Image Rubber Stamps, quote - Fiskars Cloud 9 Design Simple Thoughts "Laughter" set
INKS Versamark, Versafine Onyx Black
EMBELLISHMENTS Cloud 9 Design Bluebell Raindrops (alternative: enamel dots in a bottle)
OTHER colored pencils, white detail embossing powder, Sakura white gel pen, glaze pen in yellow
CARDSTOCK Neenah Classic Crest Solar White 110 lb, kraft (Substitution: a common paper grocery sack)
STEPS
1. Cut kraft panel to fit a standard white card in layers as shown. Trim bottom corners on both. Set white card aside.
2. Using black ink, stamp girl towards corner. Allow to dry.
3. Using Versamark, stamp phrase near top of card. Heat emboss with white detail powder.
4. Using color pencils, color in image. Highlight dress with white gel pen and hair with yellow glaze pen.
5. Time to assemble! Adhere image panel to white card front.
8. Time to embellish! Apply blue flat back gems wherever you like them best.
Playing along with the following Challenges:
NO-OCCASION HAPPY CARD
SUPPLIES
STAMPS girl on swing stamp - Rare Image Rubber Stamps, quote - Fiskars Cloud 9 Design Simple Thoughts "Laughter" set, background flower stamp - unknown (unmounted - please let me know if you know who made this) (alternative: stamp random flowers and leaves all in the same ink color to achieve a background look)
INKS Memento Tuxedo Black, Stampin' Up! Going Grey
MARKERS Copic (alternative: you can use any marker that is compatible with the black ink you choose)
DIE CUT Stampin' Up! Framelits Labels Collection #125598, Sizzix Sizzlets Flowers, Branches & Leaves set #656064
OTHER Sakura glitter pen and white gel pen
CARDSTOCK Neenah Classic Crest Solar White 110 lb, scraps and snippets of colored cardstock - I believe the textured is Bazzill) (alternative: use a petite pattern to emboss flat cardstock before die cutting flowers)
STEPS
1. Cut white cardstock panel to fit a standard white card as shown.
2. Use grey ink to stamp a floral background stamp on white panel.
3. Use black ink to stamp phrase on white cardstock scrap. Die cut into label shape.
4. Die cut flowers and stems from various colors of scrap cardstock.
5. Use black ink to stamp girl image on white cardstock scrap.
6. Color image with markers. Highlight dress with white gel pen and hair with silvery glitter pen.
7. Fussy cut little girl image.
7. Time to assemble! Adhere background image panel to white card front. Use foam dots to adhere components as shown.
8. Time to embellish! I forgot this part - a flat back gems or enamel drops in white would look great.
Playing along with the following Challenges:
Thanks so much for swinging by!
I couldn't resist, and I'm not even sorry ;o)
Nancy


