Search This Blog

Pages

Showing posts with label Thank You. Show all posts

August 20, 2026

TRI-PANELED WITH BRANCH


Hi friends!


Playing along with this TRY A SKETCH ON TUESDAY challenge
(ends 8/30)


Hope it’s okay that I swapped the panels of color out for panels of different embossed patterns! 
 

SOME DETAILS

Three different folders were used to emboss the three panels to fit the design as shown. The notebook paper was enhanced with a bit of spiral punching along one edge. 

The branch with flowers was blended with distress inks, and highlighted with white gel pen and a few flat back rhinestones. 

Sentiment was die cut from textured pink card stock and mounted on the shadow cut from vellum.

*TIPS*
In order to raise up lettering with vellum, I like to cut two or three of the skinny letters from scrap white card stock, stack them, and apply on the underside of the vellum to give the whole sentiment height without anything showing through.

To color in skinny die cuts like this, I like to use a small blender brush to color it while it is still in the surrounding card stock on the die cutting pad after going through the die cutting machine. 


SUPPLIES

branch die - Memorybox #98470 Blooming Vine
sentiment dies - Spellbinders #S4-1312 Serenade Sentiments
embossing folders - notebook page -Sizzix, flowers - Cuttlebug, leaves - unknown
notebook spiral punch - EK Success
vellum 
flat back rhinestones


Thanks for stopping in today!


March 01, 2026

BACKYARD & TROPICAL BLOOMS.

 Hello!

Playing along with this Try A Sketch on Tuesday challenge.


It was very freeing to use some gorgeous patterned paper, as I usually make my own backgrounds. And I really enjoyed this very user-friendly sketch. 

 I found it easiest to cut and adhere the two end strips slightly larger than needed, and then do the center strip to even everything out. 

I cut the rectangle panel from vellum, then the frame using 2 sizes of these nesting label dies. The vellum was glued on the striped background panel. The flower and stem were stamped on white cardstock, fussy cut and the outline color was spread with a wet paint brush. 

Sentiment was die cut in gold card stock. Embellishments are flat backed gems glued on, and there is yellow glitter glue in the flower center. Flower head is foam mounted.   


SUPPLIES

flower stamp - Stampin’ Up! retired set

Thanks die - Spellbinders set

patterned paper - Stampin’ Up! retired

grass die - Penny Black


* I originally spent a few days working intermittently on this card below for the challenge, and really loved it, but was shocked when I got ready to upload it - it was eerily similar to a fellow stamper’s card already entered! But here it is just for fun:


SUPPLIES

flower dies - Stampin’ Up!

label/frame dies - Spelbinders Nestibilities

patterned paper - Stampin’ Up! retired Flamingo something, I think 🤔

vellum

sentiment strip - preprinted, sponged pink

gold glitter cardstock


Thanks for stopping in today!


February 20, 2026

SPRING BRANCHES.

Hello!


Added another flower and I think it’s better!


Playing along with the following challenges in no particular order:

this Inspiration Station challenge (ends 2/28).


UPDATE! 😊


and this Just Us Girls challenge (ends 2/25).


and this TGIF challenge (ends 2/26).


and Ellibelle’s Garden Party #12 challenge - anything in or from a garden
 (ends 3/9).

and Alphabet Challenge - V for volume (dimension) on a card (ends 3/6).

UPDATE! :o)
I got a mention as the Spotlight Winner!


I thought this die cut blue panel evoked a feeling of sky, without using one of my favorite scenic design elements - clouds - AGAIN. Maybe tomorrow 😂 The sentiment was stamped in Versamark and heat embossed in gold. Branch was die cut and colored and shaded as shown, colored with mini Waffleflower blender brushes and Distress Oxide inks. And to give a feeling of dimension I foam dotted the leaves. Flowers were shaped upwards slightly with soft foam mat and large ball flower shaper before gluing to branches.


SUPPLIES

sentiment stamp - unmarked secondhand set 
branch with flowers dies - Spellbinders Flowering Quince set
background panel die - Penny Black Antique Frame set


Thanks for stopping in today!

October 31, 2025

BIG PUG LOVE


Hello!
Another cute dog stamp - just a joy to work with! 

Stamped him on kraft cardstock and used a white gel pen on his eyes (oh the challenge of finding a good one - I’m so open to suggestions), added some glossy accents to his nose, and colored his tongue pink. By using the thickest foam tape under the “a”, a little thinner type under the “h” and “n”, and none on the rest, in person you get the illusion that there is some foreground dimension. I couldn’t find a stencil to suit for a swirling fall leaves effect so I used this background stamp and a fade effect by applying ink with a flat blender brush. It was hard to judge how much pale orange ink I had on the stamp and I covered a slightly larger area than I intended. 


Playing along with the current challenge theme at Addicted to CAS Challenge


SUPPLIES

dog stamp - Simon Hurley “big hugs” #HUR85560 set

heart stamp - Stampin! Up! “I {Heart} Hearts” Set

alphabet stamp set - PSX “Lower Case Typewriter”

sentiment stamp - Stampendous Fran’s “Every Occasion” #SSC1354

swirly background stamp - Judikins #2130 J


Thanks for stopping in today!

October 25, 2021

VIOLET ORB

Hello! A quick and easy, clean and simple card.  This one definitely looks best in person.


TECHNIQUES

ink staining (I smooshed Distress Oxide inkpad in Violet onto a large acrylic block, spritzed with water, pressed a sheet of transparent file folder into this, and then dabbed cardstock onto the plastic)

heat embossing (gray panel)
fussy cutting (thank you panel)


SUPPLIES

flower stamp - Stamp It! "Floral Cluster" #L 1659
word stamps - Penny Black "Million Thanks" #30 680
inks - VersaFine black, Distress Oxide Wilted Violet


Playing along with the following Challenges:


Thanks for stopping by!


October 28, 2020

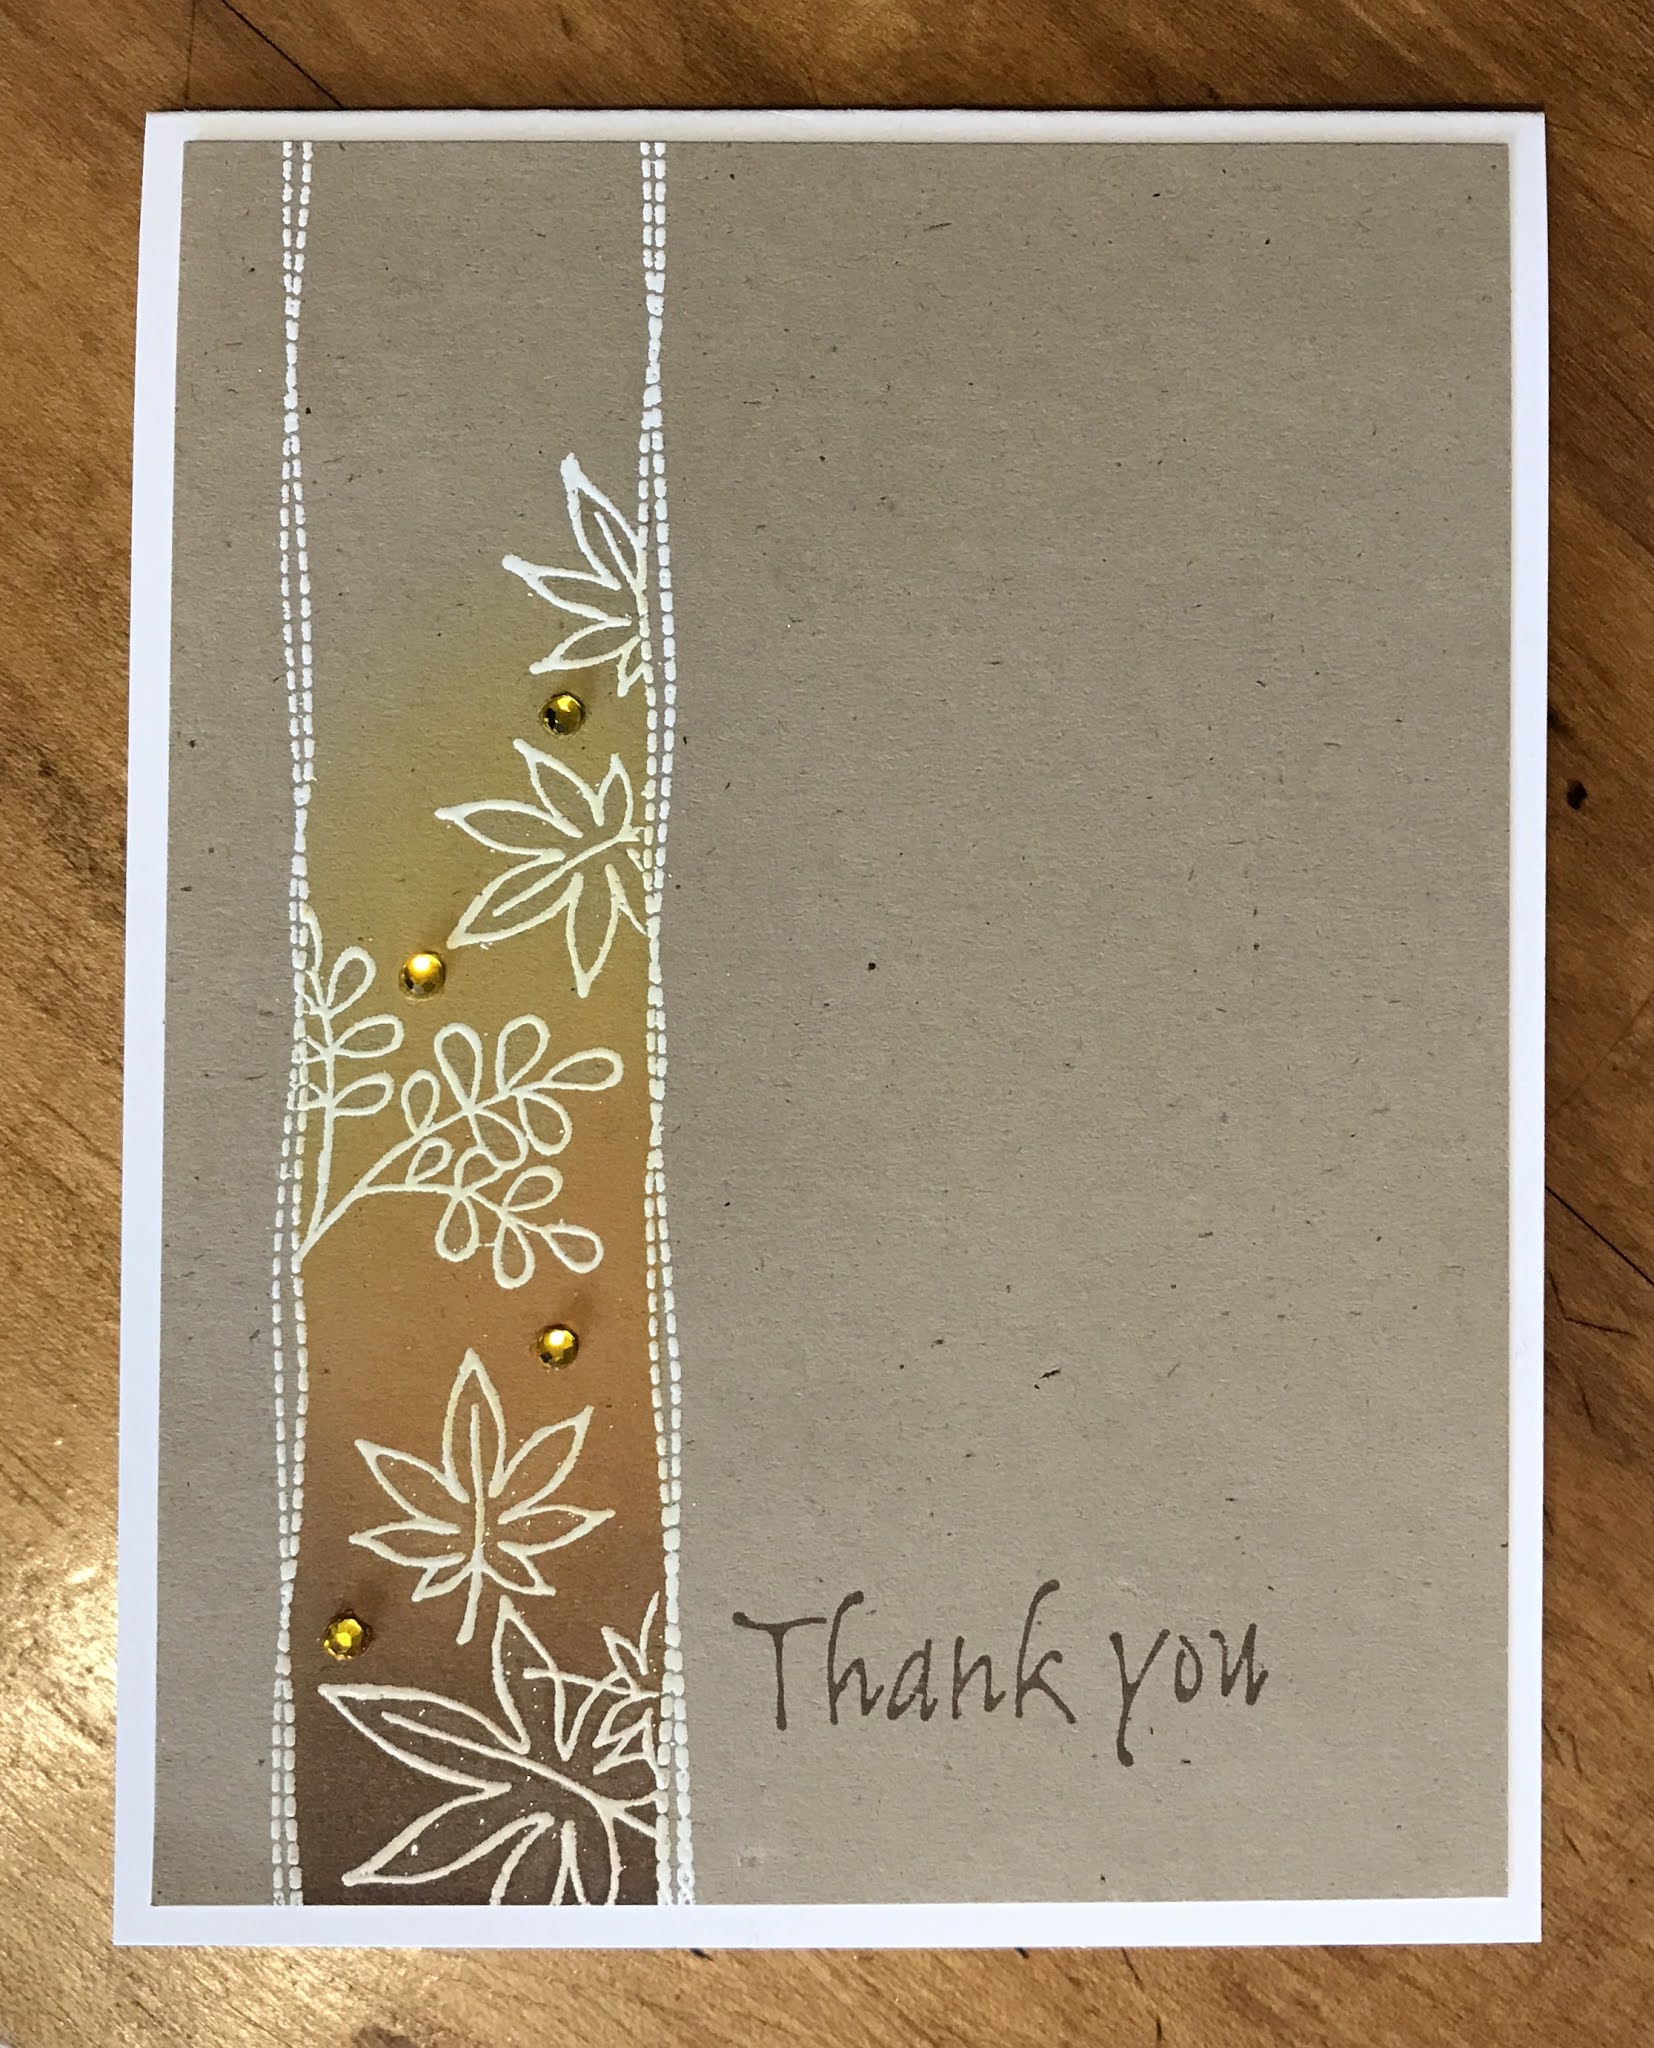
AUTUMNAL THANK YOU

Hello there!


(this kraft cardstock is lighter in person)

SUPPLIES

STAMPS - Stampin' Up! Artfully Asian set
INKS - Distress Oxide, Versamark 
PAPER - Neenah Solar White 110 lb, generic kraft
OTHER - white embossing powder, flat-back gems, liquid sparkle pen, blending brushes, heat gun for embossing


STEPS

1.  Trim kraft cardstock to fit white card front.
2.  Stamp border lines on kraft with Versamark and heat emboss with white powder.
3.  Mask border on both sides with Post It's, etc.  Stamp leaves in Versamark and heat emboss with white powder.
4.  Remask panel as above.  Using blending brushes, lay inks down in order shown.
5. Apply gems, and sparkle to leaves if desired.
6.  Stamp sentiment in darkest ink color.
7.  Affix kraft panel to white top fold card.
8.  Send card to your favorite person!


Thanks for stopping by - have a blessed rest of your day!  :o) 


February 11, 2020

Thank You Cards


SUPPLIES:
Cardstock - Neenah Classic Crest Solar White 110lb
Stamps - Stampin' Up! PUN FUN & I {HEART} HEARTS
Markers - Copic, fine point black marker
Inks - Stampin' Up! various reds & pinks, Memento Tuxedo Black
Other - Gelly Roll white gel pen

TECHNIQUE:
1. Stamp image and sentiment in black ink on cardfront and color in with markers, highlighted by white gel pen.
2.  Use a blank slick surface to stamp image on again and then transfer to white cs scrap. Trim and color same as front image, filling in any fainter lines with black pen, and adhere to inside of card, covering up marker bleed from front image.
3. Stamp a row of hearts in various ink colors on scrap white cs, making sure edges touch. Fussy cut, keeping hearts all attached.Score at connection points and mount only back of each end heart to inside of card as shown. (Tip: Before cutting hearts out, score and fold accordian-style to make sure you will have the backs showing on top and bottom of stack where you will need to affix to the card base - you may need to add another heart. You can then tape/glue each end heart on the reverse and lay the stack on the inside of the card, fold the cover closed and they should line up nicely.)


This next card was a thank you for a beautiful table runner given to us at Christmas-time, made from coffee bean sacks.  As I was going to send the thank you out after the holiday season, I wanted to retain the same feeling, but without the dark greens and reds.  It's hard to see in the photo without expanding, but the stamped band on the card had light red and light green sponged onto the stamp image.


SUPPLIES:
Stamps - Stampin' Up! BEAUTIFUL BATIK, sentiment from See-D's AGING GRACEFULLY
Inks - Stampin' Up, brown is a Distress Oxide
Other - watercolors, Gelly Roll white gel pen, medical gauze, tissue paper
Paper - watercolor, Neenah white

TECHNIQUE:
1. Spread watercolor wash over watercolor paper. While still wet, lay gauze over it and allow to dry.  Remove gauze and tear edges. Mount to cardfront.
2. Ink border stamp by dabbing wadded up tissue paper on inkpads and then onto rubber.  (Tip: Use different scrap of tissue for each color, and try to work in random areas with just one color applied although some overlap is okay. Guard against muddying the colors as some inks are juicier than others.)
3. Stamp sentiment in brown over border and trim to size. Adhere to cardfront.
4. Using brown ink, stamp images on watercolored paper. Add white gel pen to images and some dots around them.


Thanks for stopping by!  
May you be blessed today, and may you be a blessing... 

Nancy

May 26, 2009

Paper Souffle Peony

Helllllooooooooo...? Anyone still there? LOL It feels like SO LONG since I've posted. I've been able to make just three cards ALL MONTH (the I Brake for Stamps with the little girl, a simple one for the monthly card-club I go to when I can, and this thank you card I made for my parents last night that I wanted to share with you). After not stamping much I worried that I wouldn't be able to stamp at all but it's always easier for me when I have someone special in mind as I put a card together. I saw the current Somerset Studio magazine while looking for something else yesterday, paged thru it, and had to have it just for two wonderful paper manipulating articles in it. One is an article on page 80 called Souffle` Papier d' Art by the ever-amazing Sandra Evertson Using her technique you can use any print or photo and a pin to prick paper with a needle and get the effect below. So quick and easy I had a decent result as soon as I sat down late last night to try it for the first time.
Click on photo for a close-up...
Card measures 5 1/2" x 4 1/4"
STAMPS: peony - Judi-kins, phrase - Hero Arts, background - 'Floral', Stampin' Up! INKS: Versamark, Distress Tattered Rose and Brushed Corduroy, SU Always Artichoke SUPPLIES: flower punch, miniature flat-backed pearls, floral ribbon, striped ribbon, pearl-head straight pin, pink crochet thread, sewing needle, textured paper, distressing tool NOTES: for the corners I stamped the background in Tattered Rose, cut it into four triangles, edged them with Brushed Corduroy, and applied them with a glue pen. I swiped Tattered Rose on cream cardstock and punched the flowers. I used an embossing stylus and the palm of my hand to round them before attaching the back centers with glue to the corner triangles, then I just applied the gem pearls to the centers. ~ The wide ribbon was preprinted and I tied it in a simple knot, inserting the green striped ribbon before tightening the knot. I tied some pink crochet floss on a pearl-head sewing pin and put it thru the knot ~ The cream colored paper and the pale pink cardfront are lightly textured.
Thanks for checking in - hope your month was great! Stay tuned - I have a little blog giveaway coming up in the next week :o)