Search This Blog

Pages

Showing posts with label Distress Inks. Show all posts

November 08, 2021

LEAVES AND FLOWERS

Hello!


TECHNIQUES

ink blending (with small brushes before die cutting) 
die cutting
pop dotting (yellow flowers and phrases)
colored pencil shading 
ink sponging (along edges)


SUPPLIES

floral stamp with matching die - Waffle Flower "Bouquet Builder 5"
sentiment stamps - Stampin' Up!
Distress dye inks
colored pencils
white gel pen
black flat back faceted gems
foam mounting tape
blending brushes
Stickles glitter glue
sheet music text page


PLAYING ALONG WITH THE FOLLOWING CHALLENGES:


Thanks for stopping in today!
Nancy J


August 04, 2021

RAINY DAY

Hello!


TECHNIQUES

Distress Ink watercolor , die cutting (main panel), heat embossing (sentiment)

I smooshed blue ink from the pad onto acetate sheet (a second layer of light green on the second card) spritzed with water, laid another acetate sheet over to blend and then removed, laid image panel onto inked acetate sheet (you can use both sides of sheets on scrap cs to maximize ink usage).  I stamped the image first in black Versafine ink to better control placement of color.


STAMPS & DIES

stitched border die - My Favorite Things
stamp - old photopolymer cling on asst French images 5" x 7"sheet

A variation in layout and colors/placement:


Playing along with the following Challenges:


January 10, 2021

ONE ITEM, MULTIPLE LOOKS! SERIES {#3} Featuring Floral Background Stamp

 Welcome to my new series One Item, Multiple Looks!  

 I'm really excited to inspire myself and others to

* explore and stretch the supplies we own 
* let go of anything we don't love
* choose wisely when repurchasing 
*  explore the endless techniques and styles available to us

I will be posting one new grouping featuring a different specific crafty item each week for at least the month of January or so.  To access all posts in this series just click on the topic One Item Multiple Looks! in the sidebar Index of Posts...  Hope you enjoy!

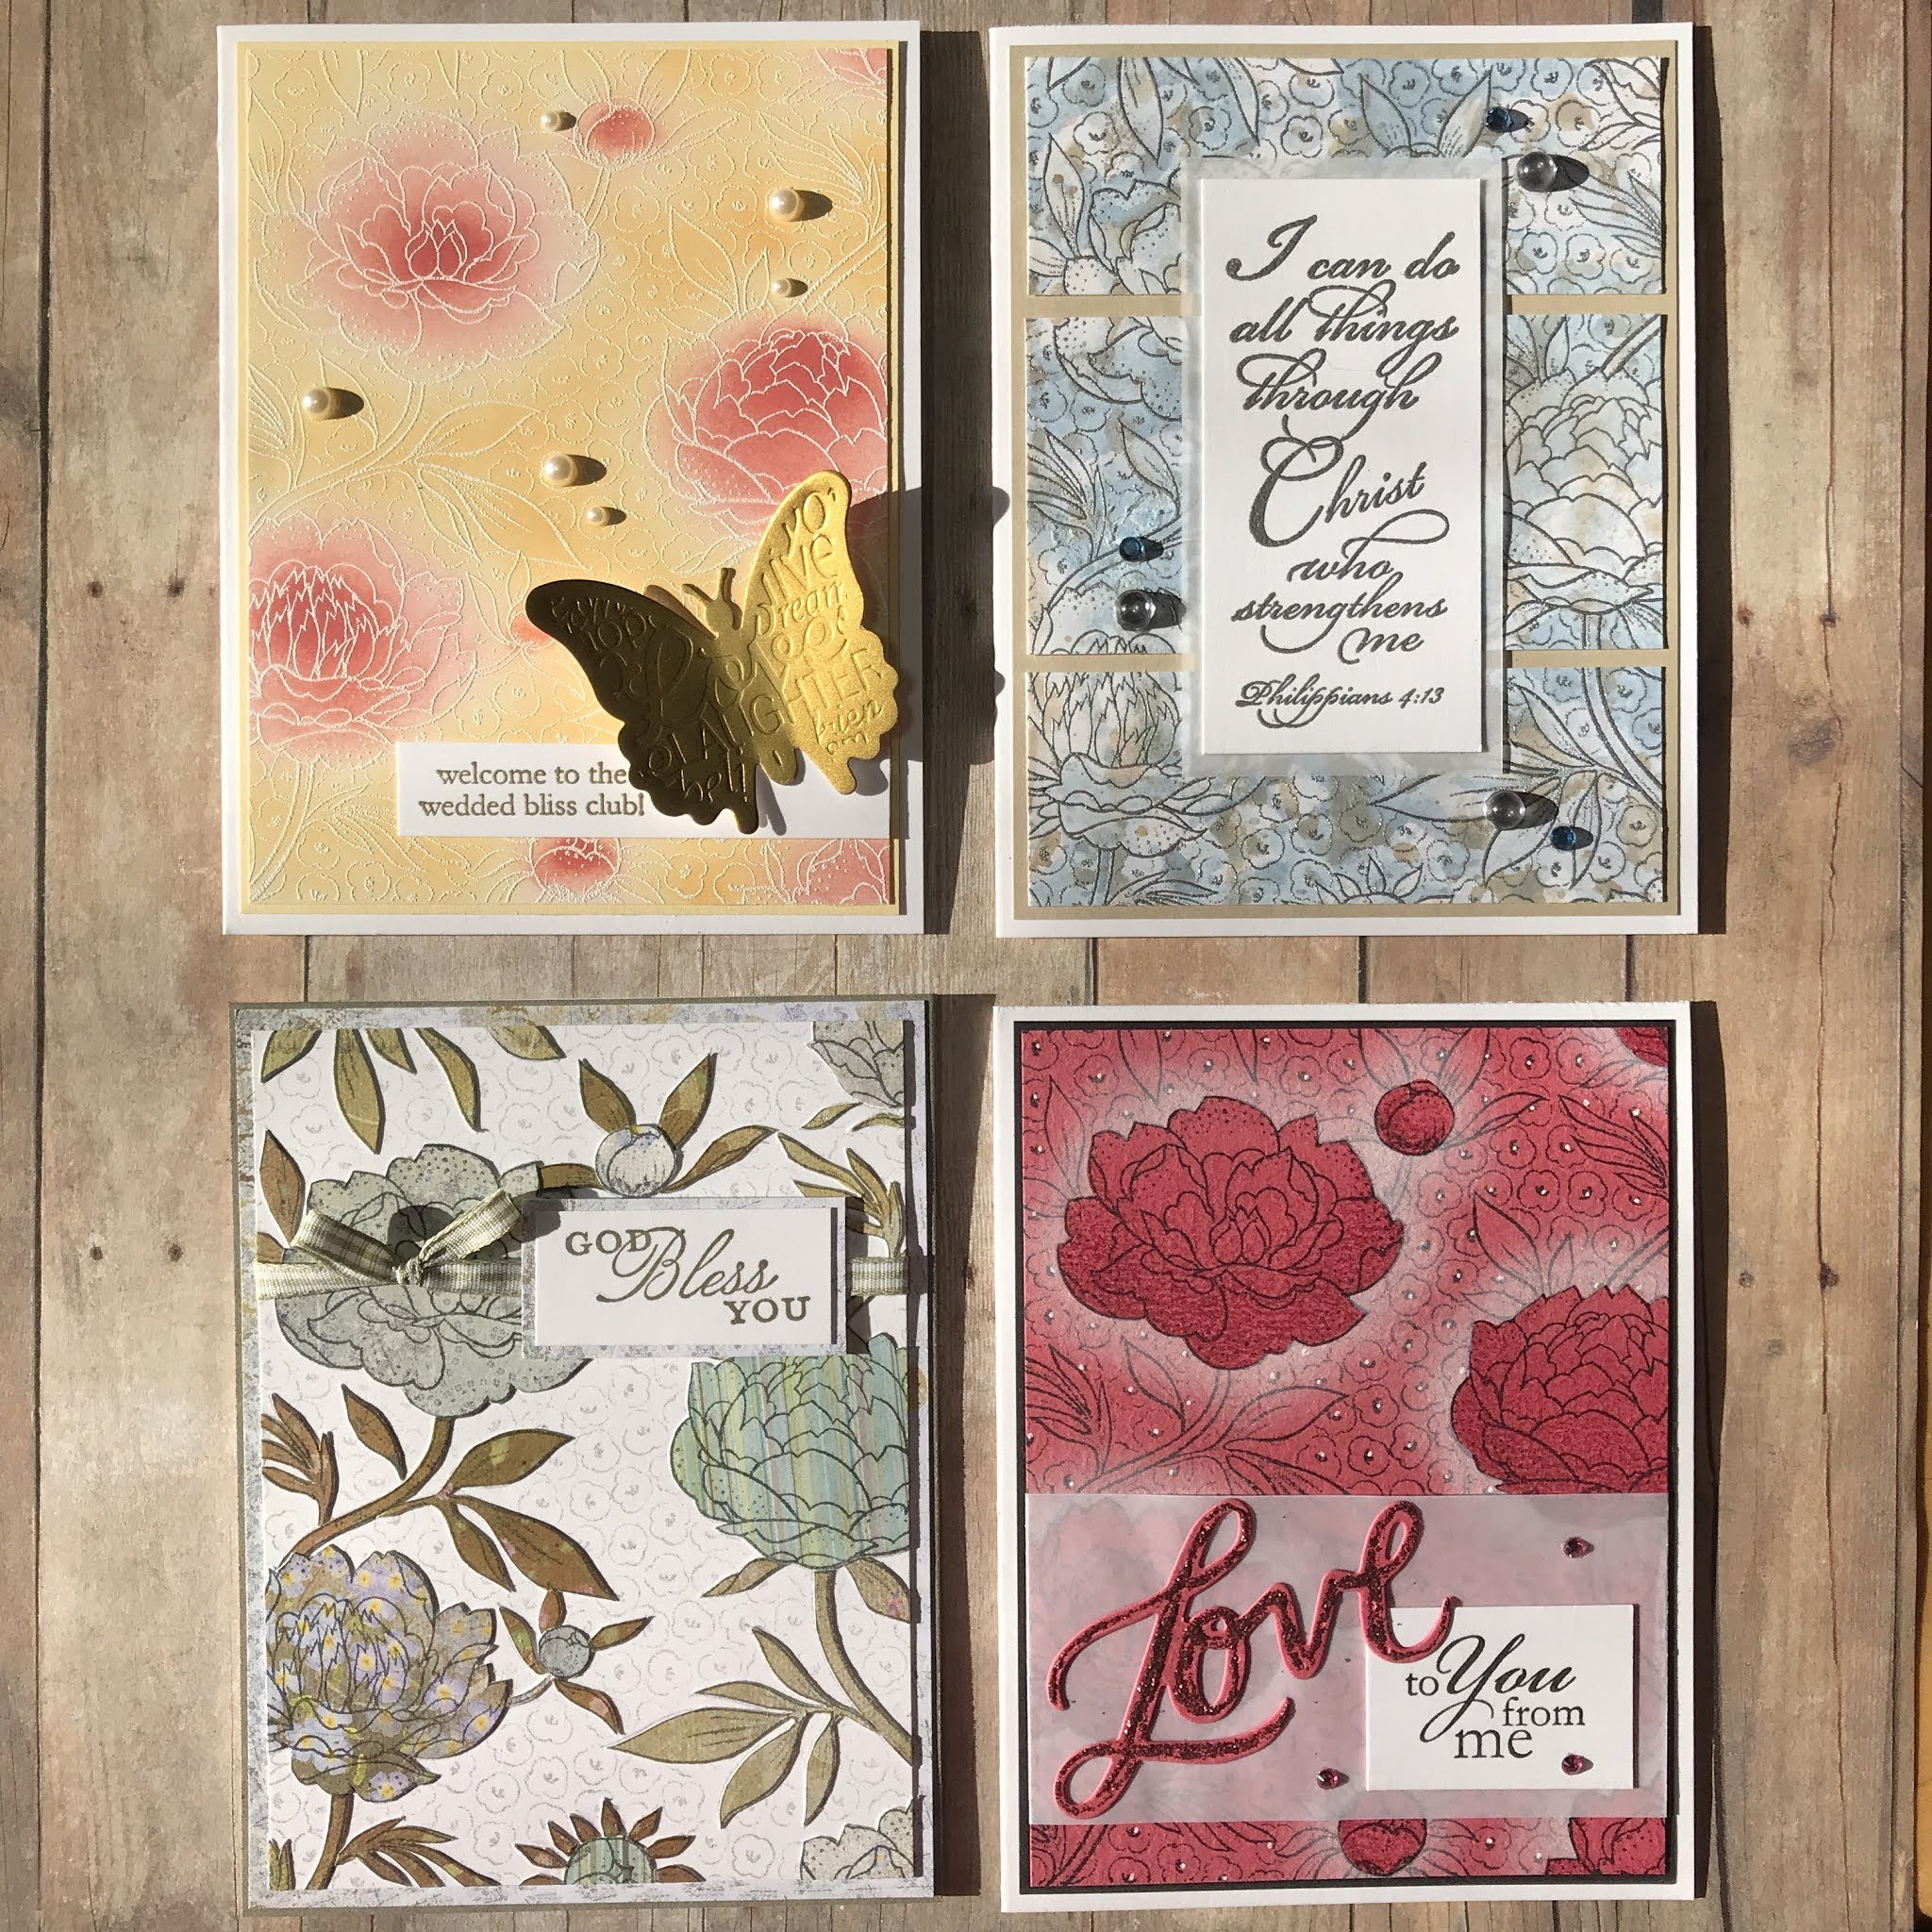
This week's grouping features a floral background stamp. Techniques feature embossing, ink blending, paper piecing and haloing.


Butterfly Card


SUPPLIES

STAMPS floral background - unmarked, please contact me if you know who made it!, words -Stampin' Up! set, also unmarked (the hazards of buying preowned LOL)
INKS  Distress Oxide Spiced Marmalade and Fired Brick, Versamark
DIECUT Momenta Cut & Emboss #19803 R6
EMBELLISHMENTS  Stampin' Up! flatback pearls
OTHER  white and gold detail embossing powders 
PAPERS  white and yellow cardstock, matte gold cardstock


Let's get started!

STEPS 

1.  Cut white and yellow cardstock panels to fit a standard white card in layers as shown. Set aside (Alternative to yellow cardstock: ink a white piece with the same ink color, or edge a white panel with a yellow or gold marker).
2.  Using Versamark ink, stamp background image on white cardstock. Cover with white detail embossing powder and heat emboss. (Alternative: you could stamp your own background type image using single flower stamp and stamping some tiny image in between).
3.  Use blending brushes and inks to blend into background as shown. Brush ink off lines with soft cloth.
4.  Run matte gold cardstock through embossing/cutting machine with butterfly cut and emboss die. (Alternatives: you could emboss a sheet of cardstock and die cut a butterfly from that, or heat emboss a butterfly stamp image in gold and trim it out, etc)
5.  On white scrap of cardstock, stamp sentiment in Versamark and heat emboss with gold detail powder.  
6.  Time to assemble! Adhere image panel to yellow panel and yellow panel to white cardfront.  Apply strong glue or tape to underside of butterfly body and apply over white sentiment strip as shown.  Gently bend wings upward.
7.  Time to embellish!  Apply flat back pearls as shown.


Playing along with the following Challenges:


Silver Embossed "Watercolor"


SUPPLIES

STAMPS floral background - unmarked (please contact me if you know who made it!), words - I Brake for Stamps
INKS  Distress Ink Faded Burlap, Faded Jeans and Stormy Sky, Versamark
EMBELLISHMENTS  Hero Arts and random flatback crystal gems
OTHER  silver detail embossing powder
PAPERS  white and tan cardstock, vellum


STEPS 

1.  Cut white and tan cardstock panels to fit a standard white card in layers as shown (do not trim white panel into thirds till you're finished stamping and coloring). Set aside (Alternative to tan cardstock: ink a white piece with the same ink color).
2.  Using Versamark ink, stamp background image on white cardstock. Cover with silver detail embossing powder and heat emboss. (Alternative: you could stamp your own background type image using single flower stamp and stamping some tiny image in between).
3.  Smoosh the blue inkpads onto nonstick surface, spritz with water and lay panel into this.  Dry panel and repeat with brown ink.
4.  On white scrap of cardstock, stamp sentiment in Versamark and heat emboss with silver detail powder.
5.  Trim image panel into thirds. 
6.  Time to assemble! Adhere image panel to tan panel and tan panel to white cardfront.  Apply word panel onto vellum panel as shown, and adhere to background panel.
7.  Time to embellish!  Apply flat back gems as shown.


Playing along with the following Challenges:


Gem of a Challenge Anything Goes (ends 1/11)


White Haloing Card


SUPPLIES

STAMPS floral background - unmarked (please contact me if you know who made it!), words - Stampin' Up! set, also unmarked (the hazards of buying preowned LOL)
INKS  Versafine Onyx Black, VersaMagic Cloud White
DIECUT EK Success Word Set #54-80027
EMBELLISHMENTS  random flatback gems
OTHER  white gel pen, Stickles glitter in Pink, color pencils 
PAPERS  pink, black and white cardstock


STEPS 

1.  Cut pink and black cardstock panels to fit a standard white card in layers as shown. Set aside. (Alternative to black cardstock: ink a white piece with the same ink color, or edge a white panel with a black marker).
2.  Using black ink, stamp background image on pink cardstock. (Alternative: you could stamp your own background type image using single flower stamp and stamping some tiny image in between).
3.  Stamp flower heads on masking paper and apply to image panel. (Alternative: stamp images on copy paper, trim and apply removable adhesive to reverse.)
4.  Use blending brushes or sponges to spread white pigment ink around flower heads and buds as shown. Remove masking.
5.  Use colored pencils in same color family to shadow flower heads and buds as shown.
6.  On white scrap of cardstock, stamp sentiment in black ink.
7.  Die cut word from pink cardstock and apply glitter glue.
8.  Use white gel pen to highlight tiny flower centers.
9.  Time to assemble! Wrap vellum around background image panel, adhering on the reverse. Adhere image panel to black panel and black panel to white card front.  Apply Love die cut and white word panel to vellum as shown.
10.  Time to embellish!  Apply flat back gems as shown.


Playing along with the following Challenges:


Paper Pieced Card


SUPPLIES

STAMPS floral background - unmarked, please contact me if you know who made it!, words -Stampin' Up! Trust God set
INKS  Memento Tuxedo Black, Stampin' Up! Going Gray and True Thyme
OTHER  ribbon
PAPERS  white cardstock, unknown patterened


STEPS 

1.  Cut white cardstock and patterned paper panel to fit a standard white card in layers as shown. Set aside. (Alternative to patterned paper: ink a white piece of card stock with an intricate patterned stamp and colored inks, or stencil a white panel with various inks and patterns).
2.  Using gray ink, stamp background image on white cardstock. (Alternative: you could stamp your own background type image using single flower stamp and stamping some tiny image in between all in the same ink color).
3.  Stamp background image on various patterned paper pieces with black ink.  
4.  Fussy cut flowers and leaves/stems from patterned papers.
5.  On white scrap of cardstock, stamp sentiment in green ink.
6.  Time to assemble! Adhere all fussy cut patterned paper pieces to image stamped in gray ink on white panel. Wrap a ribbon around image panel as shown, and adhere sentiment panel as shown. Adhere image panel to patterned paper panel, and this to white card front.


Playing along with the following Challenges:

Dare 2B Artzy January Anything Goes


Thanks so much for stopping by, I'll see you here again soon!

Nancy

January 03, 2021

ONE ITEM, MULTIPLE LOOKS! SERIES {#2} Featuring Girl on Swing Stamp

 Welcome to my new series One Item, Multiple Looks!  

 I'm really excited to continue to inspire myself and others to

* explore and stretch the supplies we own 
* let go of anything we don't love
* choose wisely when repurchasing 
*  explore the endless techniques and styles available to us

...and along that note, I'll be sharing exactly what I used and how.  But I use what I have and so, in the supply list, I'll offer alternatives to specific supplies listed wherever substitutions come to mind.

I'll be posting one new grouping featuring a different specific crafty item each week for at least the month of January.  To access all posts in this series just click on the topic One Item Multiple Looks! in the sidebar Index of Posts...  Hope you enjoy!


This time I have a slim line, a mechanical pendulum, a CAS and a no-occasion happy card for you. I chose a rubber stamp image this go around that's close to my heart!  It is from one of my own sheets years and years ago, but I don't recall if ever stamped with it.  Raise a hand if you can relate to unused stuff in your stamp space?! (If you have interest in this stamp there is info in the sidebar under Rare Image Rubber Stamps.)


Below are a video, all the details, supplies and steps.  Let's jump in!


SLIMLINE CARD


SUPPLIES

STAMPS  girl on swing stamp - Rare Image Rubber Stamps, quote - Fiskars Cloud 9 Design Simple Thoughts "Laughter" set
INKS  Versamark, Distress dye, Memento Tuxedo Black 
MARKERS  Copic (alternative: you can use any marker that is compatible with the black ink you choose)
STENCIL  A Colorful Life Cloud Edger (alternative: any cardstock cut with a scalloped edge)
EMBELLISHMENTS  stars - Duncan Enterprises for PSX paper, rock, scissors "Extras" set, silver circles - Stampendous Diamond Dot stickers (alternative: silver pen or enamel dots in a bottle)
OTHER   silver detail embossing powder, Sakura glitter pen and white gel pen, Spica pen "Sand"
CARDSTOCK  Neenah Classic Crest Solar White 110 lb, matter silver (Substitution: a metallic silver paint pen to edge image panel)


Let's get started!

STEPS 

1.  Cut cardstock panels to fit a slim line white card in layers as shown. Set aside.
2.  Use a blending brush or sponge/foam to apply pink dye ink onto white panel, using the cloud stencil. Edge the sides, and wherever else you want some depth, with the same ink.
3.  Allow panel to dry, then stamp first word in purple dye ink. Allow to dry.
4.  Using a stamp positioner, stamp full phrase in Versamark, going only halfway up Joy lightly.  Cover with silver detail powder and heat emboss.
5.  Use a stamp positioner to stamp girl image at edge of cloud with black ink.  
6.  Color image with markers.  I used a silvery glitter pen to color the swing, and a goldish glitter pen to go over here hair.  Add white highlights as desired.
7.  Time to assemble! Adhere image panel to silver panel, and silver panel to white slimline card front.
8.  Time to embellish!  Apply flat back gems and stickers wherever you like them best.


Playing along with the following Challenges:

(this Colorful Life cloud edger stencil is new to me)


(this Colorful Life cloud edger stencil is new to me)


PENDULUM CARD


SUPPLIES

STAMPS  girl on swing stamp - Rare Image Rubber Stamps "Children" sheet, tree - RIRS "Garden" sheet, quote - Fiskars Cloud 9 Design Simple Thoughts "Laughter" set
INKS  Versafine Onyx Black 
EMBELLISHMENTS  twine, Ranger 3D Gloss
OTHER   colored pencils, foam dots and tape
PATTERNED PAPER  unknown (Stampin' Up! if I had to guess - it's been around a long time) (alternative:  stamp your own background, or draw marker lines on white panel)
CARDSTOCK  Neenah Classic Crest Solar White 110 lb


STEPS 

1.  Cut patterned paper panels to fit a standard white card in layers as shown. Set aside.
2.  Using black ink on white scrap cardstock, stamp girl once, and tree three times. Stamp girl on scrap patterned paper also and trim out dress.
3.  Using color pencils, color in trees and the rest of the girl.  Glue dress in place. Apply glossy accents to shoes and allow to dry.
4.  Fussy cut girl and apply twine with glue over rope lines. (Tie knot in the end of the twine for a more realistic look  ;o)
5.  Fussy cut trees, cutting one in half.  
6.  Here's where it can get tricky if you want the image to move like a pendulum.  My best advice is go to Jennifer McGuire's blog, search "pendulum card", and follow her instructions to a T; she is a genius and it would be foolish for me to think I could explain the process better. (I glued the top of the swing ropes to a small circle of heavy cardstock to attach to the foam dot that moves).
7.  When you have the girl cutout placed where it can swing freely, adhere the tree parts to the card as shown.  Fold the upside down center one on the top over the top edge of the card as needed to hide your foam tape.
8.  Using black ink, stamp phrase where it looks good.
9.   Adhere striped image panel to flowered patterned paper, and then this panel to a standard white card front.


Playing along with the following Challenges:


CAS on KRAFT CARD


SUPPLIES

STAMPS  girl on swing stamp - Rare Image Rubber Stamps, quote - Fiskars Cloud 9 Design Simple Thoughts "Laughter" set
INKS  Versamark, Versafine Onyx Black 
EMBELLISHMENTS  Cloud 9 Design Bluebell Raindrops (alternative: enamel dots in a bottle)
OTHER colored pencils, white detail embossing powder, Sakura white gel pen, glaze pen in yellow
CARDSTOCK  Neenah Classic Crest Solar White 110 lb, kraft (Substitution: a common paper grocery sack)


STEPS 

1.  Cut kraft panel to fit a standard white card in layers as shown. Trim bottom corners on both.  Set white card aside.
2.  Using black ink, stamp girl towards corner. Allow to dry.
3.  Using Versamark, stamp phrase near top of card. Heat emboss with white detail powder.
4.  Using color pencils, color in image.  Highlight dress with white gel pen and hair with yellow glaze pen.
5.  Time to assemble! Adhere image panel to white card front.
8.  Time to embellish!  Apply blue flat back gems wherever you like them best.


Playing along with the following Challenges:


NO-OCCASION HAPPY CARD


SUPPLIES

STAMPS  girl on swing stamp - Rare Image Rubber Stamps, quote - Fiskars Cloud 9 Design Simple Thoughts "Laughter" set, background flower stamp - unknown (unmounted - please let me know if you know who made this) (alternative: stamp random flowers and leaves all in the same ink color to achieve a background look)
INKS  Memento Tuxedo Black, Stampin' Up! Going Grey
MARKERS  Copic (alternative: you can use any marker that is compatible with the black ink you choose)
DIE CUT  Stampin' Up! Framelits Labels Collection #125598, Sizzix Sizzlets Flowers, Branches & Leaves set  #656064
OTHER   Sakura glitter pen and white gel pen
CARDSTOCK  Neenah Classic Crest Solar White 110 lb, scraps and snippets of colored cardstock - I believe the textured is Bazzill) (alternative: use a petite pattern to emboss flat cardstock before die cutting flowers)


STEPS 

1.  Cut white cardstock panel to fit a standard white card as shown. 
2.  Use grey ink to stamp a floral background stamp on white panel.
3.  Use black ink to stamp phrase on white cardstock scrap. Die cut into label shape.
4.  Die cut flowers and stems from various colors of scrap cardstock.
5.  Use black ink to stamp girl image on white cardstock scrap. 
6.  Color image with markers. Highlight dress with white gel pen and hair with silvery glitter pen.  
7.  Fussy cut little girl image.
7.  Time to assemble! Adhere background image panel to white card front. Use foam dots to adhere components as shown.
8.  Time to embellish!  I forgot this part - a flat back gems or enamel drops in white would look great.


Playing along with the following Challenges:


Thanks so much for swinging by! 
I couldn't resist, and I'm not even sorry ;o)

Nancy