Search This Blog

Pages

Showing posts with label Glitter. Show all posts

January 09, 2022

ENJOY LIFE

Hi! Squeezing another card in today to play along with a sketch challenge. 


Sharing this card with the following challenge blog:

#638 (ends 1/9)


Update: thrilled to get a shout out :o)


TECHNIQUES

alcohol markers (figure and panel) *
die cutting  (oval)
white gel pen
flat back gems
foam mounting (oval panel)

*outlining an image in a slightly darker shade of the background will help it subtly pop  


SUPPLIES

girl and sentiment stamps - Jane Davenport clear set #JDS052
border stamps - Kelly Panacci Borders #KPSTP4 clear set 
inks - Stampin' Up! Melon Mambo, Memento Tuxedo Black
aurora flat back gems - Hampton Art Studio G #VAC0638
glitter glue - Stickles Icicle  
tulle - random stash
white gel pen - Sakura Gelly Roll


Thanks for stopping in!

September 13, 2021

TRIO OF BEES

Hello everyone!


CARD #1

Using a little music paper pages to play along with the following Challenge:


Card #1 
TECHNIQUES

heat embossing (bee, sentiment), die cutting (circles), stenciling (honeycomb), masking (bee)


Card #1
SUPPLIES

bee stamp - Ching "Bumble Bee" #E1262
sentiment stamp - Poppystamps "Whittle Everyday" set #CL484
circles die - Sizzix Thinlits set #6650339
honeycomb stencil - Stampers Anonymous set #THMMM111
glitter glue - Stickles Distress "Scattered Straw"


CARD #2


Card #2
TECHNIQUES

stenciling (honeycomb), glitter glue (wings), colored pencil (bee), heat embossing (bee & sentiment), masking (bee)

* spatters made with Higgins Black Magic waterproof drawing ink and paintbrush


Card #2
SUPPLIES

bee stamp - Ching "Bumble Bee" #E1262
sentiment stamp - Hero Arts "Hello Stamp & Cut" set #DC151
honeycomb stencil - Stampers Anonymous set #THMMM111
glitter glue - Stickles "Icicles"


CARD #3

Playing along with the following Challenge:

                                              Less is More #451 Sparkle  (ends 9/17).


 Card #3
TECHNIQUES

stenciling  (honeycomb), colored pencils (bee), heat embossing (bee), glitter glue (wings), masking (bee)


 Card #3
SUPPLIES 

bee stamp - Ching "Bumble Bee" #E1262
sentiment stamp - Stampin' Up! "Simple Delights" set (2007)
honeycomb stencil - Stampers Anonymous set #THMMM111
yellow ink - Stampin' Up!  "Daffodil Delight"
glitter glue - Stickles "Frosted Lace"


Thanks much for stopping in today!


September 09, 2021

SPARKLE BEE

Hello!


TECHNIQUES

heat embossing (honeycomb & bee), alcohol marker (light grey outline around bee), colored pencil (bee body), glitter glue (wings)


STAMPS

bee -  Ching #E1262 "Bumble Bee" 1992 (from a Ben Franklin store originally! gaging by the price sticker)
sentiment - Poppystamps #CL484 "Whittle Everyday" set
honeycomb background - JRL Designs Co. #V166 "Honeycomb"

OTHER 

circle dies - Spellbinders Nestabilities


 Playing along with the following Challenges:


Thanks for stopping in today!

September 01, 2021

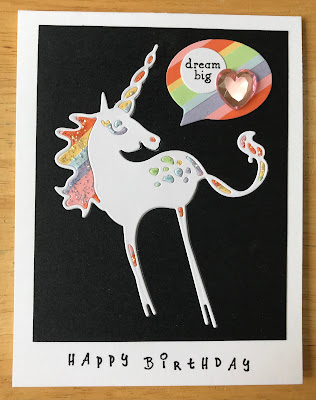
BIRTHDAY UNICORNS

Hello!


TECHNIQUES

heat embossing, die cutting, paper piecing

I laid down colored strips of cardstock on copy paper using double stick adhesive, then die cut.  I used the insert pieces on the card below.


STAMPS

birthday sentiment - Stampin' Up! It's Your Birthday set
sparkle sentiment - poppystamps Whittle Everyday set  #CL484
swirl background - JRL Design "Starry Night Swirl" #V145

OTHER

unicorn die cut - Jane Davenport set #JDD-006
embossing powder - Creations Unlimited "French Lilac"
star adhesive gems - park lane #1731-6605


And another version:


TECHNIQUES

 die cutting, paper piecing

this is the reverse cut-outs of the die cut image above.  sparkle glue applied to accent panels.


STAMPS

birthday sentiment - Stampin' Up! 2003
dream big sentiment - unknown

OTHER 

unicorn die cut - Jane Davenport set #JDD-006 
quote bubble die cut - Cricut Cuttlebug set #2003992
glitter glue - Stickles "Frosted Lace"


Playing along with the following Challenges:


July 15, 2021

SPARKLE BOUQUET

Hello!


STAMPS 

 Bouquet - Waffle Flower #271262 Bouquet Builder 5 with matching die

OTHER SUPPLIES

Markers are Copic
Sparkle is Zig Wink of Stella brush pen


TECHNIQUES

Alcohol marker coloring (inspired by Yana Smakula for this style), card stock scrap strip background (see Ingrid Blackburn's Youtube video titled "Not Trash! Clever ways to use paper scraps")


Playing  along with the following Challenges:

The Flower Challenge  (ends 7/25).

Thrilled to be honored with this!

Daisy Chain   (ends 7/26).


Hoping you have a beautiful day!
 

December 14, 2020

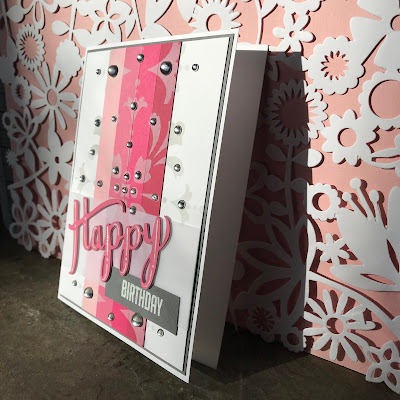
HAPPY BIRTHDAY MEDALLION

Hello all!


So inspired by a card in this style that Jennifer McGuire posted recently.  Hers was in blue tones so be sure and look for her more recent video on stenciling.


SUPPLIES

STAMP  Stampin' Up! Hooray It's Your Day set 
INKS  Stampin' Up! Going Gray (dye), VersaMagic Cloud White (pigment)
STENCIL  Complements Bastille Border #BL-795
DIE CUT  ekSUCCESS Word Set 
EMBELLISHMENTS  Hero Arts  #CH153 Smooth Clear Gemstones, flat back & mirrored
OTHER  Stampin' Up! White Detail Embossing Powder, Sakura white gel & sparkle pens


STEPS

1.  Trim white and gray cardstocks as shown to fit standard fold white card.
2.  Cut strips out of colored cardstock and adhere as closely together as possible on thinner paper.
3.  Trim striped panel to fit card as shown.
4.  Use low-tack tape to line stencil up over striped panel.
5.  Use blending tool to apply white pigment ink through stencil onto striped panel.
6.  Use low-tack tape to affix stencil in place over plain white cardstock panel, centering so your striped panel lines up where you'd like it to.  
7.  Use blending tool to apply light gray dye ink through stencil onto white panel.
8.  Die cut word Happy from two layers of white cardstock and one of pink.
9.  Adhere die cuts into a tight stack and highlight divet areas with white gel pen and sparkle pen.
10.  Stamp word Birthday on gray cardstock panel with pigment ink, sprinkle with white detail powder and heat emboss.
11.  Cut vellum strip to size, with enough to wrap around edges.
12.  Adhere panels together as shown onto white card.
13.  Apply gemstones to design as desired.


 This card was so rewarding to put together - hoping you get time to play too!


Playing along with the following Challenges:


December 04, 2020

BELIEVE

Holiday hello all!


Inspired by and playing along with the Challenges below:

Shabby Chic and Vintage Style


SUPPLIES

STAMPS  Hero Arts candles (partial: I omitted the flame portion),  Basicgrey flourishes, Stampin' Up! Harlequin background
DIE CUTS   Momenta #32265 R8
INKS   Distress Antique Linen, Memento Tuxedo Black, Staz-on White
MARKERS   Copic assorted greens
EMBELLISHMENTS   Jolee's Boutique flat back black faceted gems, random flat back reflective red gems, sheer gold ribbon, acetate sheet
CARDSTOCK   mirror gold, random white
OTHER   Pentel Slicci gold pen, Wink of Stella glitter brush pen


STEPS

1.  Trim acetate panel and score to side fold card size
2.  Cut 4 white cardstock panels to the size shown
3.  Stamp one white panel with harlequin background stamp and Distress Antique Linen ink
4.  Ink candles stamp with Memento Tuxedo Black ink (I omitted the flames) on previously stamped panel and again on scrap white cardstock
5.  Color the candles on scrap cardstock with black and gold pens as shown, and trim around each candle.  Adhere to image panel
6.  Color in the leaves with Copic markers and adhere flat back gems where berries are stamped
7.  Ink flourishes with black ink and stamp in desired pattern. Coat with Wink of Stella when ink is dry.
8.  Stamp large flourish in white Staz-on onto acetate cardfront
9.  Use make-up sponge to add ink to edges of cardfront with white Staz-on
10.  Apply ribbon as shown to image panel and along card fold 
11.  Die cut sentiment from mirror gold cardstock and apply over ribbon as shown
12.  Apply flat back faceted black gems as shown


 Thanks so much for being here!

November 15, 2020

FESTIVE BLIZZARD

Welcome!!


SUPPLIES

Stamp - word "Winter" Hero Arts #C3038
Die - Momenta Set #32265 R8
Stencils - American Traditional #BL-130 Snowflakes, Plaid Folk Art 6 Pack - Dots 
Ink - Distress Ink Stormy Sky
Embossing Powder - Creations Unlimited French Lilac
Cardstock - random 
Embellishments - random flat back crystals, sequins


STEPS

1.  Cut white cardstock to size. Tape stencil on top, using low-tack tape.
2.  Using blender brush, apply ink to white cardstock, starting in corner and fading out as you go.
3.  Remove stencil and wipe card panel down with pre-embossing nonstick pad.  
4.  Lay snowflake stencil in desired positions and apply Versamark ink direct from pad.  
5.  Sprinkle snowflakes with embossing powder and heat emboss.
6.  Run "happy" die and silver paper through diecut machine.  Apply to card with glue.
7.  Stamp "winter" only in blue ink on cardfront.
8.  Glue gems and sequins to white cardstock.
9.  Mount white cardstock to topfold blue card.


 Thanks for visiting and happy crafting!!

October 28, 2020

AUTUMNAL THANK YOU

Hello there!


(this kraft cardstock is lighter in person)

SUPPLIES

STAMPS - Stampin' Up! Artfully Asian set
INKS - Distress Oxide, Versamark 
PAPER - Neenah Solar White 110 lb, generic kraft
OTHER - white embossing powder, flat-back gems, liquid sparkle pen, blending brushes, heat gun for embossing


STEPS

1.  Trim kraft cardstock to fit white card front.
2.  Stamp border lines on kraft with Versamark and heat emboss with white powder.
3.  Mask border on both sides with Post It's, etc.  Stamp leaves in Versamark and heat emboss with white powder.
4.  Remask panel as above.  Using blending brushes, lay inks down in order shown.
5. Apply gems, and sparkle to leaves if desired.
6.  Stamp sentiment in darkest ink color.
7.  Affix kraft panel to white top fold card.
8.  Send card to your favorite person!


Thanks for stopping by - have a blessed rest of your day!  :o) 


November 25, 2019

Stolen Moments

I've always really loved these images.  I believe I got them in 2005. Their cuteness is timeless  :o)


Playing along with the following challenge:


STAMPS: 
penguins - Art Impressions (#G-3060 & G-3061), ice block - Stampin' Up! "Cold & Cuddly" set, phrase - Verses Rubber Stamps (#BB0411-C)

INKS: Memento Tuxedo Black, Distress Ink Faded Jeans, Stormy Sky, Weathered Wood and Black Soot

MARKERS:  Copic

OTHER: Stickles Silver Glitter, Sakura Gelly Roll white pen

1.  Stamp penguins once on white cardstock and once on Post-It notes for masking. 
2.  Place masks over penguins and stamp ice block.
3.  Cut snowline mask from scrap and apply temporarily over penguin masks.
4.  Starting with lightest ink sponge cardstock.  Follow with other inks as shown.
5.  Use black ink to stamp phrase.
6.  Dot white pen onto sky area.
7.  Remove all masking and color penguins in with markers. Shade as needed.
8.  Add glitter glue to ice block and allow to dry.
9.  Layer to white cardfront using foam tape.


Thanks for stopping by!
May you be blessed, and may you be a blessing...   :o)

November 06, 2019

Live Simply Flower


To get the stamen heads to show up better, I first applied white gel pen, and when that dried I colored over them with yellow marker.


Stamps: Stampendous "Garden Background" 2012 (#R137), Stampin' Up! "Trust God" set

Inks: Memento Tuxedo Black, Staz On Stone Gray

Markers: Copic

Other: Sakura white gel pen, Stickles Worn Lipstick


1. Use Post-Its to mask background stamp and apply grey ink; remove Post-Its.

2.  Stamp image in corner of card.

3. Stamp sentiment in open area (I say this from experience - if you color everything in and THEN stamp the phrase wrong it's all over LOL)
4. Use markers to color in the image (using white gel pen or acrylic on the stamen heads will help the yellow to show up better). 
5. Use the yellow marker to add dots around the flower head, white gel pen to add highlights, and Stickles highlight center of flower.


Thanks for stopping in!
May you be blessed and may you be a blessing...   :o)