Search This Blog

Pages

Showing posts with label Sympathy. Show all posts

March 05, 2024

1 SKETCH, 11 CARDS!

 I’ve had such a fun time in the studio playing along with this Clean and Simple challenge at AAA Cards Challenge that I ended up with 11 card variations in 5 different designs! Also joining in with Addicted to CAS  

If you love CARDMAKER CHALLENGE BLOGS too check out my sidebar >>>>>>>>>>>>>

where I've linked and listed by category lots of fun challenge sites to play along with!


UPDATE :o)


These were little stamps were great fun to play with!  I used a stamp positioner to add each one.  A stencil was used for the grassy hills. I added a bit of neutral gray alcohol marker to each critter.


SUPPLIES

critter stamps - Stampin’Up! set Furry Folk
Friends words - Altenew set Whimsical Herringbone
Together words are from Altenew/Hero Arts set Bloom & Grow
sun- Inkadinkado Kid Quotes set


I used some coordinating Memento Dewdrop colors and stamped each heart separately in a pleasing arrangement. There was a piece of fuzz on the words stamp that transferred to the paper but I was able to cover it by stamping the same quote on pink vellum and laying it directly over. The piece under the Love & Hugs is pink glitter cardstock.


SUPPLIES
heart stamps - Stampin’Up! I {Heart} Hearts set
quote on vellum panel -Altenew Well-Read set
black panel words - Creative Expressions Wordies Sentiment Sheets
love in red words - Stampendous set Every Occasion


I used three shades of blue Distress Oxide inks to achieve a gradient look to the tiles. I did a little experimental bordering around the tiles with a neutral gray alcohol marker.


SUPPLIES
graphic tiles - Stampin’Up! set Six-Sided Sampler
words - My Favorite Things Deepest Sympathy set


I used some Hero Arts reactive ink to stamp each element and when dry they have a bit of subtle texture.  


SUPPLIES
circular graphic stamps - Stampin’Up! Circle Circus set  
words on black panel - Tim Holtz Idea-ology Small Talk set 
words stamped in black - Altenew Across the Pond set  


The line for the pennant banner was handdrawn with a Micron finepoint marker.  I used a neutral gray alcohol marker to add a bit of dimension to one side of each flag.


SUPPLIES
pennants stamps - Stampin’Up! Pennant Parade set  
quote in blue - Inkadinkado Kid Quotes set 
words in arrow - American Crafts Jen Hadfield Home+Made set


Thanks for stopping by!


September 13, 2022

CAS ROYAL SYMPATHY

Hello!

Thoughts and prayers going out for all those who are mourning the Queen's passing. 

Sharing this card with the following Challenge:

#473  Black and White


TECHNIQUES

basic stamping (diamond background)
heat embossing (crown, words)
handcut (banner)


SUPPLIES

crown stamp - Hampton Art Carpe Diem clear set #LE5549
diamond background stamp - Stampin' Up! Looks Like Spring set
With Sympathy words stamp - random Stampin' Up!
inks - Versamark, VersaFine Onyx Black
white detail embossing powder


Thanks for stopping by today!


July 17, 2021

SYMPATHY FLOWERS

Greetings


STAMPS

Flowers - Stampinback

Sentiment - Stampin' Up! Heal Your Heart set

OTHER SUPPLIES

Embossing folder - Cuttlebug

Shimmer spray - Avery Elle Clear Shimmer Spray 


TECHNIQUES

Heat embossing, ink blending, dry embossing, fussy cutting
(Sentiment and large flower are pop dotted)


Playing along with the following Challenges:

Krafty Chicks  (ends 7/21).
Let's Squash It  (ends 8/1).
Simon Says Stamp   (ends 7/21).


More Mixed Media  (ends 8/1)


Great to see you here today!


January 28, 2021

ONE ITEM, MULTIPLE LOOKS! SERIES {#6} Featuring Flower Stamp

 Welcome to my new series One Item, Multiple Looks!  

 I'm really excited to inspire myself and others to

* explore and stretch the supplies we own 
* let go of anything we don't love
* choose wisely when repurchasing 
*  explore the endless techniques and styles available to us

I will be posting one new grouping featuring a different specific crafty item each week for at least the month of January or so.  To access all posts in this series just click on the topic One Item Multiple Looks! in the sidebar Index of Posts...  Hope you enjoy!

This week's item is a gorgeous flower stamp by Stampinback:


Blue on Kraft Card


SUPPLIES

STAMPS   flowers - Stampinback, words - Hero Arts Prayers Stamp & Cut  #DC183
INKS   Memento Tuxedo Black, Versafine Onyx Black, Versamark 
DIE   word - Hero Arts Prayers Stamp & Cut  #DC183  
EMBELLISHMENTS   random white enamel dots
OTHER   colored pencils, white gel pen, white detail embossing powder
CARDSTOCK   dark gray, kraft and white 


Let's get started!

STEPS 

1.  Cut cardstock panels to fit a standard white card in layers as shown. Set aside.
2.  Stamp flower in black Memento ink on kraft panel.  Stamp again on masking paper and fussy cut.
3.   Apply mask to stamped flower and overstamp side flowers. Remover mask.
4.  Use colored pencils to fill in flowers. Highlight with white gel pen.
5.  Use stamp positioner to stamp black outline again over main flower in Versafine ink.
6.  Run word die through cutting machine two times on white scrap cardstock. Use glue to adhere letters into a stack.
7.  Stamp words on gray cardstock with Versamark ink and heat emboss with white detail powder.  Trim into rectangles.
8.  Time to assemble!  Layer panels as shown. Adhere word die cut stack and word strips.
9.  Time to embellish!  Add enamel dots to panel.


Playing along with the following Challenges:


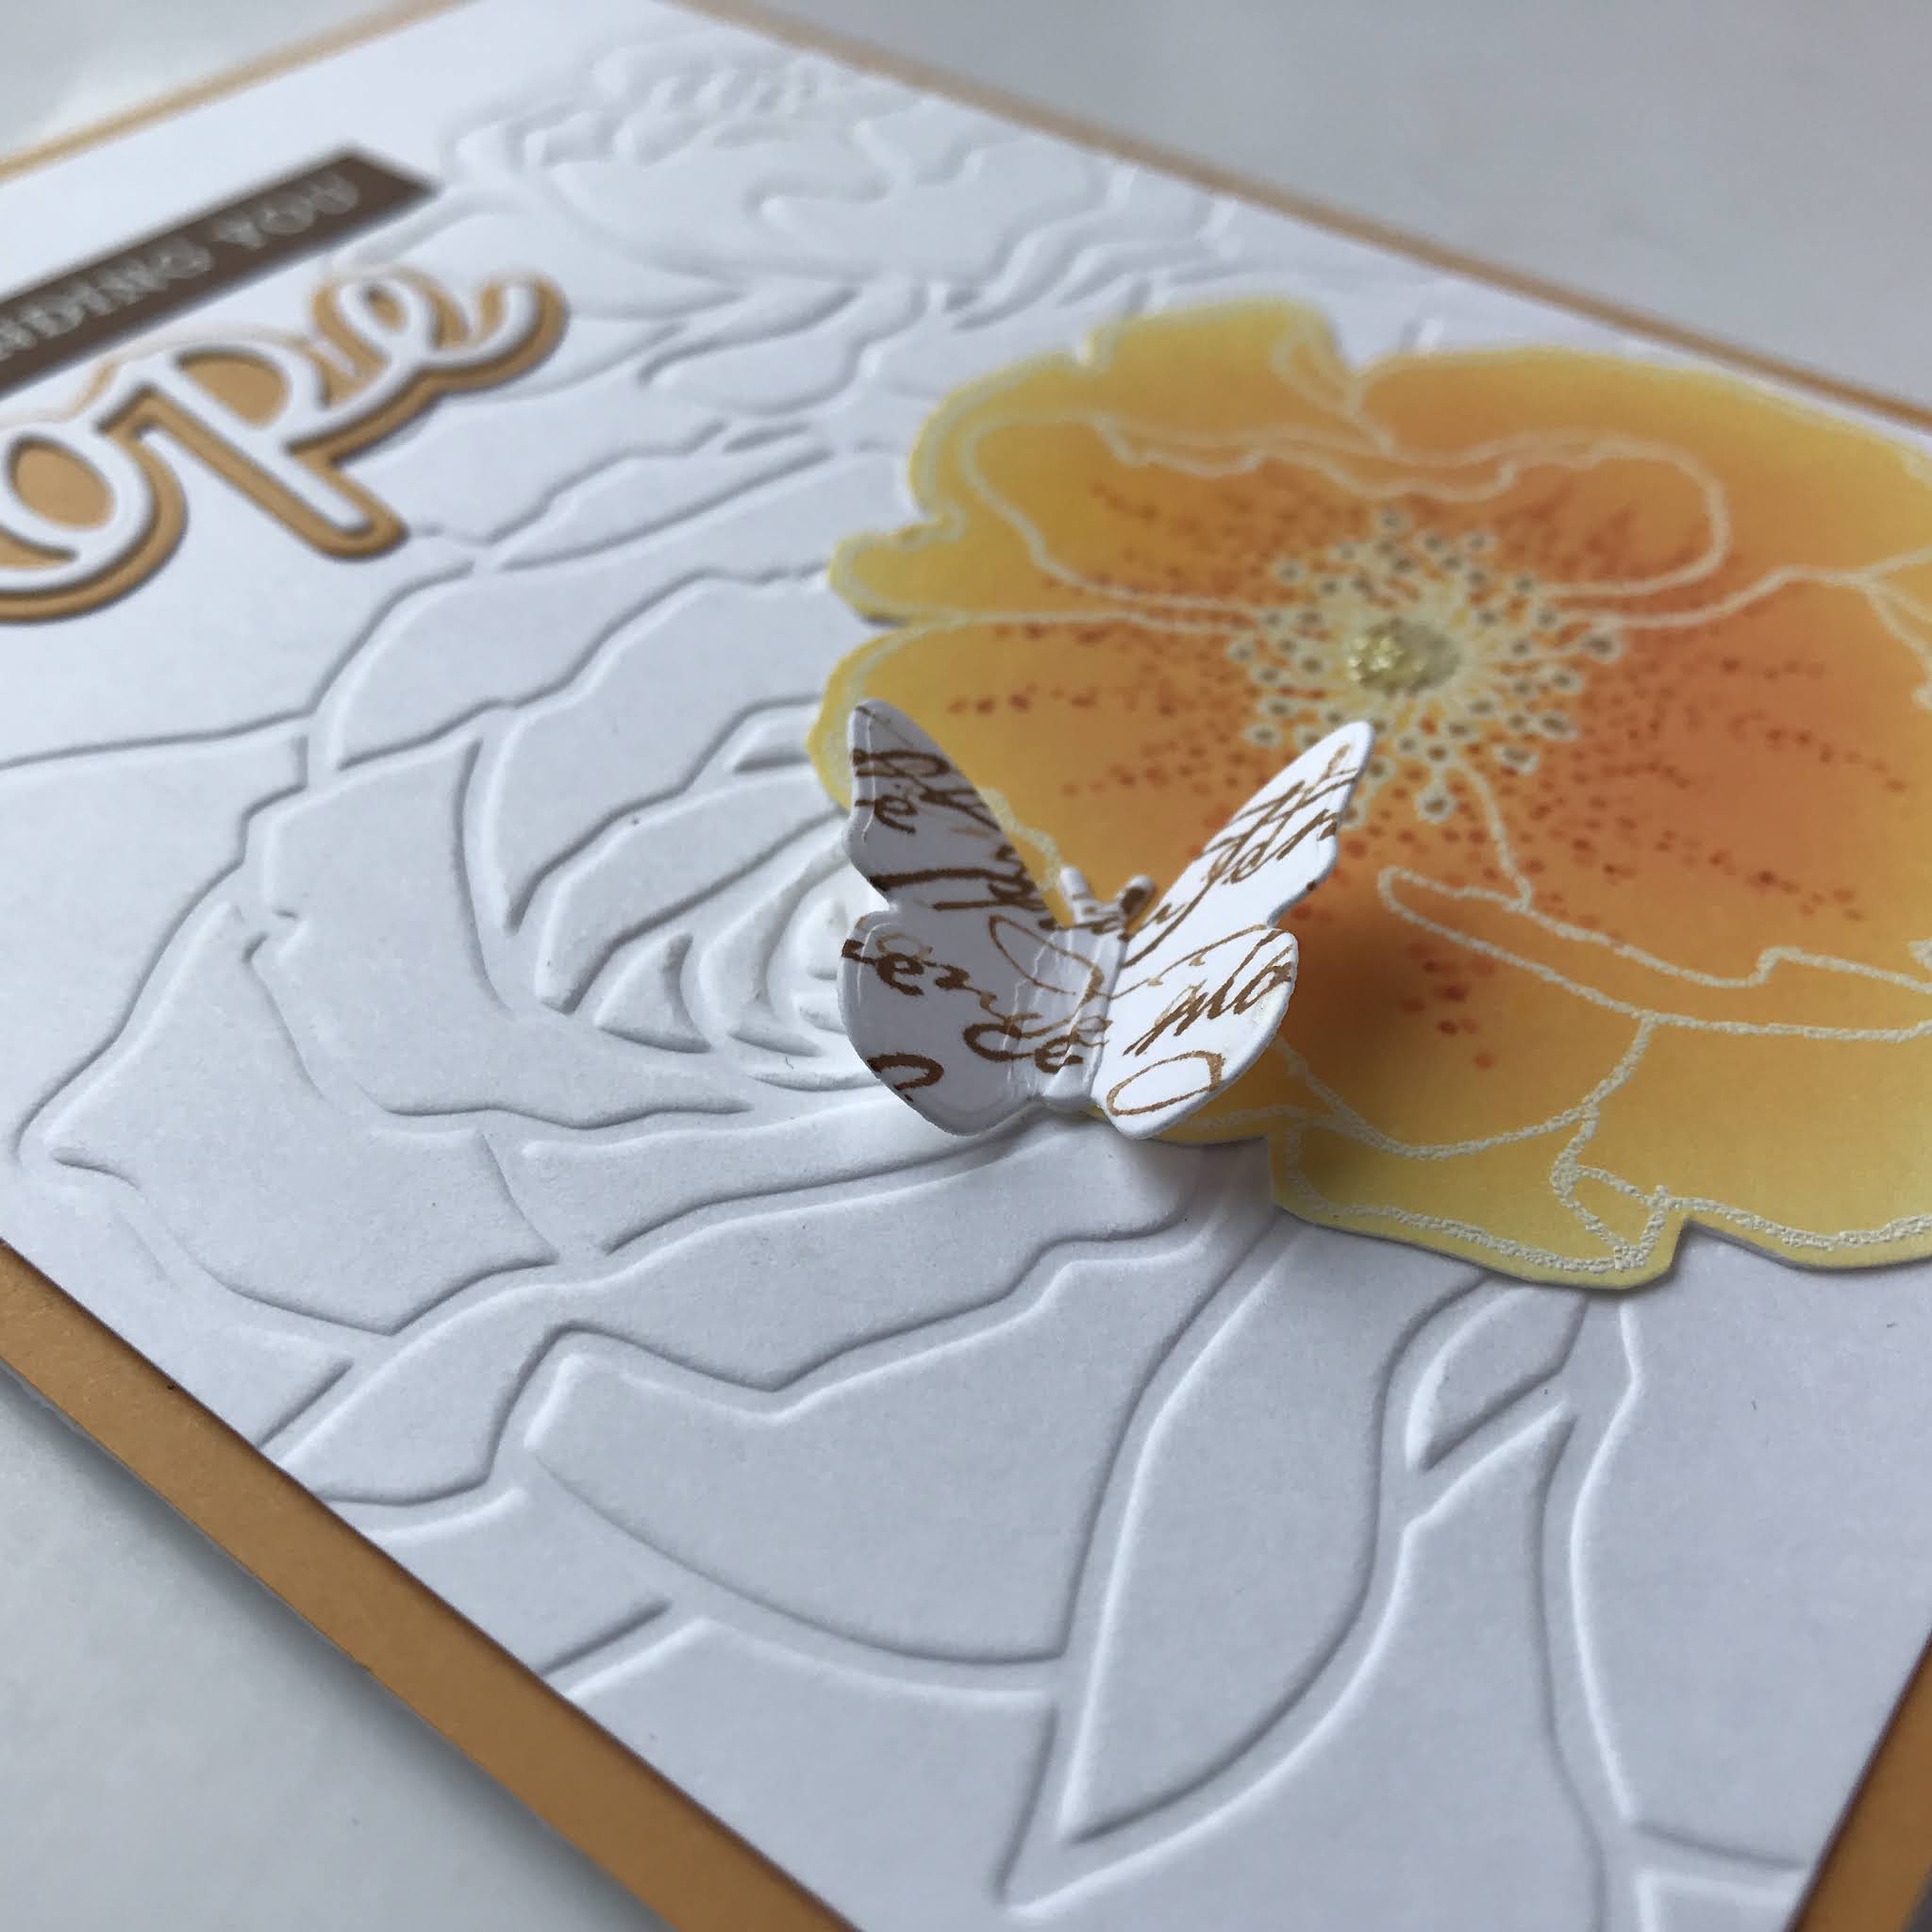
Yellow Hope Card


SUPPLIES

STAMPS  flower - Stampinback, greeting words - Hero Arts Prayers Stamp & Cut  #DC183, background words (on butterfly) - Stampin' Up! French Script
INKS  Memento Tuxedo Black, Versafine Onyx Black, Versamark, assorted Distress
MARKERS  Copic
DIE   Hope - Tonic Studios Will's Hand, butterfly - random
EMBOSSING FOLDER  Stampin' Up! 
OTHER   white embossing powder, glitter gel pen
CARDSTOCK  dark brown, mustard and white 


Let's get started!

STEPS 

1.  Cut cardstock panels to fit a standard white card in layers as shown. Set aside.
2.  Run white panel through embossing machine with flower folder.
3.  Stamp flower in Versamark ink and heat emboss with white detail embossing powder.
4.  Blend yellow and orange inks into flower as shown.  Highlight with markers and sparkle gel pen.  Fussy cut flower. 
5.  Stamp French Script in brown ink on white cardstock scrap. Run through die cut machine.
6.  Run hope through die cut machine with white and mustard scraps as shown.
7.  Stamp greeting with Versamark ink on brown cardstock scrap and heat emboss with white detail embossing powder.
8.  Time to assemble!  Adhere panels to standard white card base as shown.  Apply flower to bottom right corner. Mount butterfly by putting tape or glue only on the body.  Bend wings upward when dry.  Layer Hope die cuts and adhere as shown with word strip.


Playing along with the following Challenges:


Red Poppies Card


SUPPLIES

STAMPS  flowers - Stampinback, background words - Stampin' Up! French Script
INKS   Versafine Onyx Black, Distress Vintage Photo
DIE  Tonic Studios #1884e Will's Hand
OTHER   Nuvo Crystal Drops in Simply White, watercolors - Prima Art Philosophy Confections The Classics, white acrylic paint
PAPERS  vellum
CARDSTOCK  white, dark brown and antique cream


Let's get started!

STEPS 

1.  Cut cardstock panels to fit a standard white card in layers as shown. Set aside.
2.  Stamp flower head in black ink on lower portion of cream panel, and on masking paper.
3.  Apply mask to large flower head and overstamp tall flower stems. Stamp side flower stem on masking paper also.
4.  Leave mask on large flower, and apply mask to side flower as well.  Overstamp script in brown ink.
5.  Use watercolor and a small amount of water to color in flowers and stems.
6.  Splash white acrylic paint over panel.
7.  Run word through die cut machine with white and brown cardstocks. Glue layers together.
8.  Time to assemble!  Wrap image panel with vellum and adhere on the back side.  Adhere image panel to standard white card front.  Glue die cut word stack onto vellum.
9.  Time to embellish!  Apply crystal white drops to vellum.


White Love Card


SUPPLIES

STAMPS  flower - Stampinback
INKS   Versamark, Distress Dye
DIECUT  leaves - Sizzix Sizzlets #656064, label - Stampin' Up! Bigz Top Note #113463, word - Tonic Studios #1891e Will's Hand
EMBOSSING FOLDER   Stampin' Up! by Sizzix  
OTHER   Nuvo Crystal Drops in Simply White, Stickles Glitter Glue in Frosted Lace, white detail embossing powder
CARDSTOCK  white


Let's get started!

STEPS 

1.  Cut cardstock panel to fit a standard white card in layers as shown. 
2.  Run white panel through embossing machine for base layer background.
3.  Run white cardstock scraps through die cut machine once for label and leaves, and two times for the word.
4.  Glue words together. Apply glitter glue to word stack.
5.  Stamp flower head in Versamark and heat emboss with white detail powder.
6.  Blend ink onto flower. Fussy cut.
7.  Apply glitter glue to center of flower, and white chrystal drops to the stamens.
8.  Time to assemble! Adhere panels as shown.  Trim some leaves as desired and adhere them underneath the flower.  Glue die stack down as shown.


Playing along with the following Challenges:


Thank you so much for visiting!  I hope you enjoyed, Nancy J


February 11, 2020

1 Stamp, 2 Looks * Floral Cornucopia


SUPPLIES:

Stamps - Stampendous flower arrangement, Stampin' Up! sentiment
Inks - Versamark, Memento Tuxedo Black
Markers - Copic
Other - flat back rhinestones, black detail embossing powder, acetate card (I have heard good things about Hero Arts' but I just used a transparency sheet I had on hand), Gina K. Connect glue

TECHNIQUE:

1.  Stamp image in Versamark onto white cardstock. Emboss with black powder.
2.  Color in image with Copic markers, including pale blue around image. 
3.  Stamp sentiment
4.  Apply rhinestones
5.  Trim image as shown, and cut 3 more pieces of white cardstock to match size.
6.  On acetate card, mount image panel to cardfront, another on the reverse it on the inside cover, and the same steps for the inside and back of the card.


Playing along with TTCRD Anything Goes


Another card with warm tones instead of cool:


SUPPLIES:

Stamps - Stampendous flower arrangement, Stampin' Up! sentiment
Inks - Versamark, Stampin' Up! brown
Markers - Copic
Other - flat back half pearls, gold detail embossing powder, Gina K. Connect glue, tan/ochre watercolor, white gel pen, Wink of Stella sparkle pen

TECHNIQUE:

1.  Stamp image in Versamark onto white cardstock. Emboss with gold powder.
2.  Watercolor around image and scrunch paper up if it refuses to dry flat!  Edge with brown ink pad.
3.  Color in image with Copic markers. Highlight with white gel pen and sparkle pen on main flower.
4.  Stamp sentiment in brown ink.
5.  Apply half pearls


Thanks for stopping by! 
May you be blessed today, and may you be a blessing...

Nancy