Search This Blog

Pages

Showing posts with label 3D / Mechanical. Show all posts

December 21, 2021

SCENIC SHAKER CARD

  Welcome to this 29 day series of Christmas cards for the 2021 holiday season, so glad you're here with me.  Hope you get lots of inspiration and entertainment right up to Christmas day!  


Lots of foam mounting is key here!


TECHNIQUES

ink blending (base card)

shaker card (lots of tutorials available online for making these - I should've followed one closely instead of winging it LOL but I was able to use up some inked scraps from the deer card posted earlier :o)


SUPPLIES

scene stamp including sentiment - Stampin' Up! undated/title unknown
inks - Versafine Black, Distress Oxide Chipped Sapphire and Faded Jeans
sequins and beads - random


Sharing this card in the following Challenges:


Thanks for visiting here and I will see you again tomorrow!


January 03, 2021

ONE ITEM, MULTIPLE LOOKS! SERIES {#2} Featuring Girl on Swing Stamp

 Welcome to my new series One Item, Multiple Looks!  

 I'm really excited to continue to inspire myself and others to

* explore and stretch the supplies we own 
* let go of anything we don't love
* choose wisely when repurchasing 
*  explore the endless techniques and styles available to us

...and along that note, I'll be sharing exactly what I used and how.  But I use what I have and so, in the supply list, I'll offer alternatives to specific supplies listed wherever substitutions come to mind.

I'll be posting one new grouping featuring a different specific crafty item each week for at least the month of January.  To access all posts in this series just click on the topic One Item Multiple Looks! in the sidebar Index of Posts...  Hope you enjoy!


This time I have a slim line, a mechanical pendulum, a CAS and a no-occasion happy card for you. I chose a rubber stamp image this go around that's close to my heart!  It is from one of my own sheets years and years ago, but I don't recall if ever stamped with it.  Raise a hand if you can relate to unused stuff in your stamp space?! (If you have interest in this stamp there is info in the sidebar under Rare Image Rubber Stamps.)


Below are a video, all the details, supplies and steps.  Let's jump in!


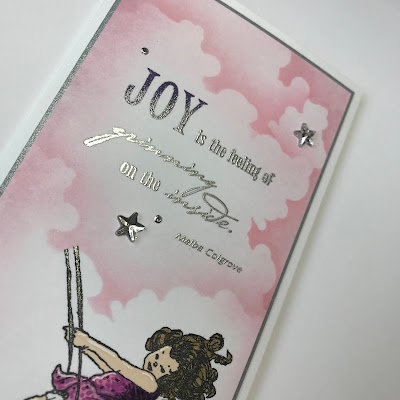
SLIMLINE CARD


SUPPLIES

STAMPS  girl on swing stamp - Rare Image Rubber Stamps, quote - Fiskars Cloud 9 Design Simple Thoughts "Laughter" set
INKS  Versamark, Distress dye, Memento Tuxedo Black 
MARKERS  Copic (alternative: you can use any marker that is compatible with the black ink you choose)
STENCIL  A Colorful Life Cloud Edger (alternative: any cardstock cut with a scalloped edge)
EMBELLISHMENTS  stars - Duncan Enterprises for PSX paper, rock, scissors "Extras" set, silver circles - Stampendous Diamond Dot stickers (alternative: silver pen or enamel dots in a bottle)
OTHER   silver detail embossing powder, Sakura glitter pen and white gel pen, Spica pen "Sand"
CARDSTOCK  Neenah Classic Crest Solar White 110 lb, matter silver (Substitution: a metallic silver paint pen to edge image panel)


Let's get started!

STEPS 

1.  Cut cardstock panels to fit a slim line white card in layers as shown. Set aside.
2.  Use a blending brush or sponge/foam to apply pink dye ink onto white panel, using the cloud stencil. Edge the sides, and wherever else you want some depth, with the same ink.
3.  Allow panel to dry, then stamp first word in purple dye ink. Allow to dry.
4.  Using a stamp positioner, stamp full phrase in Versamark, going only halfway up Joy lightly.  Cover with silver detail powder and heat emboss.
5.  Use a stamp positioner to stamp girl image at edge of cloud with black ink.  
6.  Color image with markers.  I used a silvery glitter pen to color the swing, and a goldish glitter pen to go over here hair.  Add white highlights as desired.
7.  Time to assemble! Adhere image panel to silver panel, and silver panel to white slimline card front.
8.  Time to embellish!  Apply flat back gems and stickers wherever you like them best.


Playing along with the following Challenges:

(this Colorful Life cloud edger stencil is new to me)


(this Colorful Life cloud edger stencil is new to me)


PENDULUM CARD


SUPPLIES

STAMPS  girl on swing stamp - Rare Image Rubber Stamps "Children" sheet, tree - RIRS "Garden" sheet, quote - Fiskars Cloud 9 Design Simple Thoughts "Laughter" set
INKS  Versafine Onyx Black 
EMBELLISHMENTS  twine, Ranger 3D Gloss
OTHER   colored pencils, foam dots and tape
PATTERNED PAPER  unknown (Stampin' Up! if I had to guess - it's been around a long time) (alternative:  stamp your own background, or draw marker lines on white panel)
CARDSTOCK  Neenah Classic Crest Solar White 110 lb


STEPS 

1.  Cut patterned paper panels to fit a standard white card in layers as shown. Set aside.
2.  Using black ink on white scrap cardstock, stamp girl once, and tree three times. Stamp girl on scrap patterned paper also and trim out dress.
3.  Using color pencils, color in trees and the rest of the girl.  Glue dress in place. Apply glossy accents to shoes and allow to dry.
4.  Fussy cut girl and apply twine with glue over rope lines. (Tie knot in the end of the twine for a more realistic look  ;o)
5.  Fussy cut trees, cutting one in half.  
6.  Here's where it can get tricky if you want the image to move like a pendulum.  My best advice is go to Jennifer McGuire's blog, search "pendulum card", and follow her instructions to a T; she is a genius and it would be foolish for me to think I could explain the process better. (I glued the top of the swing ropes to a small circle of heavy cardstock to attach to the foam dot that moves).
7.  When you have the girl cutout placed where it can swing freely, adhere the tree parts to the card as shown.  Fold the upside down center one on the top over the top edge of the card as needed to hide your foam tape.
8.  Using black ink, stamp phrase where it looks good.
9.   Adhere striped image panel to flowered patterned paper, and then this panel to a standard white card front.


Playing along with the following Challenges:


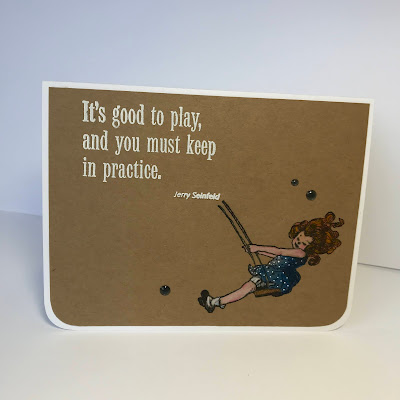
CAS on KRAFT CARD


SUPPLIES

STAMPS  girl on swing stamp - Rare Image Rubber Stamps, quote - Fiskars Cloud 9 Design Simple Thoughts "Laughter" set
INKS  Versamark, Versafine Onyx Black 
EMBELLISHMENTS  Cloud 9 Design Bluebell Raindrops (alternative: enamel dots in a bottle)
OTHER colored pencils, white detail embossing powder, Sakura white gel pen, glaze pen in yellow
CARDSTOCK  Neenah Classic Crest Solar White 110 lb, kraft (Substitution: a common paper grocery sack)


STEPS 

1.  Cut kraft panel to fit a standard white card in layers as shown. Trim bottom corners on both.  Set white card aside.
2.  Using black ink, stamp girl towards corner. Allow to dry.
3.  Using Versamark, stamp phrase near top of card. Heat emboss with white detail powder.
4.  Using color pencils, color in image.  Highlight dress with white gel pen and hair with yellow glaze pen.
5.  Time to assemble! Adhere image panel to white card front.
8.  Time to embellish!  Apply blue flat back gems wherever you like them best.


Playing along with the following Challenges:


NO-OCCASION HAPPY CARD


SUPPLIES

STAMPS  girl on swing stamp - Rare Image Rubber Stamps, quote - Fiskars Cloud 9 Design Simple Thoughts "Laughter" set, background flower stamp - unknown (unmounted - please let me know if you know who made this) (alternative: stamp random flowers and leaves all in the same ink color to achieve a background look)
INKS  Memento Tuxedo Black, Stampin' Up! Going Grey
MARKERS  Copic (alternative: you can use any marker that is compatible with the black ink you choose)
DIE CUT  Stampin' Up! Framelits Labels Collection #125598, Sizzix Sizzlets Flowers, Branches & Leaves set  #656064
OTHER   Sakura glitter pen and white gel pen
CARDSTOCK  Neenah Classic Crest Solar White 110 lb, scraps and snippets of colored cardstock - I believe the textured is Bazzill) (alternative: use a petite pattern to emboss flat cardstock before die cutting flowers)


STEPS 

1.  Cut white cardstock panel to fit a standard white card as shown. 
2.  Use grey ink to stamp a floral background stamp on white panel.
3.  Use black ink to stamp phrase on white cardstock scrap. Die cut into label shape.
4.  Die cut flowers and stems from various colors of scrap cardstock.
5.  Use black ink to stamp girl image on white cardstock scrap. 
6.  Color image with markers. Highlight dress with white gel pen and hair with silvery glitter pen.  
7.  Fussy cut little girl image.
7.  Time to assemble! Adhere background image panel to white card front. Use foam dots to adhere components as shown.
8.  Time to embellish!  I forgot this part - a flat back gems or enamel drops in white would look great.


Playing along with the following Challenges:


Thanks so much for swinging by! 
I couldn't resist, and I'm not even sorry ;o)

Nancy

February 11, 2020

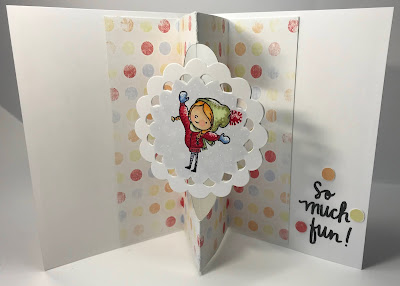
Snow Day Spinner Card


(See video below to watch spinner inside actually spinning)


SUPPLIES:

Stamps - Crate Paper SNOW AND COCOA
Ink - Memento Tuxedo Black
Markers - Copic
Die Cut - Stampin' Up! Sizzix Big Shot Bigz L PERFECT PENNANTS
Patterned Paper - unknown
Other - Ranger Accents in white, Sakura Gelly Roll white gel pen


TECHNIQUE:

1.  Die cut 3 scalloped circles from white cs
2.  Stamp each circle with a different child and color with markers.  Use gray marker to color in open space and add white gel pen highlights.
3.  Affix patterned paper to white card front.  Adhere one circle with image, stamp sentiment in black and highlight with white dot accents.
4.  For best results on inside of card refer to spinner card videos on YouTube - Jennifer McGuire is a mechanical card genius! The main thing is to make sure your circle cut from the inside patterned paper will freely accomodate your spinning feature. The second most important is that the spinning circle won't hang outside the card when folded for mailing.
(TIPS:  Hold off on cutting the length off your patterned paper till you know how much you will need when it is folded.  You may need to reinforce the patterned paper section with light to medium weight cardstock.  Be sure to have the panel lying flat when you attempt gluing the thread on the inside fold top and bottom as it will need to dry flat and stretched straight.) 
5.  Stamp sentiment on inside of card as desired.


Thanks for stopping by!
May you be blessed today, and may you be a blessing...

Nancy


March 12, 2009

Exciting news...

...for you if you love the Rare Image Rubber Stamps GARDEN sheet! Check out the Stamp Something blog March 13 and on for the fun!! :o)
Here's a shadowbox card I just finished up featuring both the RIRS GARDEN and PETS sheets images. I've been so inspired by Pat Moore's art on the RIRS site that I wanted to start stamping some scenic artwork again. The shadowboxes can be a little putzy and you have to concentrate when you're measuring and cutting LOL but when they are finished I really get a kick out of having these little dioramas sitting around on my desk for a bit. I have a few more I finished last year and had thought they were on my blog but I couldn't find them anywhere. I'll post the three of them here in the next few days...


Card measures 3 1/2" square and 1" deep


STAMPS: cat, birdbath and tree - Rare Image Rubber Stamps, path - V.I.P., cottage - PSX, mountain scene - Comotion, large grass - All Night Media, small grass - Stampin' Up!
INKS: Adirondack Willow, Lettuce, Pesto, Sandal, Latte, Stampin' Up! Bashful Blue
SUPPLIES: stamp positioner, ruler, pencil, eraser, stipple brushes, colored pencils, Flower Soft, Exacto knife, Micron 02 black finepoint marker
NOTES: see below


I generally start scenic work by drawing the approximate size of the finished piece on paper, and then stamping the images I'm planning to use so I can see how it fits together.


After I measure the cardstock for the total piece and mark where score lines go, I draw my opening and trim around it with an Exacto knife.


At this point I usually stamp the scene on the inside panel and if I screw it up (like this time LOL) I just stamp it on a matching piece of cardstock trimmed to fit. I like to continue part of the scene onto the inside side panels so the card looks good from an angle (and I do the outside side panels a bit too, if I'm not too lazy ;o)
For any areas that don't match up perfectly, or there is blank space, I use the finepoint black marker to add what's needed. A good example is the continuing line of the path on the frame area - once the card was folded together I drew in some grasses to continue the path stamped on the inside so it would look like it was coming into the forefront. This is where I also added the Flower Soft to start on the frame and draw the eye into the scene.

To apply color, I used the lightest colors and applied them with Airebrush stipple brushes, then filled in darker using the same and colored pencils. I kept a mask over the cat the whole time to retain the crisp white.


Hope you enjoyed - now go check out Stamp Something!

September 13, 2008

Hello!

oh my goodness, it's been so long since I posted I almost forgot my blogger password!! LOL I kind of lost my stamping mojo for a while there. But I'm back and feeling like playing with ink and stamps!

In a nutshell, here's what I've been up to since last post: I made sample cards for the upcoming Technique Junkie newsletter in October, I made a Pineapple Upside Down cake, I cleaned the garage, I planted an herb garden by my back step (photos coming!), I got stung on the top of my foot by a bee, I had the chance to rescue a baby cardinal with a bad wing and take it to the Wildlife Rehab Center, I played with the neighbor's cat as usual and got a nasty cut on my eyelid and two more on my cheek, I completely emptied and restocked our antique booth, I rearranged some stone borders around the yard to get ready for planting more in the back yard, and did a lot of just regular old make the house payment work.

Okay, on to a card I just finished!

(click on photos for more detail - sorry the black bkgd washed it out a bit, figured it was better to photograph rather then scan this card because of the 3D nature
)


....and here's the card below that I picked up at a used stamp sale and dismantled so I colud make my own, only to Google and find there is a perfectly good template for it on SplitCoastStampers!! LOL Here's the link for you in case you want to play.


No designer paper was harmed in the making of my card ;o) although using it versus hand-stamped cardstock would probably make it easier to fold and better for mailing.

I had also picked up this green, brown and white ribbon when I bought the sample card and felt like playing with those colors, so the inks on my card are Stampin' Up! Kiwi Kiss, Close to Cocoa, Creamy Caramel, and Colorbox White ink.

I started by stamping various flowers from SU's Spring Solitude set in the brown and green inks on caramel cardstock. Then I used the corresponding wheel to add flowers in white. I used my Scor-Pal to make the score lines, then folded as shown. I used a sponge and Caramel ink to highlight all the edges. The flower applied to the dress is from a punch. I put the flower in my palm and pushed a rounded pen cap into it to make it concave, then added a green flat backed gemstone.

I thought about putting the dress on white, but then thought why not a color? So I stamped the words Diva (unmounted and unmarked) then filled in the open area with a white gel pen, and Mood Du Jour with phrase (Inkadinkado, Mood Du Jour set by Dawn Houser) in the Kiwi ink on pale blue cs, using a stamp positioner. I stamped the faces, also from the Mood set, in Kiwi on white scraps, punched them out, and edged them with Caramel ink and a sponge. I had a scrap from the dress background so I used that behind my main image face, which is pop-dotted.

Not sure where I got the hanger, Savvy maybe?, but I'm sure they are around at the stamp and craft stores. I used Glue Dots to tack it down behind the dress straps.

I just stamped the stemmed plant on a background linen-textured white cs, using the Cocoa ink, and layered all as shown, adding a row of more green gemstones to the bottom corner.

Careful if you try this dress - it's so much fun I just wanted to make more, but work calls!! I want to go tweak the shop and add a few bulky items while I have some extra space to work with LOL!


July 13, 2008

Wiper Card for a Wedding Couple

UPDATE!
Yay! and thanks to Nancy Y for sending me the link to a tutorial on this card!!
For anyone wanting to make your own, check out this blog: STAMPS, PAPER, SCISSORS It should be halfway down the page and is titled Wiper Card (I'm guessing because the tab swishes up like a windshield wiper blade) ((Cheri, if you need a demo of this on an actual vehicle just c'mon over ROTFLMBO oh, I crack me up ;o)) Be sure and click on WIPER CARD in the righthand column of her blog for a template with instructions!!!

Here's a mechanical card I bought in a box of samples at a stamp sale earlier this summer. Isn't it cool?! It uses two sheets of 3 1/2" x 8 1/2" cs, scored and attached at the end panels. The crab panel moves to the right so it'll close and lay flat. The coolest part, besides the googlie eyes, is the little panel that pops up from the inside as the card is opened (that would be in a long strip with both panels lying back to back). This type of card is best in person because it's so fun to play with!

So this was my inspiration for a casual wedding card for friends that recently tied the knot (don't look any further Krista if you want to be surprised! LOL)


the inspiration card:

Click photos for more detail

and here's mine:

Card closed measures 4 1/4" x 6"


I made my card a little larger to suit the stamp I was using for the main panel.


I've had a bad headache for a couple days so my method on this one was a little scattered ;o) I think I decided on the card format first, then the colors I wanted to use, then the technique, then the stamps. I think ;o) LOL

Anyway, I meant to use the Technique Junkies "Stippled Pigments" technique from the Dec 06/ Jan 07 newsletter, but needed to change so much it ended up totally different than I was picturing. I knew I wanted to emboss in white and add color later so that's what I did, starting with white cs. The color comes from using a Dreamweaver stencil brush and Versamagic Dewdrop Chalk inkpads. All colors used were Pink Petunia, Malted Mauve, Perfect Plumeria, Sahara Sand and Jumbo Java. I love how chalk inks settle into the cs and blend so well as they are drying.

One thing about putting the chalk inks over the white embossing - it tends to color the white and is hard to rub off thoroughly so I used a paper stub with some alcohol to remove the chalk coloring from the embossing. Sounds putzy but it goes quick!

I stamped the flower in the Jumbo Java repeatedly and accented the flourish (all stamps are from the Stampin' Up! set "Baroque Motifs") with a Tombow dark brown fine-tip marker. I used adhesive flat-backed Crystal Stickers Pearls (from Archiver's) as accents. I realized too late that I had a need for two halves on the edges - so I thought they're cheap enough, I'll try to cut one in half! I could hardly believe it worked!! I have to say, you CANNOT beat Tonic cutting tools! LOL The edges looked raw as they weren't pearlized so I used used some liquid pearl on them. I rounded two of the corners because it looked a little harsh.

The half circle slit punch is from SU. I put a brown rivet in the center and threaded a ribbon thru as shown (ribbon is from the dollar bin at Michael's, where a certain friend of mine says it's where bad ribbon goes to die LOL, but we always manage to buy some! This is good stuff - as it's reversible, pink on one side, brown on the other.)

The background is second-generation Jumbo Java, as is the medallion on the pop-up panel. Oops, I guess the Congratulations is a Anna Griffith stamp.

I wish I had a tutorial page to lead you to on the card format - the original card was from a Stampin' Up! demonstrator so if anyone knows of an original source please let me know and I will definitely want to give credit where credit is due - thanks!

February 16, 2008

Shadowbox Bird

I had a really tough time getting a decent photo of this 3D card, so I apologize for the shadows.


Trust me! This is one where you really want to click the second photo below to see the background close up, and other details...


(open view)


(closed view for mailing)


Card lying flat measures 4 1/4" x 5 1/2"


Before I start describing the process let me just say I was inspired to make card after Lisa S., a TechniqueJunkie designer, posted a beautiful card with this shadowbox form to the email group, and provided a link on her blog to the directions at SCS here. The beauty of this template is that the card folds perfectly flat for mailing and fits in a regular size envelope!

Almost all stamps are from a bird sheet (Time To Stamp) from I Brake For Stamps. I followed the directions in the link above, which are SO easy! The card just consists of a blue piece of 4 1/4" x 5 1/2" cardstock for the front, and a white one of the same size for the back, and they are only joined on the last 1/2" on each end.

*tip*
Avoid scoring until you have stamped the front and your ink will lay better.

I wanted a rustic birdshell look to the front, so I started with blue cs, stamped Stampin' Up!'s Linen background on it in Adirondack Mushroom, then overstamped this with SU's splatter bkgd stamp using white pigment ink (the best brand for this being Colorbox).

I didn't have an oval cutter so I punched a large oval out of cs (using an Emagination Crafts Inc. punch), laid it down on the cardfront, traced it with pencil, and then trimmed it out with a small blade scissor.

*tip*
If your cutting isn't perfect, sponge around the opening and layer embellishments over the horrible spots.

My cutting was pretty good LOL but I sponged Mushroom ink on the oval edges and outside card edges for definition. I stamped the images shown right over the background in Mushroom and SU Mellow Moss, and stamped other images on white scraps using SU So Saffron also and trimmed them out. The eggs were stamped on the oval I removed from the center, cut out and applied to the nest. The paper flower and leaves are connected by an antiqued flower brad and held down with a glue dot (if I put the brad thru the cardstock it might rub a dark spot on the white when going thru the mail).

For the inside I stamped the images as shown, going all the way to the top, bottom and side edges so that no matter how the card is tilted the entire inside is covered. To get the swirlies on the bird, after I had inked the solid stamp with Mushroom, I pressed the uninked rubber of the leaf stamp onto it, removing some ink and leaving a pattern. Then I just scored both pieces, folded and taped the very end panels. Sounds complicated - super easy!

Thanks for looking!

December 11, 2007

OT - Under the weather

Sorry for the lack of a post today - not feeling the greatest at the moment. Just wanted to pop in and give you a link to a great blog I found just now that has ornaments like I mentioned in yesterday's post!

http://papertrufflez.typepad.com/paper_trufflez/2007/12/goin-ornamental.html

December 10, 2007

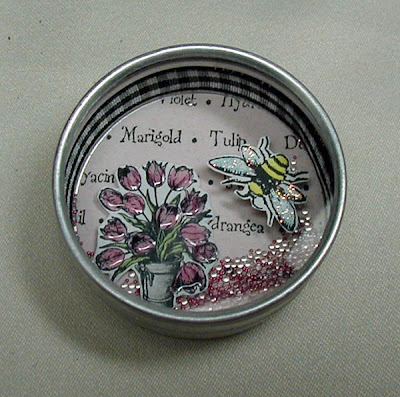
Shadowbox Magnets

Hope your weekend was a good one. I probably should have wrapped up my Christmas shopping but it was so cold I felt like doing catch-up work here in the house most of the time instead!

One of our first Christmases as a newly-married couple we cut large stars out of corrugated cardboard and decorated them with beautiful ribbon bows, tearing some of the top layering off to reveal the corrugation (in an artsy way!), and highlighting them with glitter. The basic color-scheme was red, gold and kraft. But the special part was, inspired by my Grandmas's tradition of ordering christmas ornament balls with everyone's name on them and hanging them on the tree each year, we spelled everyone's name in glitter, one per star.


Now it might sound tacky, but it actually made for a beautiful tree, with all that gold and red and the kraft against the green of the tree, and some white lights. I think we filled in with different-sized traditional red ball ornaments.


We still use those ornaments and I can't tell you what a treat it is to go find "your" ornament, especially for the kids. It gives a great sense of continuity year after year. Fortunately we made about twice as many as we had names for originally so we've been able to add names to those as there are new additions.

The shadowbox magnets below were featured in the RubberStamper magazine earlier in the year, but I thought I'd share them again because I got to thinking what awesome Christmas tree ornaments you could make...

This shadowbox-style ornament could become a cool new tradition, with everyone getting to make their own, putting in whatever is important to them that year, then signing and dating on the back. The general make-up is a background circle, a cut-out image or two pop-dotted, a ribbon around the inside edge and something to shake (sand, microbeads, etc). Just add ribbon around the outside with a loop for hanging. These containers can be had really reasonably priced at a Joann's or Michael's, usually in the wedding aisle as favor boxes.

A great time to make these would be when everyone is sitting around after Thanksgiving turkey, too full to do anything but sit! It would be best to have circles pre-cut and stickers, etc. available for those who want to put about five minutes into one and then watch the game :o)


Tins measure about 2" across and 1" deep


Just a few notes:

You can add dimensional glue or glitter to parts of your image for extra shine as in the flower one, or magnet words as in the ocean one.
Tape or glue the stamped circle of cardstock down firmly as that is your base for the other elements.
I think I used very tacky double-stick tape for the ribbon on the inside, as glue can tend to discolor ribbon and give a lumpy look.
Be sure to put glue along the threads on the inside of the lid and twist it shut when you have it the way you like.

I'd like to make some Christmasy ones and if I can get some done I'll post them.

Thanks for looking!


November 26, 2007

Stand Up Santa & Friend

Here's another stand up card by way of the Deerfoams box inspiration (see Saturday's post):


Card standing measures 7" across x 6" high to top of image panel x 2" deep.

You'll be so proud of yourself after you make this card you'll want to just put it on your own mantle instead of sending it off to a lucky recipient for Christmas ;o) But if you do send it out, it will fold flat.


I really really REALLY suggest (strongly! >;o) that you make yourself a practice template like the one below (click photo for larger view) first and hang on to it for a refresher when you want to make a new one. It's SO much easier if you don't have to remeasure everything.

*tip*
I keep a 3-ring binder for all the mechanical/3D cards I have made or would like to make. For each seperate type, I slip the pages of directions in a sheet protecter and the template and/or a sample card featuring it behind these so I can just flip thru it for instant inspiration.


You can start with a piece of patterned paper and adhere it to cs for strength or make your own base piece like I did here. I started with an 8 1/2" x 11" sheet of off-white cs, planning to trim it down as needed.

I wiped a Distress ink pad in Peeled Paint on a nonstick pad, then spritzed it with water. I laid the cs down on this and lifted off to dry. It needed more interest so I use a Distress ink pad in Frayed Burlap and ran it randomly over the paper, starting at the tall end and coming downwards with it. Still not right so I took the Frayed Burlap pad, swiped it on the nonstick pad lightly, and then poured a puddle (about quarter size) of Irredescent Watercolor Medium, mixed with some water, onto the pad and used a rubber brayer to mix it all together and roll over the background paper. This added a faint sparkle that shows up close and browned the green more evenly.

*tip*
The reverse of the bkgd cs will show a bit so I like to give the back side a wash of the color I'm using.

I stamped 2 different PSX Poinsetta stamps over the bkgd using Frayed Burlap and then the Background Text-Thin stamp (A Stamp in the Hand) in Brilliance Galaxy Gold.
After the bkgd was completely dry and flat, I trimmed it to 7" x 11". I flipped it decorated side down and drew pencil lines the short way at 1" (A), 4" (B), 6" (C) and 9" (D), and then scored these, still on the reverse. Then I drew the same type of lines at 5" (E), 7" (F) and 8" (G) without scoring or cutting. I turned the piece sideways with line A at the far end and focusing on the area between line B and D I drew pencil lines at 1 1/2" (H), 3" (I), 4" (J) and 5 1/2" (K). I know this seems tedious and confusing at the same time but you're almost there!! ;o)

I measured 1" up from line D and scored this line (G) between lines H and K. Then starting at this scored line I cut the two pencil lines (H and K) up to Line B with an Exacto knife. Then I scored lines E and F between I and J, and then cut lines I and J (with the Exacto) between lines E and F.

And the cutting and measuring is done - yayyyyy! Breath a sigh of relief now ;o)

The rest is pretty simple - I just stamped my main image (Inkadinkado) on off-white cs using black ink, the second stamping. I colored it in using Distress inks and Q-tips, and trimmed the edges with deckle scissors. I layered this to a green panel, then dark brown and then red. It's important to make sure the red panel will fit between lines H and K with a little room to spare. At this point I sponged some Frayed Burlap onto all the cut edges of the base card for definition.

To put it all together, glue the 1" panel near line A underneath the wide panel at the opposite end. Now holding the base, push on the panels between the edge and line H and the edge and line K. Now center the red panel on the 2" x 1" pop out panel adhering it from line F to the scoreline at line C only.

I punched some flowers from the green and red scraps and layered them with a gold brad, and then adhered them to the card as shown with Glue-Dots. I wrapped the bottom of the panel with a red ribbon and tied a brown and black gingham ribbon around it.

*tip*
Always adhere a part of your ribbon to the cardfront, even if it seems stretched tight enought to stay in place. I like to do this right near the most awkward spot - here where the tied ribbons bunch up the red ribbon. I like the skinny ATG tape gun for this.

For the tag accent, I stamped the Merry Christmas collage word stamp (Hero Arts) on the off-white cs using the Distress Peeled Paint, then the large Merry Christmas again in black lining it up with a stamp positioner. I used the Multitags Scallop punch by McGill on this and on the brown cs, then layered them as shown.

Because my image panel ended up so much heavier than the base it had a tendency to be too top heavy and fall backwards. I fixed this by attaching a matching easel on the back of the image panel (see photo) that will fold back on itself when folding the card up.
Thanks for looking!