Search This Blog

Pages

Showing posts with label Paper Piecing. Show all posts

May 07, 2026

KRAFTY CIRCLE SQUARES.

 Hi friends!


Playing along with this FRESHLY MADE SKETCHES Challenge
(ends 5/11).
UPDATE!
Kim has honored me with Queen of Clean this challenge!  ❤️


I wasn’t quite sure exactly what direction I was going to head when I first saw the sketch above, but I LOLed at Kim’s mentioning she was going to do squares since there had been lots of circles previously, because I already knew I was going to fill my squares with circles 😂

After I found the paper collection I wanted to use it was just a matter of semi-precision cutting and pasting. Squares were raised slightly with heavyweight scrap card. White elements on the kraft card stock were heat embossed. This card measures approximately 4.75” square. 


SUPPLIES

Hello sentiment stamp - Gina K. Designs Petite Geranium clear set
Best you sentiment stamp - Fun Stampers Journey cling rubber set #SS-0632
splatter dots stamp - Stampin’ Up! random (1998)
patterned paper - Pebbles Spring Fling #733112
white detail embossing powder

And another card I made using my extras:


Thanks for stopping in today!


December 03, 2021

WHO'S FEELING MERRY?

    Welcome to this 29 day series of Christmas cards for the 2021 holiday season - so glad you're here with me! Hope you get lots of inspiration and entertainment right up to Christmas day...

These faces - could there be two more low-key merrymakers anywhere?!


TECHNIQUES

paper piecing (cats, large starburst)
die cutting (circle)
 color pencil (hats)
sparkle gel pen (eyes)
glitter glue (ornament)
 Copics (gray shading)


SUPPLIES

cats stamp (partial - words left off) - Stamps Happen Max & Lucy "Purr-fect Holiday" #20065
merry definition stamp - unmarked
starburst stamp - Stampin' Up! "Snow Burst" set
circle die - Spellbinders
patterned paper - unknown
textured metallic pink cardstock - random
glitter glue - Stickles "Frosted Lace"


Sharing this card on the following Challenge Blogs:


Winter Wonderland  (ends Jan 6)


Thanks for stopping in today and I'll see you back here tomorrow!


September 04, 2021

ANOTHER UNICORN

Hello!


TECHNIQUES

ink swiping (background), die cutting, patterned paper (mane, sentiment panel), vellum (sun)

STAMPS

sentiment - Poppystamps Whittle Everyday set #CL484

OTHER

unicorn die - Jane Davenport set  #JDD-006
hello die - Hero Arts Hello Stamp & Cut set # DC151 (stacked 3x on white cs)
sun (flower) punch - Martha Stewart


Playing along with the following Challenges:


 Thanks for visiting!

September 01, 2021

BIRTHDAY UNICORNS

Hello!


TECHNIQUES

heat embossing, die cutting, paper piecing

I laid down colored strips of cardstock on copy paper using double stick adhesive, then die cut.  I used the insert pieces on the card below.


STAMPS

birthday sentiment - Stampin' Up! It's Your Birthday set
sparkle sentiment - poppystamps Whittle Everyday set  #CL484
swirl background - JRL Design "Starry Night Swirl" #V145

OTHER

unicorn die cut - Jane Davenport set #JDD-006
embossing powder - Creations Unlimited "French Lilac"
star adhesive gems - park lane #1731-6605


And another version:


TECHNIQUES

 die cutting, paper piecing

this is the reverse cut-outs of the die cut image above.  sparkle glue applied to accent panels.


STAMPS

birthday sentiment - Stampin' Up! 2003
dream big sentiment - unknown

OTHER 

unicorn die cut - Jane Davenport set #JDD-006 
quote bubble die cut - Cricut Cuttlebug set #2003992
glitter glue - Stickles "Frosted Lace"


Playing along with the following Challenges:


January 15, 2021

BE YOU

Update:
Sharing this card in the last challenge of the year at The Card Concept, where the theme is a favorite card created this year.  This card just makes my heart happy :o) and I am such a fan of Jane Davenport's images
 

This stamp is new to me.  I was so taken with the sass and purchased the phrase at the same sale to make sure she had a great message to go along side.  


SUPPLIES

STAMPS  
girl - Jane Davenport Giraffe Wisdom #JDS-053 clear set 
words - Picket Fence Studios It's Peopley Out There #S-150 set
pennants - Simple Stories Always in My Heart #10739 set
INKS
Memento Tuxedo Black
Versafine Onyx Black
EMBELLISHMENTS 
crystal stars - Park Lane Adhesive Gems #1734-6597
PATTERNED PAPERS  
assorted older Stampin' Up! and random
CARDSTOCK 
textured gray, white - random
MARKERS
Copic


STEPS  

1.  Cut gray cardstock to card front size.
2.  Adhere patterned paper panel to center of gray card.
3.  Using Memento black ink, stamp figure on white cardstock scrap and color skin and hair with markers.
4.  Stamp figure on various patterned paper pieces and fussy cut.  Adhere to image panel.
5.  Edge entire image with a neutral gray marker.  
6.  Trim panel into diamond shape and adhere to gray card front over dot paper panel.
7.  Using Versafine black ink, stamp pennants and words as shown.
8.  Stamp pennant flag on various scraps of patterned paper and fussy cut.
9.  Adhere pennant pieces to card front as shown.
10.  Apply flat back gems as desired.


Playing along with the following Challenges:


 Thanks for stopping in!
Nancy

January 10, 2021

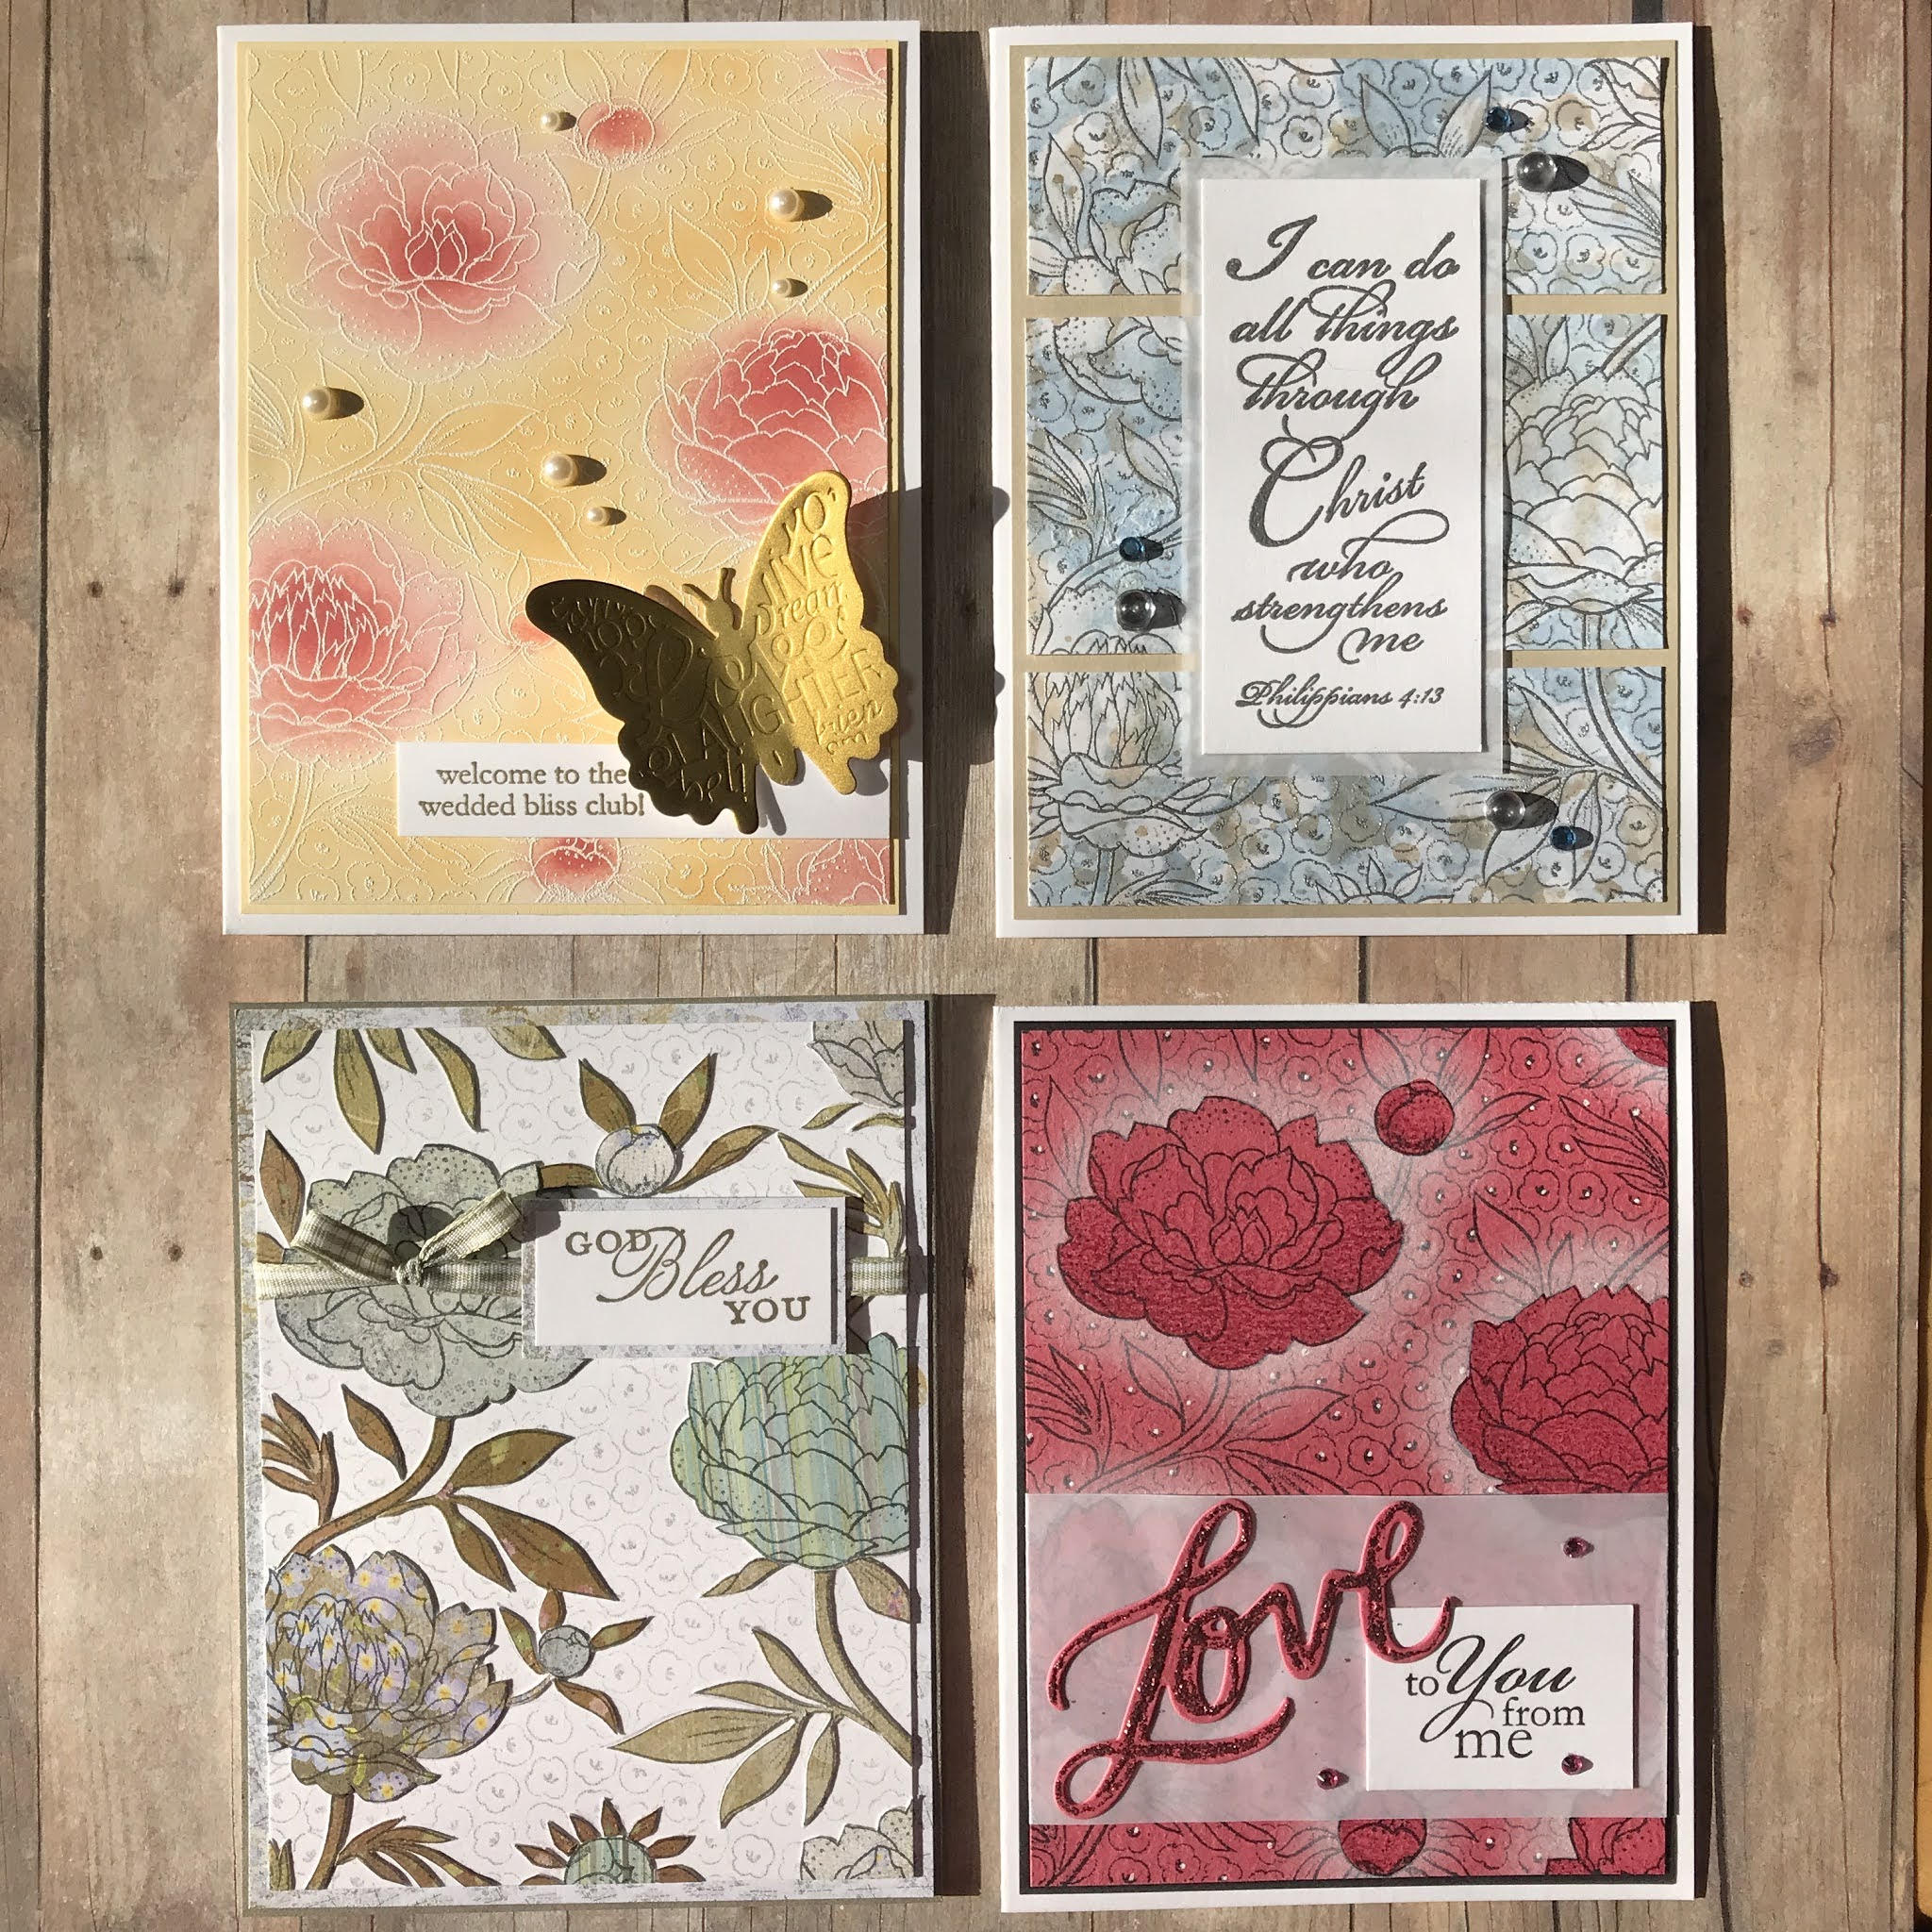
ONE ITEM, MULTIPLE LOOKS! SERIES {#3} Featuring Floral Background Stamp

 Welcome to my new series One Item, Multiple Looks!  

 I'm really excited to inspire myself and others to

* explore and stretch the supplies we own 
* let go of anything we don't love
* choose wisely when repurchasing 
*  explore the endless techniques and styles available to us

I will be posting one new grouping featuring a different specific crafty item each week for at least the month of January or so.  To access all posts in this series just click on the topic One Item Multiple Looks! in the sidebar Index of Posts...  Hope you enjoy!

This week's grouping features a floral background stamp. Techniques feature embossing, ink blending, paper piecing and haloing.


Butterfly Card


SUPPLIES

STAMPS floral background - unmarked, please contact me if you know who made it!, words -Stampin' Up! set, also unmarked (the hazards of buying preowned LOL)
INKS  Distress Oxide Spiced Marmalade and Fired Brick, Versamark
DIECUT Momenta Cut & Emboss #19803 R6
EMBELLISHMENTS  Stampin' Up! flatback pearls
OTHER  white and gold detail embossing powders 
PAPERS  white and yellow cardstock, matte gold cardstock


Let's get started!

STEPS 

1.  Cut white and yellow cardstock panels to fit a standard white card in layers as shown. Set aside (Alternative to yellow cardstock: ink a white piece with the same ink color, or edge a white panel with a yellow or gold marker).
2.  Using Versamark ink, stamp background image on white cardstock. Cover with white detail embossing powder and heat emboss. (Alternative: you could stamp your own background type image using single flower stamp and stamping some tiny image in between).
3.  Use blending brushes and inks to blend into background as shown. Brush ink off lines with soft cloth.
4.  Run matte gold cardstock through embossing/cutting machine with butterfly cut and emboss die. (Alternatives: you could emboss a sheet of cardstock and die cut a butterfly from that, or heat emboss a butterfly stamp image in gold and trim it out, etc)
5.  On white scrap of cardstock, stamp sentiment in Versamark and heat emboss with gold detail powder.  
6.  Time to assemble! Adhere image panel to yellow panel and yellow panel to white cardfront.  Apply strong glue or tape to underside of butterfly body and apply over white sentiment strip as shown.  Gently bend wings upward.
7.  Time to embellish!  Apply flat back pearls as shown.


Playing along with the following Challenges:


Silver Embossed "Watercolor"


SUPPLIES

STAMPS floral background - unmarked (please contact me if you know who made it!), words - I Brake for Stamps
INKS  Distress Ink Faded Burlap, Faded Jeans and Stormy Sky, Versamark
EMBELLISHMENTS  Hero Arts and random flatback crystal gems
OTHER  silver detail embossing powder
PAPERS  white and tan cardstock, vellum


STEPS 

1.  Cut white and tan cardstock panels to fit a standard white card in layers as shown (do not trim white panel into thirds till you're finished stamping and coloring). Set aside (Alternative to tan cardstock: ink a white piece with the same ink color).
2.  Using Versamark ink, stamp background image on white cardstock. Cover with silver detail embossing powder and heat emboss. (Alternative: you could stamp your own background type image using single flower stamp and stamping some tiny image in between).
3.  Smoosh the blue inkpads onto nonstick surface, spritz with water and lay panel into this.  Dry panel and repeat with brown ink.
4.  On white scrap of cardstock, stamp sentiment in Versamark and heat emboss with silver detail powder.
5.  Trim image panel into thirds. 
6.  Time to assemble! Adhere image panel to tan panel and tan panel to white cardfront.  Apply word panel onto vellum panel as shown, and adhere to background panel.
7.  Time to embellish!  Apply flat back gems as shown.


Playing along with the following Challenges:


Gem of a Challenge Anything Goes (ends 1/11)


White Haloing Card


SUPPLIES

STAMPS floral background - unmarked (please contact me if you know who made it!), words - Stampin' Up! set, also unmarked (the hazards of buying preowned LOL)
INKS  Versafine Onyx Black, VersaMagic Cloud White
DIECUT EK Success Word Set #54-80027
EMBELLISHMENTS  random flatback gems
OTHER  white gel pen, Stickles glitter in Pink, color pencils 
PAPERS  pink, black and white cardstock


STEPS 

1.  Cut pink and black cardstock panels to fit a standard white card in layers as shown. Set aside. (Alternative to black cardstock: ink a white piece with the same ink color, or edge a white panel with a black marker).
2.  Using black ink, stamp background image on pink cardstock. (Alternative: you could stamp your own background type image using single flower stamp and stamping some tiny image in between).
3.  Stamp flower heads on masking paper and apply to image panel. (Alternative: stamp images on copy paper, trim and apply removable adhesive to reverse.)
4.  Use blending brushes or sponges to spread white pigment ink around flower heads and buds as shown. Remove masking.
5.  Use colored pencils in same color family to shadow flower heads and buds as shown.
6.  On white scrap of cardstock, stamp sentiment in black ink.
7.  Die cut word from pink cardstock and apply glitter glue.
8.  Use white gel pen to highlight tiny flower centers.
9.  Time to assemble! Wrap vellum around background image panel, adhering on the reverse. Adhere image panel to black panel and black panel to white card front.  Apply Love die cut and white word panel to vellum as shown.
10.  Time to embellish!  Apply flat back gems as shown.


Playing along with the following Challenges:


Paper Pieced Card


SUPPLIES

STAMPS floral background - unmarked, please contact me if you know who made it!, words -Stampin' Up! Trust God set
INKS  Memento Tuxedo Black, Stampin' Up! Going Gray and True Thyme
OTHER  ribbon
PAPERS  white cardstock, unknown patterened


STEPS 

1.  Cut white cardstock and patterned paper panel to fit a standard white card in layers as shown. Set aside. (Alternative to patterned paper: ink a white piece of card stock with an intricate patterned stamp and colored inks, or stencil a white panel with various inks and patterns).
2.  Using gray ink, stamp background image on white cardstock. (Alternative: you could stamp your own background type image using single flower stamp and stamping some tiny image in between all in the same ink color).
3.  Stamp background image on various patterned paper pieces with black ink.  
4.  Fussy cut flowers and leaves/stems from patterned papers.
5.  On white scrap of cardstock, stamp sentiment in green ink.
6.  Time to assemble! Adhere all fussy cut patterned paper pieces to image stamped in gray ink on white panel. Wrap a ribbon around image panel as shown, and adhere sentiment panel as shown. Adhere image panel to patterned paper panel, and this to white card front.


Playing along with the following Challenges:

Dare 2B Artzy January Anything Goes


Thanks so much for stopping by, I'll see you here again soon!

Nancy

November 07, 2019

Tropical Retirement

This isn't me but I wouldn't mind if it was ;o) 
Also, I could do paper-piecing all day long!

Inspired by, and entering, the following CHALLENGES:


Stamps: Art Impressions penguins (#P-3158), River City Rubber Works "Retirement Means" (#3024-G)

Ink: Memento Tuxedo Black, Stampin' Up! Daffodil Delight

Markers: Copic as shown

Other: JudiKins brush dauber, patterned paper (maker unknown)


1. Stamp image on patterned paper. Trim and apply to stamped image on white card. (I like to run a black marker around all trimmed edges to avoid a halo effect.)
2. Use markers to color image.
3. Punch a circle from scrap cardstock and sponge yellow ink on outside top and sides. (I did do a partial mask on the male penguin so I didn't get any sun on him LOL)
4. Trim around image into modified rectangle, leaving sun intact.
5. Layer onto card with patterned paper strips and turquoise panel.
6. Use black ink to stamp phrase.


Thanks for stopping in! 
May you be blessed and may you be a blessing.... :o)


June 13, 2011

Stampotique 'Clean And Simple' Challenge


STAMPS:  cat - Rare Image Rubber Stamps, words - Smartworks, butterflies - (partial) DeNami Designs
TECHNIQUE:  Technique Junkies Paper Piecing
INKS:  Staz-On Jet Black, Stampin' Up! Mellow Moss

NOTES:  butterfly trails were hand-drawn using a Pigma Micron 3 pen, butterflies were put on in two layers with the second being glued just down the center of the bodies (with a Quickie Glue pen) and the wings bent upwards 

Thanks to Gerrie, Queen of Grunge, who brought this Stampotique challenge to my attention with her fabulous bee card posted to the TJ group, and on her blog!

Thanks for stopping by!