Hope your weekend was a good one. I probably should have wrapped up my Christmas shopping but it was so cold I felt like doing catch-up work here in the house most of the time instead!
One of our first Christmases as a newly-married couple we cut large stars out of corrugated cardboard and decorated them with beautiful ribbon bows, tearing some of the top layering off to reveal the corrugation (in an artsy way!), and highlighting them with glitter. The basic color-scheme was red, gold and kraft. But the special part was, inspired by my Grandmas's tradition of ordering christmas ornament balls with everyone's name on them and hanging them on the tree each year, we spelled everyone's name in glitter, one per star.
Now it might sound tacky, but it actually made for a beautiful tree, with all that gold and red and the kraft against the green of the tree, and some white lights. I think we filled in with different-sized traditional red ball ornaments.
We still use those ornaments and I can't tell you what a treat it is to go find "your" ornament, especially for the kids. It gives a great sense of continuity year after year. Fortunately we made about twice as many as we had names for originally so we've been able to add names to those as there are new additions.
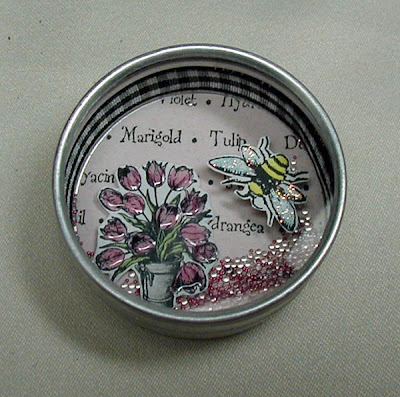
The shadowbox magnets below were featured in the RubberStamper magazine earlier in the year, but I thought I'd share them again because I got to thinking what awesome Christmas tree ornaments you could make...
This shadowbox-style ornament could become a cool new tradition, with everyone getting to make their own, putting in whatever is important to them that year, then signing and dating on the back. The general make-up is a background circle, a cut-out image or two pop-dotted, a ribbon around the inside edge and something to shake (sand, microbeads, etc). Just add ribbon around the outside with a loop for hanging. These containers can be had really reasonably priced at a Joann's or Michael's, usually in the wedding aisle as favor boxes.
A great time to make these would be when everyone is sitting around after Thanksgiving turkey, too full to do anything but sit! It would be best to have circles pre-cut and stickers, etc. available for those who want to put about five minutes into one and then watch the game :o)
Tins measure about 2" across and 1" deep


Just a few notes:
You can add dimensional glue or glitter to parts of your image for extra shine as in the flower one, or magnet words as in the ocean one.
Tape or glue the stamped circle of cardstock down firmly as that is your base for the other elements.
I think I used very tacky double-stick tape for the ribbon on the inside, as glue can tend to discolor ribbon and give a lumpy look.
Be sure to put glue along the threads on the inside of the lid and twist it shut when you have it the way you like.
I'd like to make some Christmasy ones and if I can get some done I'll post them.
Thanks for looking!


2 comments:
Your tree sounds like fun & your usual creative flair! Talk about creative....these magnets are too clever. I'm lucky just to make a card!
these are just fab GF! I don't know where you get all your inkspiration from...wowza!
Post a Comment