Search This Blog

Pages

December 31, 2007

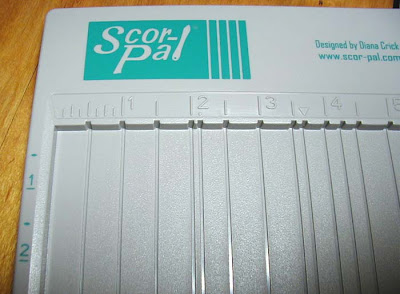
Scor-Pal tool

Here's a photo of the tool I've been mentioning
(and a close up further down)


It' called Scor-Pal and is made exclusively for scoring cardstock and paper. It is a fairly rigid plastic, about 12" x 14", and about 1/2" high, with a recessed area for placing the paper, and then lines recessed further in for scoring. There is a ruler on the top and both sides, and it will handle up to 12 x 12 sheets, with score lines every inch and additional ones. It comes with it's own scoring tool which snaps into place at the top as shown so it won't be misplaced, although I think another bone folder could substitute.

There is a fabulous website at Scor-Pal that actually has online magazine articles with step by step photos of projects using this tool.

I found it to be very user friendly and accurate. It takes an initial practice run to decide how hard you should press depending on the paper thickness used but that's it! I found it so simple to make diagonal lines, and for fans of faux-grid, it's a snap! No more measuring for so many styles as all the work is already done (and you know how I love special folds). There's a line at 4 1/4" for scoring A2 cards in half and many more at various intervals.

The packaging comes with some ideas and as you can see from the website there'll be no shortage of ideas for future use.

I picked mine up at a local Archiver's (I have to admit I went in with a 30% off coupon planning to buy a Scor-It! when I noticed this and knew instantly it would work better for my needs) I think this will be a product I'll actually use every time I make cards.

Catching up!

Hope you all had a beautiful Christmas. I got to see family and travel out of town, which all seems to have rejuvenated me. I've spent the past week thinking of little changes I should make and what I'd like to see happen with my time in the coming year, and I have written it all down where I can glance at it for a refresher if/when LOL I forget my goals. No super-lofty ones but a bit of a plan I think I can work with on a regular basis :o)

Will be posting again soon - I want to share a new product I found with you so I'll go take some photos....

December 21, 2007

Acetate Sympathy Bouquet

Good morning :o)

I was browsing SplitcoastStampers for the first time in a long while yesterday and found a tutorial for acetate-bodied cards. I had tried my own last year and it worked alright, but it was so much easier with their step-by-step instructions with photos and sizes. Here's the link for the page it's on: SplitcoastStampers Be sure to click on the gallery link at the bottom of the page for some more great sample cards.


Card measures 4 1/4" x 5 1/2"

I pretty much followed the SCS directions, changing the size to suit my stamp image size. I stamped the flowers (Inkadinkado) in black Staz-On, then used a blender pen and Stampin' Up! markers to color it in. I used some iridescent glitter glue over the blue on the water area and added a silver dragonfly brad as shown.

*tip*
When adding brads and rivets, etc. try to use them so that subsequent layers of cs will cover the backs.

The sympathy stamp is a Anna Griffin, and the swirls are Autumn Leaves, Rhonna Farrer, Elegant Swirls set (stamped in white Staz-On - don't forget to reink this pad frequently for best coverage.) I used a sponge to edge the card with the white ink, and tied a sheer silvery ribbon along the fold.
Thanks for looking!

December 20, 2007

Brayered Resist cards

Okay, as promised! These are the cards my folks made in my stamp room on their visit here. We used Versamark ink to stamp the image on glossy paper, waited a minute for it to dry, and then using a rubber brayer, rolled over it randomly with dye ink. And that's it! So simple and fun to see what develops. Kudos to them for whipping up cards in someone else's space, and my Dad not being a stamper - what a good sport you were to play too!! A good evening for the ol' memory box. :o)


Mom's card features a pine bough by Great Impressions, a sentiment stamp by Inkdadinkado and a Marvy Dee Gruenig Blending Blox in Shades of Olive. The image panel is the size of an A2 card so the finished card is a bit larger.

Dad's card features a leaf small background stamp by All Night Media, and a word stamp (one of my all time favorites!) by Endless Creations. The lettering was stamped in Perfect Plum by SU! and the background was brayered in Kaleidocolor's Cappuchino Delight.
I just love to see people as they stamp in person - I always see something done in a way I hadn't thought of - and of course what a thrill when a self-professed non-stamper picks up an inkpad and stamps and makes a beautiful card!!
Thanks for looking!

Hello!

Sorry for the lack of posts recently but I was fortunate enough to have my Mom and Dad here for few days this week! We got to stamp a bit and they both made a card :o) We just used a very quick easy technique with some instant gratification! I'm hoping to post scans of those shortly. Oh! and I want to share an awesome new product I found and love! Plus I've been tagged and need to get that info together...

~ Now on to some musings ~

Adding to this blog over the past two months has really pointed out to me how hard I struggle to balance my life even a little bit on an on-going basis. Covering all the bases all the time feels impossible most days! I have a stack of unwashed dishes in my kitchen right now to prove it ;o)

I'm mulling over New Year's Resolutions, which is something I hardly ever do. But I am feeling the need to prioritize more than ever this coming year to make sure I fit in all the really important stuff, and set up some guilt-free stamp time too.

Feel free to leave a comment on what you want to change for yourself in the new year even if it's just in baby steps - maybe it will save me the trouble of having to think on my own LOL I'm kidding, of course, as everyone has different needs, goals and dreams, but sharing thoughts with others can jump-start our own creativity as we've all seen in stamping. If I get a workable format/list/plan down on paper, I'll share it with you (maybe Jan 1st! :o)

December 15, 2007

OT -On a hh mission!

I'm on a mission this winter to clear our house of anything we don't like or don't use. I've mentioned our small area space and it's starting to feel smaller! I don't remember what got me fired up to do this a couple weeks ago - maybe my other off-topic ranting about my newspaper pile and how freeing it was to just toss it! That's HARD for someone with pack-rat tendencies - all the Cleanies out their are rolling their eyeballs at that >;o)

I know it's a rotten time to get into all this, right before Christmas, poor weather to have a garage sale, equally poor weather to schlep a load to the local charity, but oh well! Gotta strike while the iron is hot :o) (Must be an old blacksmith term - can you tell I grew up too close to the prairies of ND?! LOL)

So if you're here strictly for stamping info, I must warn you there isn't any today! I wasn't even going to share this info below but then I thought it might help someone else too. I did use my circle punch LOL but in the effort of getting the job done rather than following my perfectionistic tendencies to make it perfect, the letters are hand-scribbled on heavy manila index cs and not stamped on pretty paper like they should be. LOL To you who have known me awhile, see how far I've come?!

Here's what I did yesterday:


This is a closet I share with my stamping supplies :o) It's all tops of one sort or another. I got this brainstorm in our other closet with really poor lighting to make some tags for the rods like they do in retail clothing so I could see all the way to the back corner and know what's there (the closet is 10 feet long with one single door!) I just used large heavy weight manilla index divider cards, punched them with my 2" circle punch, and then cut them into a square around the circle. I cut the corners off with a scissor and a slit in the center of the larger side to slip it onto the rod. If I had a quick way to get larger circles I would have just used two circle punches so they'd be prettier - like donuts! LOL


I was finding all my clothes were kind of organized by type but in my denial of recent weight gain over the years I had not removed my too-small clothes. So I took each item out, and if I hadn't worn it in the last six months and still liked it I tried it on. Now I have to be honest here - every organization book and diet guide will tell you if your clothes don't fit to get rid of them - but I kept anything I was still able to wear as recently as last summer. I have a section that says Too Small right on the tag now and if they don't fit by this next summer I'll reconsider, but at least they are not in with clothes I can wear now.


So I have all the bottom pieces in the other closet with the following tags for sections: Jeans, Winter Skirts & Dresses, Summer, Too Small (by only one size HA HA!) And in my tops closet I have the following 3/4 Sleeve, Long Sleeve, Button Up, Turtlenecks, Polar Fleece (I wear ALOT of this because it's so warm and easy to wash), Sweaters, Zip Sweatshirts, and for Layering Only (slight stains etc. to be worn ONLY under other things) and Summer.


I'm feeling good about this set-up, so good in fact, I've been doing laundry all day today knowing I have a place for everything to go when it's done. It's been very motivating for me and I would be thrilled it it helps someone else too!

December 14, 2007

Bling Snowflake

This scan turned out a bit dark so it's hard to see, but the points on the snowflake are little domed gems with mirror backs that look like a whitish silver irl.

All stamps are by Innovative Stamp Creations (see sidebar for link).

Card measures 5 1/2" x 4 1/4"

I started with a watercolor paper panel - I like the kind where the pad is sealed all the way around, and you have to slice around the edge to lift off the top layer after it's dry. This sealing reminds me of the red coating at the top of notepads that binds the pages together and then you can tear one sheet off at a time. The sealed watercolor pad keeps the page from warping as it drys. I think I got my pad at Blick's art supply, but you could get a similiar effect by taping all four sides of your paper down on a craft mat etc. before you start this.

I embossed the snowflake in black, and then colored it in with markers. I spritzed the panel with water till the colors ran and then let it dry. For more info on this technique and more artwork samples check out TechniqueJunkies on the sidebar.

I trimmed the panel, added the Merry Christmas with black Staz-On, and the self-adhesive stickers (Archiver's). I edged the panel with a silver Sharpie, and layered it to a light blue panel.

I used the paper I'd trimmed off for the square panels, edging them in silver, layering them to blue cs and then punching rectangular holes for the sheer black ribbon.

There is a swirly design stamped in black on the background cs, and this is mounted to a dark silver metallic cs.

Thanks for looking!

December 13, 2007

Mini Memo book & keychain

Thanks for all the nice comments - I'm feeling a little better now :o)

For all of you wondering what to do about some quick and easy stocking stuffers or go-along gifts, turn one of these...

...into one of these!


The notebooks are small - about 4 1/2" x 3 1/4" and lightweight so they travel well in a purse, pocket, bookbag, etc. Below is one I made and started using last year, just about this time. It is well-worn and probably needs replacing, but it has served me much better than I thought possible, and I still have blank pages left to fill in! LOL I jot down EVERYTHING in it while I'm out and about - short errand lists, addresses of houses with amazing front yards, spur of the moment info I want to put in a permanant file when I get home, a recipe someone shoots from the hip, directions, etc. I even find myself making little lists (wishes, goals, nonsense ;o) while I'm waiting in line somewhere or sitting in an office waiting for an appointment.


These mini composition books are the easiest thing to cover. Just measure the height of the book in front of you (there can be a bit of varience) and more than double the width. I like to draw a pencil line down the exact center of this piece of cs which would be the center of the binding so I know where my design should be centered. Figure the binding will take up 7/8" on either side of this line.

So just decorate this cs any way you'd like, then use the stickiest double-sided tape you have to wrap it around the original book. Line up the top and bottom as you can trim the other edges later.

I added a crochet thread bookmark to the one shown so you'd want to tape this to the spine before attaching the spine cover. Make sure if you attach tags, etc. that they will actually hang below the book when closed, as shown. I used to have a butterfly charm on mine but it got torn off long ago so now I just have a thread hanging there! Use super-sticky tape for the spine as well, and don't be afraid to score it with a really round embosser first so that it doesn't want to pop apart later. I used suede paper on the cat one, and crumpled and inked regular heavy cs on the other.

I sponged my edges after I had trimmed up the edges flush with the pages.

The keychain shown was from the Kid's Camp bins at JoAnn's last summer. The back center pops out to add the photo, artwork, etc. Both the notebook and keychain sets were made for a boutique that friends and I participated in last November (ask me if I ever want to do one of those again soon LOL - great time with friends, not so much money involved ROFL!)

Cat and background stamps are Stampin' Up!, Meow is PSX, pawprint is All Night Media, and quote is Wordsworth. The crown and collar are highlighted with metallic silver pen and the cat's nose is a pink rhinestone :o)

Thanks for looking!

December 11, 2007

OT - Under the weather

Sorry for the lack of a post today - not feeling the greatest at the moment. Just wanted to pop in and give you a link to a great blog I found just now that has ornaments like I mentioned in yesterday's post!

http://papertrufflez.typepad.com/paper_trufflez/2007/12/goin-ornamental.html

December 10, 2007

Shadowbox Magnets

Hope your weekend was a good one. I probably should have wrapped up my Christmas shopping but it was so cold I felt like doing catch-up work here in the house most of the time instead!

One of our first Christmases as a newly-married couple we cut large stars out of corrugated cardboard and decorated them with beautiful ribbon bows, tearing some of the top layering off to reveal the corrugation (in an artsy way!), and highlighting them with glitter. The basic color-scheme was red, gold and kraft. But the special part was, inspired by my Grandmas's tradition of ordering christmas ornament balls with everyone's name on them and hanging them on the tree each year, we spelled everyone's name in glitter, one per star.


Now it might sound tacky, but it actually made for a beautiful tree, with all that gold and red and the kraft against the green of the tree, and some white lights. I think we filled in with different-sized traditional red ball ornaments.


We still use those ornaments and I can't tell you what a treat it is to go find "your" ornament, especially for the kids. It gives a great sense of continuity year after year. Fortunately we made about twice as many as we had names for originally so we've been able to add names to those as there are new additions.

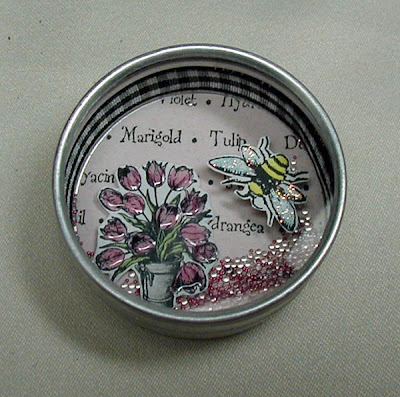
The shadowbox magnets below were featured in the RubberStamper magazine earlier in the year, but I thought I'd share them again because I got to thinking what awesome Christmas tree ornaments you could make...

This shadowbox-style ornament could become a cool new tradition, with everyone getting to make their own, putting in whatever is important to them that year, then signing and dating on the back. The general make-up is a background circle, a cut-out image or two pop-dotted, a ribbon around the inside edge and something to shake (sand, microbeads, etc). Just add ribbon around the outside with a loop for hanging. These containers can be had really reasonably priced at a Joann's or Michael's, usually in the wedding aisle as favor boxes.

A great time to make these would be when everyone is sitting around after Thanksgiving turkey, too full to do anything but sit! It would be best to have circles pre-cut and stickers, etc. available for those who want to put about five minutes into one and then watch the game :o)


Tins measure about 2" across and 1" deep


Just a few notes:

You can add dimensional glue or glitter to parts of your image for extra shine as in the flower one, or magnet words as in the ocean one.
Tape or glue the stamped circle of cardstock down firmly as that is your base for the other elements.
I think I used very tacky double-stick tape for the ribbon on the inside, as glue can tend to discolor ribbon and give a lumpy look.
Be sure to put glue along the threads on the inside of the lid and twist it shut when you have it the way you like.

I'd like to make some Christmasy ones and if I can get some done I'll post them.

Thanks for looking!


December 09, 2007

Congratulations!

Trudy, your name was picked in the weekly card drawing - yaaaayyyyyy! Give me a holler when you get a chance and let me know which you'd like :o)

Card Style Poll Results

Thanks to all who took the poll this week! Sorry if I missed your style - the poll format wasn't working well when I set it up so I was only able to do so many. I would have liked to have given the all of the above option for people like me who can't quite settle on one style! LOL
Here are the results:
43% Realistic / Elegant
18% Vintage
18% Whimsical
12% Collage / Altered
6 % Trendy

Rustic Chalked Giraffe

This scenic stamp is from a half sheet of awesome safari images by I Brake For Stamps - see the sidebar for current sale info!

Card measures 5 1/2" x 4 1/4"

I started this card by stamping the image on cream colored Stampin' Up! cs with black Staz-On ink. I colored it in with SU chalks as shown using the smallest applicators I have.

I tore off the bottom of the panel and then edged it with a sponge and Staz-On Timber Brown, then Distress Antique Linen. I layered this piece to a dark brown panel.

I punched holes in the upper corners and attached brown eyelets using a Crop-a-dile. (Life has been so good since I started using that instead of hammer!)

For the background paper, I started with a piece of ochre color cs. I ran the long edge of the Timber Brown pad lightly going in one direction, crumpled it up, smoothed it out, and then ran the black pad lightly over the ridges. I attached this panel to a dark brown panel.

To assemble the card, I tore a piece of coordinating cs and adhered a strip to the top and then used twine to wrap around a decorative stick and tie on the reverse, placing it over the cs accent. Then I wrapped some more twine around the branch, ran an end thru the eyelets and attached it to the back of the main image panel, before pop-dotting the panel to the card. The last step was to apply a couple fabric leaves and then trim them to fit the corner.

Thanks for looking!

December 08, 2007

Paris Resist

Happy Saturday!
It's freezing cold here - with a - before the number! - so I plan to stay indoors and play catch-up. Since I'm a bit behind I pulled a card from the photo archives, made earlier this year. It was sent out as a rak at the time so is not available for the weekly drawing, but it involves some cool techniques so I hope you enjoy it anyhow :o)


The basis for all the colors in the card originated from this extra-wide grosgrain ribbon I had picked up in the Michael's $1 bin, and an intriguing group post that you could put your ribbon thru a printer for customized wording.

So I started by typing the words in a document style on my computer and then printing them landscape style on a sheet of cardstock. I lined the ribbon up on this cardstock directly over the words, taping both ends down as flat as possible, and ran it thru the printer again. And voila! LOL it worked better than I had hoped!

I made the top background piece by simply sponging dye inks onto glossy paper, and then stamping the Paris collage image (Hero Arts) over it repeatedly in Staz-On Stone Grey, lining up the edges.

*tip*
To get good color blending with no muddying of colors, consider using a pad like Kaleidocolor where all the colors are in the same family.

For the bottom panel, I used one of the inks from the top panel and stamped a Stampin' Up! background on off white cs, and then edged it with more ink and a sponge.

For the main image panel I stamped the Eiffel Tower stamp (Inkadinkado) on glossy cs with Versamark ink and then embossed it with white detail powder. Next I sponged some more of the same inks over it, let it sit for a minute and then wiped the color off the embossed area. I stamped the Bon Voyage text (Hero Arts, I think) over this in black Staz-On ink.

To put the card together, I layered as shown, pop-dotting the image. I punched a corner from the resist panel and added it to the bottom left corner. Looks complicated but actually pretty quick and easy.

Thanks for looking!

December 07, 2007

Faux Layers Snow Children Tags

I have been desperately wanting to make a Faux Layers card ever since I saw one posted to a group a few months back. And I finally have!

This cardfront is literally one sheet of white cardstock. The layered look is achieved by careful placement of color and shadow.

Card measures 51/2" x 4 1/4"

(click for more detail)

This is one of the 12 new techniques in the December 2007 TechniqueJunkies newsletter. I really hope anyone not already subscribed will consider it - you can't spend $20 any better in the stamping world! My brother was kind enough to buy a one year subscription for me last Christmas and I'm not exagerating when I say it has totally changed my stamping for the better. Every other month you recieve a color newletter in the mail with all techniques, steps and sample photos, and then access to the website subscriber-only pages where you get full color step-by-step photos with written directions for each technique, PLUS a page of artwork by the awesome TJ designers so you know what your finished artwork should resemble LOL It's just an awesome resource and really one of those things where after you do it you groan "Why didn't I do this sooner?!"

This card is an unusually complicated one to describe, although easy enough to do IRL (15 TJ steps compared to the usual 6 or so!) but the page on the TJ website couldn't be clearer. If you "join" TJ it's with the agreement that you won't use her words or photos and repost her material, so of course out of respect I need to just direct you to TechniqueJunkies on this one. I'm pretty sure if you join anytime this month and request it she'll be willing to start your subscription with the December issue. If you've got ants in your pants >;o) try Googling Faux Layers Card, or check Splitcoaststampers technique page...

The basic idea as you've probably figured is to use masking, and reverse masking. I didn't have a tag punch so I made rectangles and used a hole punch for the rounded area. For colors on this card I used last year's Stampin' Up! In Colors, and then a blender pen and sponge to apply.
Stamp credits: kids and small snowflake grouping are Stampin' Up!'s Winter Play set, large snowflake is Northwoods, tiny single snowflake is imaginations!, greeting is Savvy, ribbons are Inky Antics Ravishing Ribbons set, and flourish is Flourishes v:I by Rhonna Farrer for Autumn Leaves.

Hope you enjoyed looking as much as I enjoyed doing!! :o)

December 06, 2007

OT Photo - Backyard ducks


Wow - what a change from this morning's card, huh?! We put cracked corn out on the ground under the birdfeeder all year round, and some of the locals have us on their feeding rounds. These are all Mallard ducks. There is a man-made pond in the area that has a warm water feed so I imagine some of these guys have figured they don't need to migrate.

Sorry for the poor photo quality - this was taken out one of our kitchen windows. The statue is a concrete angel, the pole has a gazebo-form birdfeeder on top (and a squirrel guard - don't worry, they get black oil sunflower on the ground ;o) The scraggly shrub is a native Highbush Cranberry and the rocks behind are petrified logs, which are mostly buried in snow now. That beige thing off to the left of the feeding area is a heated birdbath.

I find it amazing that even when they are hungry at least three in a group this size will always sit on the outskirts of the group, facing outwards and watching for danger.

My folks and I are always sending critter photos back and forth (his MUCH better) and if I can ever talk him into doing a bird of the day photo on his blog, I'll link it here ;o)

Tropical Sun

The first stamping magazine I ever picked up and browsed through was a RubberStampMadness, and I fell in love with scenic stamping.

I know a lot of collage and abstract has taken over as far as trends go, but I still can't resist plain old scenic stamping once in a while. This card is to all of us freezing in the snow and cold today - take a mental break and you can almost feel the sun and hear the birds calling over the water :o)


Now I made this card at the end of last winter and sent it out so it's not available for the drawing, and I don't remember the exact ink colors or brands I used so I'm going to be a little more generic in my terms than usual (though probably no less wordy, unfortunately! Never learned the fine art of putting things in a nutshell apparently LOL)

I started by stamping the gal on the towel image (Viva Las Vegastamps) two times on a scrap of white cs, and once on a scrap of beige. I colored the towel on one white image and the hat on the other. I trimmed the hat out closely and the body with swim suit from the biege stamping and layered them on the image with the colored towel, which I had already trimmed.

*tip*
You could certainly just stamp once on white cs and color it all in - I can't remember why I did it this way but I'm sure I had a good reason LOL

I opened up a gold jump-ring and attached it around her right wrist.

For the background I did the black silhouette stamping last, the sun, and footprints in sand next to last. So picture a blank piece of white card stock. I laid out my inkpads open, grabbed some of those round yellow airy synthetic sponges...

*tip*
Cut these round yellow sponges into quarters (it'll look like pie pieces - yep, always thinking about food! LOL) Then use just one color family per wedge, always inking the rounded edge for soft blending. I keep all of mine in an open basket as I use them quite a bit for sponging the edges of panels. You want to throw them all in a sink full of soapy water and then rinse once in a great while just to clean off buildup and start fresh.

...and sponged in colors freehand as shown blending at the edges. I sponged yellow first where I wanted the sun, and then a bit below that in a cone shape for reflection. Avoid sponging colors over one another where they will mix and turn into another color entirely (blue over yellow will give a greenish cast) unless you intend to change the color.

As I went along sponging, I kept laying the cut out image down to see where I wanted certain elements, like the sun and sand line.

To make the sun, I used a cheap plastic template with a circle area cut out, and sponged it in about 2/3 of the way around as you see it.

I stamped the sand line (Toybox) in the same color ink I had sponged the beach in, and then used a Q-tip to make faint footprints.

I stamped the birds (Just For Fun), the shoreline (Stampscapes) and the leaves (Paper Candy) in black ink, using a stamp positioner for placement, with my main image laying where I intended to place it. Some of the leaves are second generation stamping to add depth.

*tip*
Whenever you do a second stamping where there is an edge of cs involved, don't just stamp your image and then stamp again, or you will end up with uneven coloring on the second image because you will not have removed all of the first layer where your image didn't touch the surface (from hanging out over the edge). So stamp the image where you want it, wipe off stamp, ink again, stamp lightly on a scrap, then stamp your panel.

Lastly, I pop-dotted the main image, added black photo corners, and layered as shown.

Thanks for looking!

December 05, 2007

Christmas Pocket Card


Here's a great card for this time of year. It has a handy pocket inside that can hold a giftcard, a matching note, a newsletter (a page or under, please! LOL), a plane ticket to bring a loved one home. You can vary the size and it uses just one sheet of standard cs. (You could use a sheet of 12" x 12" cs for a larger card, but I didn't figure out any measurements for that.) And it can be decorated any way you want, even using patterned paper for a quick and easy card.

I made mine 3 3/4" x 6 when closed, but you can adjust the width shorter, or up to 8 1/2" which is the width of the cs. A business size envelope will hold a card up to 4" x 9" for standard mailing rates, but keep in mind how many thicknesses of cs this is folded, and that if you add things it might get to over an once and you will have to add more postage. I weighed this card with a gift card and envelope and it comes to 0.8 ounces.


Front view with flap that opens up


Front flap lifted up


Inside of card with pocket at the bottom (click for a larger picture with more detail).


To show size of pocket space this is a standard-size plastic gift card. Just keep in mind that your double-stick tape on the edges will eat into your room for tucking a bit. Plenty of room left on the actual card to jot a quick note above the card when it's straight and tucked in. If you don't want to risk it falling out or shifting, just apply a spot of double-stick tape to the back of it (not over any barcodes, etc. though).

View of reverse when open


This is the back of the panel where the girls are adhered on the inside

I started with a heavy-weight sheet of white cs, and stained it with brewed coffee, throwing some coffee crystals on too till it was dry, then brushing the crystals off. You might have to iron your paper a bit if it warps.


Next I measured the long sides of the cs at 1 3/4", 5 1/2" and 9 1/8" and scored the lines. So you have four panels - the first is 1 3/4", the second is 3 3/4", the third is just a hair smaller at 3 5/8" then the previous to make sure it folds up with a bit of leeway and the last panel is whatever is left LOL about 1 5/8". This is the panel you want to cut into a v as shown, and to do that I made a mark at center and 1/2" in from the edge. Then I drew pencil lines from the corners to the center dot, and cut them with a scissor.


*tip*
Get a nice sharp long-blade scissor and you can cut alot of lines without ever having to reposition the blade, getting a crisp straight line.


Let's see...before folding this panel up and taping it along the sides, I stamped a partial flower (Penny Black - Winter Glow) using Distress Vintage Photo and some Rubber Stampede holiday text in Encore Galaxy Gold on it. I also used a sponge to brush some Vintage Photo on all the edges.

I stamped more of the flower on the card as shown, and more of the text on the top panel.

For the inside panel I used a 3 1/4" x 5 1/2" piece of white cs and stamped the girls (Paper Inspirations - Snow Children) in black Staz-On and the sentiment (Northwoods Rubber Stamps) in Stampin' Up!'s Cranberry Crisp. I inked the children in using a blender pen and Stampin' Up!'s In-Colors from last year, and stamped parts of the flower as shown on the edge. I used a sponge to add Distress Vintage Photo to the edges, and then came further in using Antique Linen. I layered this panel to a Cranberry Crisp one and then to the card base.


For the outside, I stamped the sentiment (Paper Inspirations) and colored the edges the same as the inside panel. I layered it to a cranberry panel and then adhered just the top half as shown.

I stamped the To, From (Art Impressions) on the back as shown in cranberry ink.


Thanks for looking!

December 04, 2007

OT - Lightbulb moment!

I have had a flat wicker basket full of newspaper pages on my living room floor for at least 6 months. It is full of really great information I've culled out and meant to reread, do something with, etc.

Okay, now I don't have it anymore!

I picked up all the paper at once, didn't even look to see what treasure I was holding lest I be tempted to hang on LOL and tossed it all in the kitchen trash!! I feel so free, and have already reappropriated the basket to catch mittens and hats as we come in the door.

Did I mention I saw a tiny spider lurking in the paper before I tossed it - see what happens when I let stuff pile up unabated - it comes alive! And did you ever hear that you will never be more than three feet from a spider of some variety in your entire life??! Don't know if that's true but it makes sense now LOL

So here's a freeing thought - what if we took all those unfinished stamp projects we have had tucked away forever and just tossed them???! Oh I can hear the gasping already ;o) But we would gain space and the freedom to create new stuff in the style and colors we like right now - now THAT'S potential! If you can't bear to toss them, how about passing all the fun little scraps and background paper to another stamper or an art-loving neighbor kid who can either use them or toss them guilt-free?

Okay, I'm ducking now in case the rotten tomatoes start flying >;o)

Inkwash Wildflowers, Version II

In my earlier post for today, I wasn't liking the thin border around the flowers against the busy background on the card, so I stamped them again, trimmed them more loosely, and replaced the original flower grouping. I think it's a bit easier to look at the flowers as the focal point now....

I also used gold rub-on on the meatal bar, but it still scans horribly and I replaced the yellow brads with orange the color of the middle flower because the yellow scanned too much like banana yellow. I have to say, this one's definitely better in real life! LOL I think that'll be my new disclaimer!!


Inkwash Wildflowers

This is a quick easy technique for adding color to a large background stamp. The colors didn't scan exactly true, and the antiqued silver accent scanned dark. But here it is!


Card measures 5 1/2" x 4 1/4"

I started with a Stampers Anonymous word background stamp and stamped it on watercolor paper using Staz-On black ink. I waited about a minute for it to dry (here's the perfect time to clean the stamp LOL), then spritzed it with water using a fine mist. I inked the stamp up again with a Cappucino Delight Kaleidacolor pad, spritzed it with water, and stamped over the first image freehand.
*tip*
I was hoping for a more abstract color on the background so I probably should use more water on the stamp next time. And all watercolor paper reacts differently - I think mine really sucked up the water quickly.

I set this panel aside to dry while I used the K pad colors to stamp the wildflowers (Stampin' Up! - More Petal Prints set) and SU!'s True Thyme to stamp the stems, on matching watercolor paper. I trimmed these out and pop-dotted them over the background panel. I added an antiqued silver label that says Smile (Karen Foster - Emotions set), with yellow brads attached. I used slightly thicker foam tape so it would clear the flower arrangement.

I mounted the background panel to a SU True Thyme green panel and then to a mustard panel edged with the green ink, using a sponge.

Thanks for looking!

December 03, 2007

Bleached Africa

Wow - hard to believe it's the start of another work week already! Hope we can all find some time for stamping in with the work of every kind :o)

This card features bleaching. The lion and the piece it's sitting on are all one piece of cs.

Card measures 5 1/2" x 4 1/4"

To start this card I stamped the Africa map (2nd Star on the Right) on a tan card with brown ink. Then I layered the torn edge natural paper on the left.

Next I stamped the lion (Rubbernecker) on dark tan cs using embossing ink and brown embossing powder. After melting the powder with a heat gun, I took a fine paintbrush and bleach and "painted" the body of the lion. After this had dried I used a damp paintbrush and watercolors to add some brown to the body, and some green for grasses.

I trimmed around the lion closely, tore the base as shown, and adhered it to the card.

*tip*
If you're adhering an element to an uneven surface like this where one background paper is thicker than another try putting a flat Glue Dot on the thick edge and a thin pop-dot on the other side.

Thanks for looking!

December 02, 2007

Congratulations!

Donna, your name was drawn! Yippee, your comment left on the Spotlight Poinsetta paid off LOL I've sent you an email - just reply to that with the card you'd like :o) Thanks everyone for all your awesome comments - I appreciate your taking time to leave them!

Poll Results!

Here's the breakdown on how many handstamped cards you're all planning to send out this Christmas:

42% said 11-49
23% said 50-99
17% said 1-10
12% said 100+
4% said 0-3

So it looks like we've all got some company! LOL I'm in the 1-10 cards range, because I'm SUCH a putzy card maker, and lot's of my extended family would be just as tickled with a nice store-bought card (can you imagine?! ROTFLMBO >;o)

Thanks for participating. I've got another poll in the works but that element of Blogger isn't cooperating at the moment...

Circle Punch tutorial

Good morning! Hope your Sunday is off to a good start, and that you'll have some time to rest, relax, reflect, worship, stamp, etc! :o)

We had our first ground-covering snowfall here yesterday, 4" maybe, and now all the trees are covered - the pines are especially beautiful. All that shoveling got me in a Christmasy mood so I came in last night and put up a bunch of decorations - nothing fancy, just some lighted garland over the tops of our large LR furniture, decorative garland around mirrors, a nativity scene, some red berry stems, a clock that plays a traditional Christmas song on the hour, etc. Not sure about a tree yet - we're spacially challenged here (not a lot of square footage! LOL)

Do you have any circle punches lying around? Today I thought I'd share a little experiment with you. A while back I was so enamored with circle punches that I used every coupon for months stocking up on various sizes! (with little thought as to where I would put them all when I got home with them) LOL

Here are the results of my thinking "Hmmm....wonder how many ways I could use my circle punches?" I sat down with all the sizes of punches and made a prototype atc for each idea and put them in pages that hold baseball cards (nine pockets a page) in a three ring binder (yes, I use them for everything!! LOL) I can flip thru this and refer back anytime for ideas. I do the same thing with other topics which I'll try to remember to share in future.

Keep in mind these are all thrown together with scrap cs and not meant to be a finished item - more like a template.


1. I cut squares, then cut them on the diagonal, then punched the center for a photo corner effect.

2. I punched a circle, edged the it with brown ink, then folded one side over the other.

3. I folded the circles in half, glued the bottom side to a base atc, and the inside half to a white panel so the circles work as a hinge and the panel opens.

4. I punched two atc's at the same time, then 2 smaller circles. I adhered fine string between the two white circles, then adhered the string between the two atc bases so the white circle spins freely.


5. I punched four holes in white panel, threaded ribbon thru, and glued panel to atc (this holds the ribbon in place pretty well).

6. This is just a faux metal rimmed tag, made by edging a white circle punched as shown with a silver pen, then pop-dotting it for dimension.

7. These are two graduated circles attached to flap panels with eyelets. There is a piece of thin cording anchored under one circle so you can thread it around as a closure. Quick tip: place a smaller circle under the larger one as well as on top before closing eyelet and you'll have more room to wind the cording.

8. For this one, you can either use a slit punch to get the effect shown, or punch three circles and attach an eyelet as shown when attaching the circles to the white "tag", which pulls out of the pocket with the circles as the tab.


9. Pretty self-explainitory - waste not, want not LOL! Provides a cool retro feel.

10. CS buttons, tied on with embroidery floss *tip* for dimension, glue a smaller circle of cs to bottom of button before punching.

11. The black is a circle, then the white circle swings open using the brad as a pivot.

12. This is four circles - two white edged with black, and two black edged with white.


13. This is a cool effect. Stamp the same image twice. Punch one with a large punch, then mark the center of the punched out piece and punch again with a smaller circle punch. Mount as shown over the base image using pop-dots.

14. Pretty self-explainitory, just using the punches as a tag reinforcement to add interest.

15. This is a circle folded in half, then a ribbon folded over front and back, adhered with a brad, to make a tab on a mini-tag.

16. This one is using the spotlight technique, where a circle from a main image is colored and pop-dotted over the original image.


17. Olives!

18. Frosty!

19. A quick and easy way to frame with no fancy corner punches. *tip* If you draw a line across each corner first in pencil, you can line the punch up with this for even corners.

20. Punch any scrap randomly and glue the piece to a base and the color shows thru. *tip* Save the punched out circles for confetti.


21. A quick tag for stringing onto ribbon.

22. A slit cut in the center of the circles makes for different photo corners.

23. A circle cut in quarters, and you can layer them on top of the top panel or under it for totally different looks.

24. Kind of a reverse spotlight effect.


25. A spinner. Note that you can punch tiny circles in the edge for a gear effect to make turning easier. The white circle spins on the brad, just make sure you punch the spinning circle exactly in the center or it'll wobble and be off-kilter.

26. Make use of your alphabet stamps lingering lonesomely! A simple circle punch, a different color cs and pop-dots will add interest. *tip* try mixing different alphabets on the same word.

27. For these 3D flowers, cut slits as shown from edges to center, leaving an uncut circle in the center which will get covered by the smaller punched circle adhered to it. The leaves are circles cut in half.

Hope this inspires you to go dig out those punches and add them to your stamping techniques...

Thanks for looking!

December 01, 2007

Spotlight Poinsettas

Well I did a dumb thing. I took the bed linens off to wash them tonight and then forgot to throw them in the dryer LOL so now it's 12:45am and I could stand to go to sleep anytime...but since I can't here's a card I made tonight!

Card measures 5 1/2" x 4 1/4"

This poinsetta stamp is from the half sheet Christmas plate by I Brake For Stamps (see sidebar for link). I started by inking the stamp with black Staz-Onand stamping it on white cs two times.

I used a pencil to draw some freehand triangles where they looked good to me and then used a paper trimmer to cut the lines straight. I colored these with a blender pen and Distress inks (Peeled Paint, Aged Mahogany, and Scattered Straw). I adhered these to green cs and trimmed them by hand with a ruler, Exacto knife and glass mat.

I adhered the triangles to the base image, stamped extra poinsettas in the corners for balance, and then stenciled Stampin' Up!'s Cranberry Crisp around the edges. I wrapped the ribbon around the panel and adhered it to cranberry cs. I punched a hole in each corner and added anodized brads.

I adhered this to a Watercolor Distressed panel (see CD shadowbox post on sidebar for instructions), then to a cranberry card front.

Thanks for looking!

November 30, 2007

Spotlight Holly

I was really thrilled to find this stamp, and this is my first time using it. I'm very happy with the vintage look, yet it's still cheerful and festive for Christmas!


Card measures 5 1/2" x 4 1/4"

I started by stamping the collage image (Tin Can Mail for Inkadinkado) twice on off-white cs, using Staz-On ink in Timber Brown. To figure out what section to use as my "spotlight" I sketched a pencil box around an interesting section on one of the stamped images, then trimmed this area to size with my paper trimmer to get straight, even sides.

I used a blender pen and Distress inks (Peeled Paint, Aged Mahogany, Frayed Burlap and Scattered Straw) to color in this panel, and then layered it to a red panel and set it aside.

For the base image, I grabbed the other image I had stamped and I roughed the edges up with the Tim Holtz distressing tool (a scissor would work fine also, just be careful - nothing worse than an ill-placed bloodspot on a great card LOL ;o), then I sponged some of the Distress Scattered Straw around the edges.

I adhered the spotlight piece to the base image, being careful to line it up well. Then I stamped Joy to All (Hero Arts) on a scrap of off-white cs, sponged the edges with the Timber Brown, and then to darken further, I ran the pad around the edges. I pop-dotted this on the card as shown.

For the cardfront, I used the same technique as in the CD case shadow box post (see sidebar).
Thanks for looking!

November 29, 2007

Embossed Tree

Good morning! Here's a fun little tree that reminds me of a Dr.Seuss kind of Christmas :o)

These stamps are from Wood-n-Paper, Ink, and there's a 20% off total order sale going on right now! When checking out just enter this code to receive the discount: IB1207 Don't worry - she knows you're coming and is all set up for you to shop LOL Just click on the link on my side bar and it'll take you right there!


Card measures 8 1/2" x 4" and fits in a business envelope for regular mailing fees.

I started by stamping Christmas Tree #L187 on white cs, using clear embossing ink.

*tip*
I went thru a lot of embossing inks before I found one I fell in love with. Believe me, it can make all the difference in how much you enjoy embossing something! I use the pink pad by Rubber Stampede for Delta. It just says Embossing Ink Pad on the clear cover, and I believe I picked it up at a Micheal's.

I sprinkled a white embossing powder over my image, shook off all extra, and heated it with my heat gun. I picked up a large stippling/stencil brush with a rounded edge and pounced Stampin' Up!'s Old Olive over it as shown, leaving white at the edges. I would have followed the tree silhouette closer if I had had a smaller brush around.

Next I drew an even border in pencil on the reverse, about 1/4" in, and used a Fiskars embossing plate to place dots around the edges.

*tip*
If you run a scrap of wax paper over your cs before embossing, your stylus will work more smoothly, and resist tearing the paper.

I applied some self-adhesive gems to the tree (these are actually a pinkish cranberry irl) and then punched the corners as shown with a 1/2" circle punch. I adhered this panel to a cranberry one that I had also punched corners on, and then layered this to a green piece.

I stamped the sentiment in Stampin' Up!'s Cranberry Crisp and Old Olive on white cs, trimmed the corners, and layered in the same way.

For the pinkish bkgd I used a Distress wash (see CD case entry for this month for technique) in Aged Mahogany.

I adhered all layers, tying the ribbons on as shown.

Thanks for looking!

November 28, 2007

Evergreen Noel


Sorry about the crooked scan - I made this card last year and I don't have the card anymore or I'd rescan it straighter and larger so you could see more detail.

This is a very simple Christmas card, but the gold edging and embossing, which shows up much better in real life, makes it elegant.

Card measures 5 1/2" x 4 1/4"


I started by cutting a neutral piece of cs 4" x 5 1/4". I randomly stamped the pine cone (All Night Media) in brown ink, and then the pine needles (All Night Media) in Adirondack Pesto and Lettuce dye inks as shown.

I used the brown ink and a stipple brush to color in the pinecones. I wanted a soft look so I wasn't too worried about staying in the lines. I used some of the green around the edges near the needles.

I used embossing ink to stamp Noel (DeNami) in the center and embossed it with antique gold. I used a Krylon gold pen on the border, and adhered the panel to a matching green cardfront.

*tip*
When drawing a line, especially with any kind of marker, I use a metal cork-backed ruler. The cork keeps it from slipping, and also raises it enough that the marker doesn't bleed under the ruler's surface and onto your paper.
Thanks for looking!

November 27, 2007

Snow Penguin


Are any of you wanting a cool Stampin' Up! spiral notebook punch as badly as I am?! LOL As cool as the square holes are, it finally occurred to me that I could make a mighty neat approximation using a common circle hand punch combined with the rectangle hand punch! Who said necessity is the mother of invention?...I know, I know - I'm just testing you ;o)

This card is for all of you who really love blue for Christmas, or even just a winter card to say hey to someone you like. It's not quite this bright in real life.
Card measures 4 1/4" x 5 1/2"

I started with a piece of glossy cardstock. I always use Kromekote, which I bought a ream of at the last stamp show I was lucky enough to attend.

*tip*
Anytime I buy anything in bulk, paper especially, I keep the original label and attach it to the front of the folder, container, etc. You always think you'll remember the brand, but then...you know!

The first step was to use a Versamark pad to ink up two snowflake stamps (large single - Sarasota Stamps, small cluster - Stampin' Up!) and stamp them randomly over the glossy cs.

Then I used a rubber brayer, and a Kaleidocolor pad in Blue Breeze. I loaded the brayer up thoroughly by leaving the pads in the open position and running the brayer over them at a slight angle. Then, with my 4 1/4" x 5 1/2" piece of glossy cs on scrap paper, I ran the inked brayer over the cs diagonally as shown on one side, then flipped the cs around and did the other side, keeping the lighter shade in the center.

For the main image panel I stamped the penguin (Art Impressions) with VersaFine black ink, and then used a blender pen and the Kaleidocolor pad inks to color his turquoise highlight. I colored his cap and beak in with Stampin' Up! markers and the blender.
To stamp the ice, I stamped the penguin on a Post-it, cut it out and layered it over the image on the panel. Then I used the Amuse Skinny Oval and one of the colors in the K pad to stamp the ice, and then highlighted it with irred. glitter glue. After I stamped the snowflakes in the same ink around the penguin I peeled the mask off.

For the snow circle I inked up the Penny Black circle tag stamp with Stampin' Up! markers direct to the rubber, punched it out, and edged it with one of the markers.

I punched the top of the main image panel as stated above, adhered it to a black panel, then to the background panel, then white, then a black cardfront. I adhered the circle as shown and then used a silver snowflake brad.

Simple but cute, I think :o)
Thanks for looking!

November 26, 2007

Stand Up Santa & Friend

Here's another stand up card by way of the Deerfoams box inspiration (see Saturday's post):


Card standing measures 7" across x 6" high to top of image panel x 2" deep.

You'll be so proud of yourself after you make this card you'll want to just put it on your own mantle instead of sending it off to a lucky recipient for Christmas ;o) But if you do send it out, it will fold flat.


I really really REALLY suggest (strongly! >;o) that you make yourself a practice template like the one below (click photo for larger view) first and hang on to it for a refresher when you want to make a new one. It's SO much easier if you don't have to remeasure everything.

*tip*
I keep a 3-ring binder for all the mechanical/3D cards I have made or would like to make. For each seperate type, I slip the pages of directions in a sheet protecter and the template and/or a sample card featuring it behind these so I can just flip thru it for instant inspiration.


You can start with a piece of patterned paper and adhere it to cs for strength or make your own base piece like I did here. I started with an 8 1/2" x 11" sheet of off-white cs, planning to trim it down as needed.

I wiped a Distress ink pad in Peeled Paint on a nonstick pad, then spritzed it with water. I laid the cs down on this and lifted off to dry. It needed more interest so I use a Distress ink pad in Frayed Burlap and ran it randomly over the paper, starting at the tall end and coming downwards with it. Still not right so I took the Frayed Burlap pad, swiped it on the nonstick pad lightly, and then poured a puddle (about quarter size) of Irredescent Watercolor Medium, mixed with some water, onto the pad and used a rubber brayer to mix it all together and roll over the background paper. This added a faint sparkle that shows up close and browned the green more evenly.

*tip*
The reverse of the bkgd cs will show a bit so I like to give the back side a wash of the color I'm using.

I stamped 2 different PSX Poinsetta stamps over the bkgd using Frayed Burlap and then the Background Text-Thin stamp (A Stamp in the Hand) in Brilliance Galaxy Gold.
After the bkgd was completely dry and flat, I trimmed it to 7" x 11". I flipped it decorated side down and drew pencil lines the short way at 1" (A), 4" (B), 6" (C) and 9" (D), and then scored these, still on the reverse. Then I drew the same type of lines at 5" (E), 7" (F) and 8" (G) without scoring or cutting. I turned the piece sideways with line A at the far end and focusing on the area between line B and D I drew pencil lines at 1 1/2" (H), 3" (I), 4" (J) and 5 1/2" (K). I know this seems tedious and confusing at the same time but you're almost there!! ;o)

I measured 1" up from line D and scored this line (G) between lines H and K. Then starting at this scored line I cut the two pencil lines (H and K) up to Line B with an Exacto knife. Then I scored lines E and F between I and J, and then cut lines I and J (with the Exacto) between lines E and F.

And the cutting and measuring is done - yayyyyy! Breath a sigh of relief now ;o)

The rest is pretty simple - I just stamped my main image (Inkadinkado) on off-white cs using black ink, the second stamping. I colored it in using Distress inks and Q-tips, and trimmed the edges with deckle scissors. I layered this to a green panel, then dark brown and then red. It's important to make sure the red panel will fit between lines H and K with a little room to spare. At this point I sponged some Frayed Burlap onto all the cut edges of the base card for definition.

To put it all together, glue the 1" panel near line A underneath the wide panel at the opposite end. Now holding the base, push on the panels between the edge and line H and the edge and line K. Now center the red panel on the 2" x 1" pop out panel adhering it from line F to the scoreline at line C only.

I punched some flowers from the green and red scraps and layered them with a gold brad, and then adhered them to the card as shown with Glue-Dots. I wrapped the bottom of the panel with a red ribbon and tied a brown and black gingham ribbon around it.

*tip*
Always adhere a part of your ribbon to the cardfront, even if it seems stretched tight enought to stay in place. I like to do this right near the most awkward spot - here where the tied ribbons bunch up the red ribbon. I like the skinny ATG tape gun for this.

For the tag accent, I stamped the Merry Christmas collage word stamp (Hero Arts) on the off-white cs using the Distress Peeled Paint, then the large Merry Christmas again in black lining it up with a stamp positioner. I used the Multitags Scallop punch by McGill on this and on the brown cs, then layered them as shown.

Because my image panel ended up so much heavier than the base it had a tendency to be too top heavy and fall backwards. I fixed this by attaching a matching easel on the back of the image panel (see photo) that will fold back on itself when folding the card up.
Thanks for looking!

November 25, 2007

Congratulations!

Well congratulations Mom!! Your name was drawn in the weekly card drawing! And lucky for Linda too, because my policy is if family wins, someone else gets to win too ;o) So let me know when you get a minute what your first and second choices are and hopefully you'll both like different cards LOL

November 24, 2007

Self-standing Christmas Chrerub

I got the inspiration to make this card from a Dearfoams slipper box we bought recently (with slippers, of course LOL). If you like it, stay tuned for the other version, coming with Monday's post!!

Card standing measures 4 1/4" across, 2" deep, and 4" high

Here's the box the way it came, with one slipper on each level:

I'll be posting a card using this format on Monday. And the way it popped up as I was getting ready to toss it out:

Okay, I know this side view below looks ackward, but it stays standing this way with the right angle from the front view as seen above.

Here's a view below taken with the scanner to show you that it folds flat and can be easily mailed out.

Card folded up measures 4 1/4" x 5"


Here's the template (if you click on it you will get an enlarged version, easier to read.) I suggest making a trial one to use as an ongoing template.

Here's how I put it together:

I started with a sheet of 8 1/2" x 11" white cardstock, and cut it in half the long way, ending up with 2 pieces each 4 1/4" x 11". I set one aside and decorated the other. Using some of the blue alcohol inks, I put a few drops of each on a transparency, squirted a bit of blender into them and rolled them onto my cs using a cheap brayer from the paint dept. of Home Depot (yellow pad, white handle). I added some drops of the silver mixative and kept repeating till the cs was covered as shown.

When this was completely dry, I adhered the two pieces of cs together. I flipped the panel over, decorated side down, and with the long side facing me, and marked my lines with a pencil and ruler (see professionally drawn template Haha ;o) I marked them as follows: 1" (A), 4" (B), 6" (H & I), and 9" (C). Then I turned it sideways so the short end with line C was nearest me. I drew two lines between lines B and C, each 3/4" in from the edges (D & E). Then I measured 1" up from line C and drew a line (F), and 1" down from line B and drew a line (G).

Next, I cut lines D and E, from line B to line F, using an Exacto knife and glass mat. I then scored lines A, B, C, F, G, H and I (note that you do not want to score the whole length of the H/I line - only in from the edges to lines D & E).

In order to fold flat for mailing, the image panel has to fit inside the rectangle from line B to line F and from line D to line E so it will measure approximately 3 7/8" x 2 5/8". I stamped the cherub (Inkadinkado) on a white scrap cs in Stampin' Up!'s Buckaroo Blue, then stippled the same ink around it. Over this I stippled Encore's Ultimate Metallic Blue. I colored in the star with a Sakura Gelly Roll pen, and added a mirror-base domed sticker in the center. I layered this to metallic silver cs, and then to textured dark blue.

To finish decorating the base where it would show from the front, I embossed some blue snowflakes (Stampa Rosa) using Encore Ultimate Metallic Blue and clear fine detail embossing powder. Then I used clear embossing ink and Stampin' Up!'s Sterling Silver embossing powder to stamp the greeting by Anna Griffin for All Night Media near the bottom edge.

To put the card together I adhered the main image panel ONLY to the area between lines G and F and between lines D and E, and then folding the card into a box shape, I adhered the 1" panel at the end to the 2" panel on the other end.

Ta da! Fun to put together and impressive enough to display as a Christmas decoration.
Thanks for looking!