Search This Blog

Pages

March 29, 2009

Vegie ATCs

I worked on a set of vegie ATCs because I have always loved these three images from the Rubber Baby Buggy Bumpers line, now at StampFrancisco, but never used them. Plus vegie images always remind me of how amazing seeds are, that they can produce vegetables, and I love to be amazed at what God has created! Can't wait for summer all of a sudden :o)


STAMPS: vegies - Rubber Baby Buggy Bumpers, postage - Hero Arts, Stampers Anonymous, Stampa Rosa, speckle - Judith peg, vegie words bkgd - A Stamp in the Hand

INKS: Stampin' Up! Real Red, Really Rust, Always Artichoke, Mellow Moss and Certainly Celery, Staz-On Jet Black, Versamark

SUPPLIES: black embossing powder, anti-static bag, cosmetic sponges, Dove blender pen, glue stick

TECHNIQUE: Technique Junkies Dragged Madras 04/09

STEPS:
  1. Use Certainly Celery and Always Artichoke to do a Dragged Madras bkgd on a 3 1/2" x 2 1/2" card.
  2. Overstamp with the vegie words bkgd with Always Artichoke.
  3. On white scrap cs emboss vegie using Versamark and detail black powder.
  4. Use Dove blender pen and ink pools to color in vegie image.
  5. Trim image closely and adhere to card with glue stick.
  6. Stamp phrase with Staz-On Jet Black.
  7. Stamp postage with second generation Real Red.
  8. Ink speckle stamp with black ink and stamp on two edges till it needs reinking.

Hope your weekend was nice - thanks for stopping by!

March 27, 2009

Newsprint Reveal Cat Face

Another new technique from the upcoming Technique Junkie newsletter, called Newsprint Reveal.


STAMPS: cat - Rare Image Rubber Stamps, Beauty - unknown, letters - Stampin' Up, text tag - My Sentiments Exactly, flourish corner - unknown

INKS: Stampin' Up! Cranberry Crisp and Craft Whisper White, embossing ink, Marvy black

SUPPLIES: flower punches, flat backed gemstones, embossing powder - clear, colored pencils, brayer, Signo white gel pen

TECHNIQUES: Technique Junkie Newsprint Reveal 04/09

STEPS:

  1. Make bkgd using Newsprint Reveal technique.
  2. Stamp cat head on light grey cs and highlight with colored pencils.
  3. Ink Beauty stamp with Cranberry and stamp as shown.
  4. Mask cat and overstamp with text tag in second generation Cranberry.
  5. Punch asst. flowers from cs (I ran the Cranberry pad over the pink and grey cs for some variation in the same color range).
  6. Layer elements as shown, using Glue Dots to adhere flowers, and place gems in centers.
  7. Stamp the flourish corner in white ink, and when dry go over light areas with white gel pen.
  8. Layer as shown to cardfront.

Chevy is doing much better - thank you Lord! - but he needs to eat a bit more on his own. Have a great weekend!

March 26, 2009

Using up scraps

Thought to myself, why not use up those fab scraps from the last card, and so here they are! LOL I've had this fish stamp at least two years and hadn't used it because it is HUGE and I was never sure what to do with it. So here are some more ATCs (yes, I'm officially hooked!!)

Click on photo for more detail...

Each card measures 3 1/2" x 2 1/2"

STAMPS: fish - Fred B. Mullett BG 15 - Big Pompano, swirls - Autumn Leaves

INKS: Stampin' Up! Pacific Point, Versamark Watermark

SUPPLIES: corner rounder, flat backed acrylic gems (Cloud 9 Design - Archivers), ArtQuest Pearl Ex Watercolor Palette, paintbrush, Black Diamond (Judi-kins) embossing powder, sponge, white gel pen (Signo Uni-ball)

PAPER: leftover Wet Stencil scraps, Neenah Solar White #110 cardstock

STEPS:
  1. Round corners on 3 1/2" x 2 1/2" white cardstock
  2. Tear edges of decorated paper scraps and glue to base card.
  3. Wipe with anti-static pad.
  4. Ink fish with Versamark and stamp where desired.
  5. Sprinkle with embossing powder and heat.
  6. Use a paintbrush and water to activate the palette and color in fish.
  7. Add white gel pen to eyeball.
  8. Cover fish and overstamp card with flourish inked with blue ink.
  9. Sponge blue ink around edges.
  10. Add bubble gems as desired.

Just having fun - hope you enjoyed!


Ocean Flourishes

The new Technique Junkies newsletter is almost ready to go live! Here's a little sneak peek of one of my favorite techniques on it called Wet Stencil.

Card measures 5 1/2" x 4 1/4"
STAMPS: I Brake For Stamps
INKS: Stampin' Up! Pacific Point, Versamark Watermark
SUPPLIES: exacto knife, Nestibilities oval, Cuttlebug, watercolor crayons, dome top adhesive backed gems, sheer blue ribbon, water mister, sparkle gel pen, stamp positioner, embossing powder - white, sponges, wall decor stencil
PAPER: vellum, SU Pacific Point, asst. blue cs, white cs
TECHNIQUES: Technique Junkies Wet Stencil 04/09
STEPS:
  1. Do Wet Stencil technique and let dry.
  2. Cut WS panel into oval shape using template or CB and die.
  3. Crumple vellum and tear into circle to fit behind oval panel, and adhere to it.
  4. On medium blue panel, measure rectangle and cut out as shown.
  5. Using sponge and blue ink edge this panel, including the 'window'.
  6. Stamp on side of the IBFS baroque frame on side of panel as shown using a stamp positioner to add enough to fill space evenly.
  7. Using second generation ink, stamp writing in lower right hand corner.
  8. On light blue panel, stamp starfish in versamark ink three times in the area where the window will lay over it, and emboss with white powder.
  9. Stamp the rest of this piece with the starfish and Versamark ink.
  10. Wrap a sheer ribbon around this panel, tying a knot towards the top and adding gems towards the bottom
  11. Stamp the verse on the oval panel using blue ink.
  12. Highlight the edges of the flourishes with sparkly gel pen.
  13. Layer the panels as shown.
Hope the rest of your day is good - it's very grey and cold here, but it's not flooding so I've got no complaints. If you are in the Red River area my thoughts and prayers are with you right now.

March 25, 2009

World Traveler

oh the joys of being a kid with a new set of wheels!! I'm guessing when this vintage photo image was taken he thought he was king of the world :o)


Card measures 5 1/2" x 4 1/4"
INKS: Staz-On Jet Black, Stampin' Up! Not Quite Navy, Versamark Watermark
SUPPLIES: cotton balls, Q-tips, crown punch, glitter pen, white gel pen, SU Chalks, pop-dots, black photo corners
TECHNIQUE: from Rubber Stamping Artist Trading Cards by TweetyJill Publications
STEPS:
  1. Stamp main image on white cardstock using Jet Black ink.
  2. Stamp same image on Post-It, trim into rectangle and place over previously stamped image.
  3. Ink map image with Versamark and cover the unmasked area of the white cs.
  4. Wait a few minutes and then apply chalks to Versamarked area with cotton balls.
  5. Uncover masked image and apply chalks as desired with Q-tips.
  6. Stamp blue scrap with ticket, punch with crown punch, apply white gel pen to edges and sparkle pen to crown points.
  7. Stamp quote in blue ink on white cardstock and trim whimsically. Edge with Jet Black from the pad.
  8. Use black ink pad at an angle to edge the main image.
  9. Glue black photo corners to corners of image as shown.
  10. Attach quote panel and crown to image with pop-dots.
  11. Ink tickets, numbers and star with Jet Black and stamp on background.

*tip*

For the distressed look on numbers/letters, after inking the stamp I used a cotton ball to remove some ink a bit, giving those areas a faded look. Here's the tip - if you use Tack n' Peel or Tack It Over and Over on your acrylic blocks with your unmounted stamps, don't let the cotton ball rub on it or you'll have a mess of fuzz ;o)

12. Trim main panel to size and mount to black cs, and then textured blue.

HOPE THIS BRINGS BACK A HAPPY CHILDHOOD MEMORY!

March 23, 2009

Furry Friend

Card measures 5 1/2" x 4 1/4"

STAMPS: I BRAKE FOR STAMPS - Stampinback line

INKS: Distress Tattered Rose, Vintage Photo, Worn Lipstick and Weathered Wood, Staz-On Jet Black

SUPPLIES: Fiskars 'Cloud' scissors, hole punch, Dove blender pen, sheer pink polka dot ribbon, water spritzer, craft mat

TECHNIQUE: Technique Junkies Watercolor Distress

SKETCH: variation of Mojo Monday (see sidebar for link)

NOTES: flowers on cardfront are third generation Distress Vintage Photo ~ the Watercolor Distress was done on a dark cream cardstock to provide a parchment look ~ the main image panel edges were distress straight from the Distress Antique Linen pad

3 Arty Girl ATCs

More ATCs - what a surprise, huh?! LOL


Each card measures 3 1/2" x 2 1/2"

STAMPS: flourish - Autumn Leaves, daughter quote - Stamping Sensations, cosmetic quote - Inky Antics, net bkgd - B-Line Designs, all others - Jody Posey (now owned by Alluring Impressions)

INKS: Distress Fired Brick and Antique Linen, Staz-On Jet Black and Azure

SUPPLIES: flower brads, Tombow #970, water spritzer, craft sheet, oil pastels, Uniball Signo white gel pen

PAPER: vellum, Neenah Solar White 110#

TECHNIQUES: Technique Junkies Watercolor Distress

NOTES: these ended up a little busier than I planned on so I maybe should have spent more time editing ~ I wanted an arty feel so I scribbled a blue oil pastel in the open white spaces of the portraits, and just colored all the skin area with the Tombow marker, highlighting eyes/teeth with the white gel pen ~ flowers were stamped in first and second generation ink ~ the bkgd mesh was stamped on the white cs and then generously edged with the Antique Linen pad

THANKS FOR STOPPING BY AND COME BACK SOON FOR AN I BRAKE FOR STAMPS CARD!

March 22, 2009

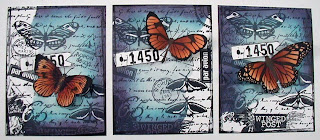
3 Butterfly Collage ATCs

I think I've found the perfect size paper to work on! I've always been so afraid of color but not now LOL I feel freer to experiment on ATCs - maybe because I know if I don't like the outcome and toss it in the trash it's just a tiny little piece...

Some days I am so in awe of God's creation I can hardly stand it! I know my butterflies aren't colored true to life necessarily, but have you ever Googled photo images for insects? The variation and and delicacy really is beyond comprehension when you remember they are tiny little functioning machines that can FLY!!
Speaking of color, I was so inspired by Michelle Zindorf's blog post today that I had to whip these up immediately. I had been laying in bed sometime during the night/morning (who can tell!) thinking about this bkgd stamp for ATCs with the torn edge technique and it went perfectly with the butterfly motif and color theme Michelle used today!


Click photo for more detail...

Each card measures 3 1/2" x 2 1/2"


STAMPS: butterflies, left to right - Funny Business, Whispers, and Stampabilities, collage - Inkadinkado

INKS: VersaMagic Dew Drops - Aspen Mist, Ocean Depth, Eggplant, Pumpkin Spice, Gingerbread and Red Brick, Staz-On Jet Black

SUPPLIES: sponges, Glue Lines, white crayon, grey pencil, Post-it notes, tissue, Q-tips, Micron finepoint black marker

STEPS:

  1. Cut 80 - 110# white cardstock to ATC size - 2 1/2" x 3 1/2"
  2. Ink collage stamp with Jet Black and stamp on cs.
  3. Tear Post-it and place as desired.
  4. Use white crayon to color in a few areas you'd like to stay whitish.
  5. Stamp collage on Post-it, trim out number rectangle and place mask over ATC.
  6. Coat sponge with Agean Mist and cover ATC surface with masks in place.
  7. Continue process with Ocean Depth, and then Eggplant, keeping to the edges.
  8. Wipe ink gently from crayoned areas with a soft tissue.
  9. Remove masks and edge with black pad as shown.
  10. Stamp butterfly on white scrap cs with black ink, then color with sponges, starting with Pumpkin Spice over all, then Gingerbread near the center, then highlighted with Q-tips and Red Brick and Eggplant.
  11. Trim and apply Glue Lines to body area.
  12. Adhere over collage in desired area and draw in antennae.
Hope you liked these - I was really happy with how they came together :o)

March 21, 2009

3 Fashion ATCs

Well I am LOVING making ATCs and wonder why they never appealed to me before! I really like making three coordinating ones while I have my supplies out.

Click on image for detail...
Each card measures 3 1/2" x 2 1/2"

STAMPS: woman with parasol - Stubby Stamper, other two women - Stamp Affair, beaded flourish - Inkadinkadoo, feathers - unknown, Paris postmark - Rubbernecker, Grand Central postmark - unknown, Milano postmark - Jody Posey

INKS: Staz-On Jet Black, VersaMagic Dew Drops - Tea Leaves, Aegean Blue and Purple Hydrangea, Versamark

SUPPLIES: Signo white gel pen, white embossing powder, heat gun, Pritt glue stick

PAPER: vellum, Neenah Solar White 110# Classic Crest

NOTES: the vellum torn strip on each was lacking weight so I layered a couple of them ~ bkgd color is pads direct to paper ~ I love 110# cardstock for ATC's - provides a very sturdy base ~ women were stamped on 110# cs, colored with the pads and a Dove blender, then trimmed out and glued down with the glue stick (yep, little miss parasol took the longest - look at those tiny feet! LOL) ~ used the white gel pen to fill in the 'highlights' on the beaded flourish (love this - just bought it for 40% at our local Joann's)

HOPE YOU LIKED - I CERTAINLY ENJOYED PLAYING!

March 20, 2009

3 Bird ATCs

I almost always do cards, but couldn't resist the new TweetyJill publication Rubber Stamping Artist Trading Cards at Michael's yesterday, which got me wanting to make some ATCs. I've wanted the book since I saw that it was coming out and it does not disappoint!
Hope these ATCs don't disappoint you! LOL as you'll probably be seeing more ;o)
Click photo for more detail...


Each ATC measures 3 1/2" x 2 1/2"
STAMPS: all I Brake For Stamps except for the background with fleur-de-lis which is Whispers, and the birds on wire which is Inkadinkado. Spatter stamp is Annette Watkins.

INKS: Distress Antique Linen, Broken China, Aged Mahogany, Frayed Burlap and Staz-On Jet Black

SUPPLIES: raffia, Fastenator, white gel pen, black fine point marker, glue stick (Pritt), pop-dots and feather

PAPER: photocopied vintage dictionary page

NOTES: turqoise bkgd was stamped over white cs rubbed with Antique Linen, and then torn and adhered to bkgd paper ~ all cards were edged liberally with Antique Linen, and then lightly with Frayed Burlap direct from the pads ~ one bird on wire was pop-dotted and nest on same card was stamped seperately and then layered, outlining eggs with a white gel pen ~ solid bird was inked with Broken China, kissed with bkgd stamp to remove some ink in a pattern, then stamped, trimmed out, and edged lightly with the black pad


Found this cool old skirt hemming stick on a metal stand and decided to use it to display finished ATCs and cards

March 18, 2009

Pastel Baby Lamb

Went to the local monthly card club last night and this was my card. We all make up a sample card and then make enough for each person to make one of the same (it's a little group). At the end of the year we all have plenty of all occasion cards so send out.


Card measures 5 1/2" x 4 1/4"

STAMPS: lamb face - Azadi Earles, leaping lamb - Art Impressions, bow - Darcie's, words - Paper Salon
INKS: Stampin' Up! Pale Plum, Pretty in Pink, and Going Gray, Staz-On Jet Black
SUPPLIES: scallop edge scissors (Clouds by Fiskars), hole punch (Marvy 1/8"), piercing tool, foam mat, sponge, blender pen (Tombow), 3D foam tape, white gel pen (Uni-ball Signo), Cuttlebug, Swiss Dots embossing folder (Cuttlebug), glue stick (Pritt), 2" circle punch
PAPER: lilac polka-dot and sage stitched plaid (unknown - it's old! LOL using what I have as much as I can ;o)
STEPS:
1. Stamp lamb face in black ink on white cardstock.
2. Using a blender pen, color as shown.
*tip*
With your ink case closed, gently push the lid to the ink pad to transfer ink to the inside cover. Use this pool with the blender pen to color. Start your pen on scrap paper to control the amount of dilution you want.

3. Trim lamb face closely with scissors, apply foam tape to reverse and set aside.
4. Stamp bow on patterned paper and trim closely. Set aside.
5. Cut a rectangle 3 3/8" x 2 7/8" from patterned paper and punch as shown a 2" circle.
6. Use a piercing tool to punch around the edges of the rectangle and circle.
7. Connect pierced dots with white gel pen.
8. Emboss a piece of green cardstock 4 1/4" x 3" with polka dots.
9. Trim the bottom edge 1/4" off with scallop edge scissors.
10. Mark the center of each scallop with a pencil dot and punch with a 1/8" hole punch.
11. Ink the leaping lamb stamp with Pale Plum and stamp in an arch across the short edge of the bottom of the white cardfront.
12. Ink a sponge wedge up with the Pale Plum and lightly edge the cardfront.
13. Ink the word stamp with black ink and stamp over the leaping lambs.
14. Layer the panels as shown using a glue stick for the bow.
Have a great day and hope you have sunshine where you are!

March 14, 2009

Roses in March!

The temps here are supposed to hit at 40 and I'm giddy! LOL Hard to believe it was 5 below the other night. My poor lilies close to the house are trying to poke thru their winter mulch already so they too need good weather from now on :o)


Card measures 6 1/4" x 4"
I took this photo late last night and didn't have enough light, but the main image is a stack of hatboxes and the phrase reads Fashions can be bought, Style one must posess.


To learn how to make these paper roses yourself, go to this blog, where she has generously provided an absolutely perfect photo tutorial!


STAMPS: bkgd - Toybox, hatboxes - Serendipity, main phrase - Victorine Originals, sm bkgd phrase - Hero Arts
INKS: Stampin' Up! Cranberry Crisp, Marigold Morning, and Old Olive, Distress Tattered Rose, Versamark

SUPPLIES: punches ~ trees - McGill Creativity, flower - Family Treasures, Ivy Scraps Scrap Fusion permanent adhesive, sheer pink ribbon, flat-backed adhesive pearls, sponge, plastic report cover, embossing powder in clear, water spritzer, heat tool, toothpick, Radiant Pearls Oyster Shell, sm paintbrush

TECHNIQUES: Technique Junkies Background Smoosh Resist 02/09 newsletter, handmade 3D flower (instructions here)

NOTES: didn't have a leave punch in the right size and didn't feel like free-hand cutting some so I used a pine tree punch with two sizes of trees on it ~ the small Style phrase is stamped in first and second generation Old Olive to take up some white space and tie in the leaves ~ the sheer pink ribbon was wrapped around the corners before layering to the cardfront ~ I added a bit of Radiant Pearls in Oyster Shell to the ridges of the flower but managed to wipe most back off applying the flower to my card LOL but you get the idea (you can also add Diamond Glaze in drops to simulate water droplets/dew)

Thanks for stopping by and have a great rest of the weekend!


March 12, 2009

Exciting news...

...for you if you love the Rare Image Rubber Stamps GARDEN sheet! Check out the Stamp Something blog March 13 and on for the fun!! :o)
Here's a shadowbox card I just finished up featuring both the RIRS GARDEN and PETS sheets images. I've been so inspired by Pat Moore's art on the RIRS site that I wanted to start stamping some scenic artwork again. The shadowboxes can be a little putzy and you have to concentrate when you're measuring and cutting LOL but when they are finished I really get a kick out of having these little dioramas sitting around on my desk for a bit. I have a few more I finished last year and had thought they were on my blog but I couldn't find them anywhere. I'll post the three of them here in the next few days...


Card measures 3 1/2" square and 1" deep


STAMPS: cat, birdbath and tree - Rare Image Rubber Stamps, path - V.I.P., cottage - PSX, mountain scene - Comotion, large grass - All Night Media, small grass - Stampin' Up!
INKS: Adirondack Willow, Lettuce, Pesto, Sandal, Latte, Stampin' Up! Bashful Blue
SUPPLIES: stamp positioner, ruler, pencil, eraser, stipple brushes, colored pencils, Flower Soft, Exacto knife, Micron 02 black finepoint marker
NOTES: see below


I generally start scenic work by drawing the approximate size of the finished piece on paper, and then stamping the images I'm planning to use so I can see how it fits together.


After I measure the cardstock for the total piece and mark where score lines go, I draw my opening and trim around it with an Exacto knife.


At this point I usually stamp the scene on the inside panel and if I screw it up (like this time LOL) I just stamp it on a matching piece of cardstock trimmed to fit. I like to continue part of the scene onto the inside side panels so the card looks good from an angle (and I do the outside side panels a bit too, if I'm not too lazy ;o)
For any areas that don't match up perfectly, or there is blank space, I use the finepoint black marker to add what's needed. A good example is the continuing line of the path on the frame area - once the card was folded together I drew in some grasses to continue the path stamped on the inside so it would look like it was coming into the forefront. This is where I also added the Flower Soft to start on the frame and draw the eye into the scene.

To apply color, I used the lightest colors and applied them with Airebrush stipple brushes, then filled in darker using the same and colored pencils. I kept a mask over the cat the whole time to retain the crisp white.


Hope you enjoyed - now go check out Stamp Something!

March 09, 2009

A Mojo Monday card

Got a chance to make a card for today's Mojo Monday challenge - they have such great layouts and I was sad I didn't get to last week's. I started on it early this morning and got to finish it about an hour ago.


STAMPS: I Brake For Stamps - the flower and butterfly are on a half sheet featuring Asian images, the phrase (Life is fragile, handle with prayers) is on a half sheet of inspirational words, the two flourishes are single images from the Stampinback line, and the script is from a half sheet featuring vintage images


INKS: Stampin' Up! In-Colors - Baja Breeze, Tangerine Tango and Kiwi Kiss, Staz-On Jet Black

PAPER: SU In-Color cardstock to match inks

SUPPLIES: matte black small brads, circle punch, stamp edge scissors, paper piercer, sponges, blender pens

SKETCH: Mojo Monday #77

If you get time go check out all the great artwork piling up on the Mojo Monday site!

March 03, 2009

Flower Child

Sorry to be so slow in posting much lately - it was again time to work on some sample cards for the next Technique Junkie newsletter so that's where my focus was for a bit.
I just got a wonderful sheet of Time To Stamp stamps from I Brake For Stamps called Children ATCs and I'll be sharing some cards it this month...


STAMPS: all stamps from I Brake For Stamps ~ child, texture, words - Time To Stamp line full sheet 'Children ATCs', stems - Stampinback line 'Scratch Flowers', script bkgd - from Collage Elements #1 half-sheet

INKS: Stampin' Up! Creamy Caramel and Pink Pirouette, Staz-On Jet Black, Colorbox Pigment Pad Frost White

SUPPLIES: EK Success flower punches, mini brushed silver and regular flower brads, crimper, distressing tool, white gel pen

TECHNIQUES: Technique Junkies Torn Frames and Faux Felt

NOTES: the flower stems grouping is all one height but I varied the heights by stamping it at different levels ~ I filled the dress in with white gel pen to draw focus to her ~ the dark cs looks black but is actually a linen texture charcoal color ~ the blue in real life is a greyed down tone rather than what shows here ~ there's a very cool little flourish on the sheet that I wanted to make a little crown from, but it was just to much going on, so next time maybe ;o)


Have a great day and I hope you can find a little time to stamp :o)